


Hardware components | ||||||
| × | 1 | ||||
 |
| × | 1 | |||
| × | 1 | ||||
Software apps and online services | ||||||
| ||||||
Hand tools and fabrication machines | ||||||
| ||||||
 |
| |||||
In the beginning, I wanted to make a simple asset tracker. However, as I worked on the project I decided to try to make it as lightweight as possible, and to have two modes of tracking.
The modes that can be used in this project are:
- Periodic emails, like every 5 minutes, that show the location.
- Pinging with a text message, for an on-demand location at any time.
I didn't have much luck setting up a headless Raspberry Pi, so I took the NOOBS route. The problem was that I could never get it to connect to WiFi.
The SD card that came with the Pi already had NOOBS installed on it.
You can format your own SD card with FAT32, download NOOBS, unzip and copy it to your SD card.
Plug in the power and a monitor with the HDMI port. I had to wait for it to boot up before I could use the other micro USB port for a wireless keyboard/mouse.
Change keyboard to English US or special characters in your WiFi password may not work.
Now you should be able to click on the WiFi networks and setup your WiFi.
Preparing the Raspberry PiNow you should be able to select Raspbian and install it. This will take a few minutes.
After installation and rebooting, you will probably want to set your preferences. For example in the United States:
1. Click on the Raspberry -> Preferences -> Raspberry Pi Configuration
2. Set Keboard to English/United States.
3. Set WiFi Country Code to US
4. Set TimeZone to US/Central
5. Set Locale to English/United States
Next, under System change your password, and you may want to change your Hostname.
Under Interfaces, enable VNC and SSH.
Reboot.
Now, hover over the WiFi icon and write down your IP address.
Now you can use putty to login with the username 'pi'.
You can also use FileZilla to transfer files if you would like to edit files on your own computer.
Update the PiUsing either putty or the Terminal on the pi GUI, issue the following commands to update the software:
sudo apt-get update
sudo apt-get upgrade
You may want to shut it down and solder on the header at this point.
Your raspberry pi is now ready to go!
Installing Hologram's SDKThere is a great tutorial about installing and using the Hologram SDK here written by benstr, your friendly Hologram representative. You should also look at the links at the end of that article about sending and receiving data.
The Hologram DashboardWhen you logon to the Dashboard you can give your device a name, and see it in the Devices tab.
In the Routes tab, you can see your existing routes and configure a new one.
The Console tab will show your activity.
Now to give your device a phone number so it can receive text messages.
Click on your device name in the Devices tab, then click on Configuration.
Now you should see the Configure phone number option. You will need a phone number for this project. It costs $1 USD, and if you received a promo code with this Hackster project you can use it to pay for the phone number.
Also on the Configuration page, in the Data Engine box, you will see "+ Show Device Key". Click here to generate a device key, which you will also need for this project.
Configure a RouteThe next thing we will need to do on the Dashboard is to configure a route.
When the Hologram Cloud receives a message from the device, the Route will tell the message where to go. In this case we will use an Email route.
First, go to the Routes page and click New Route.
Next, give the route a nickname, like gmail.
Under "SELECT TOPIC" choose SIMPLESTRING.
Next, under Select an action choose Email. Configure your email recipients and subject.
Now just click the blue 'Add route' button to add it.
Setting Up the NEO-6M GPS ModuleThe Raspberry Pi Zero W uses its serial port for Bluetooth. This means that the serial port is not available for GPS. To remedy this, we will free up the serial port, and use another port for Bluetooth on the Raspberry Pil
To allow the Raspberry Pi's serial port to be used for GPS you will need to remove the serial console setting.
Use the command line to open the raspi-config utility:
sudo raspi-config
Select option 5, Interfacing options, then option P6, Serial, then select No and exit.
Next you will need to reconfigure the Raspberry Pi Zero W bluetooth function, and restore UART0/ttyAMA0 to GPIOs 14 and 15.
You can do this by adding the line to config.txt, then reboot.
dtoverlay=pi3-disable-bt
More information about the Raspberry Pi UARTs can be found here.
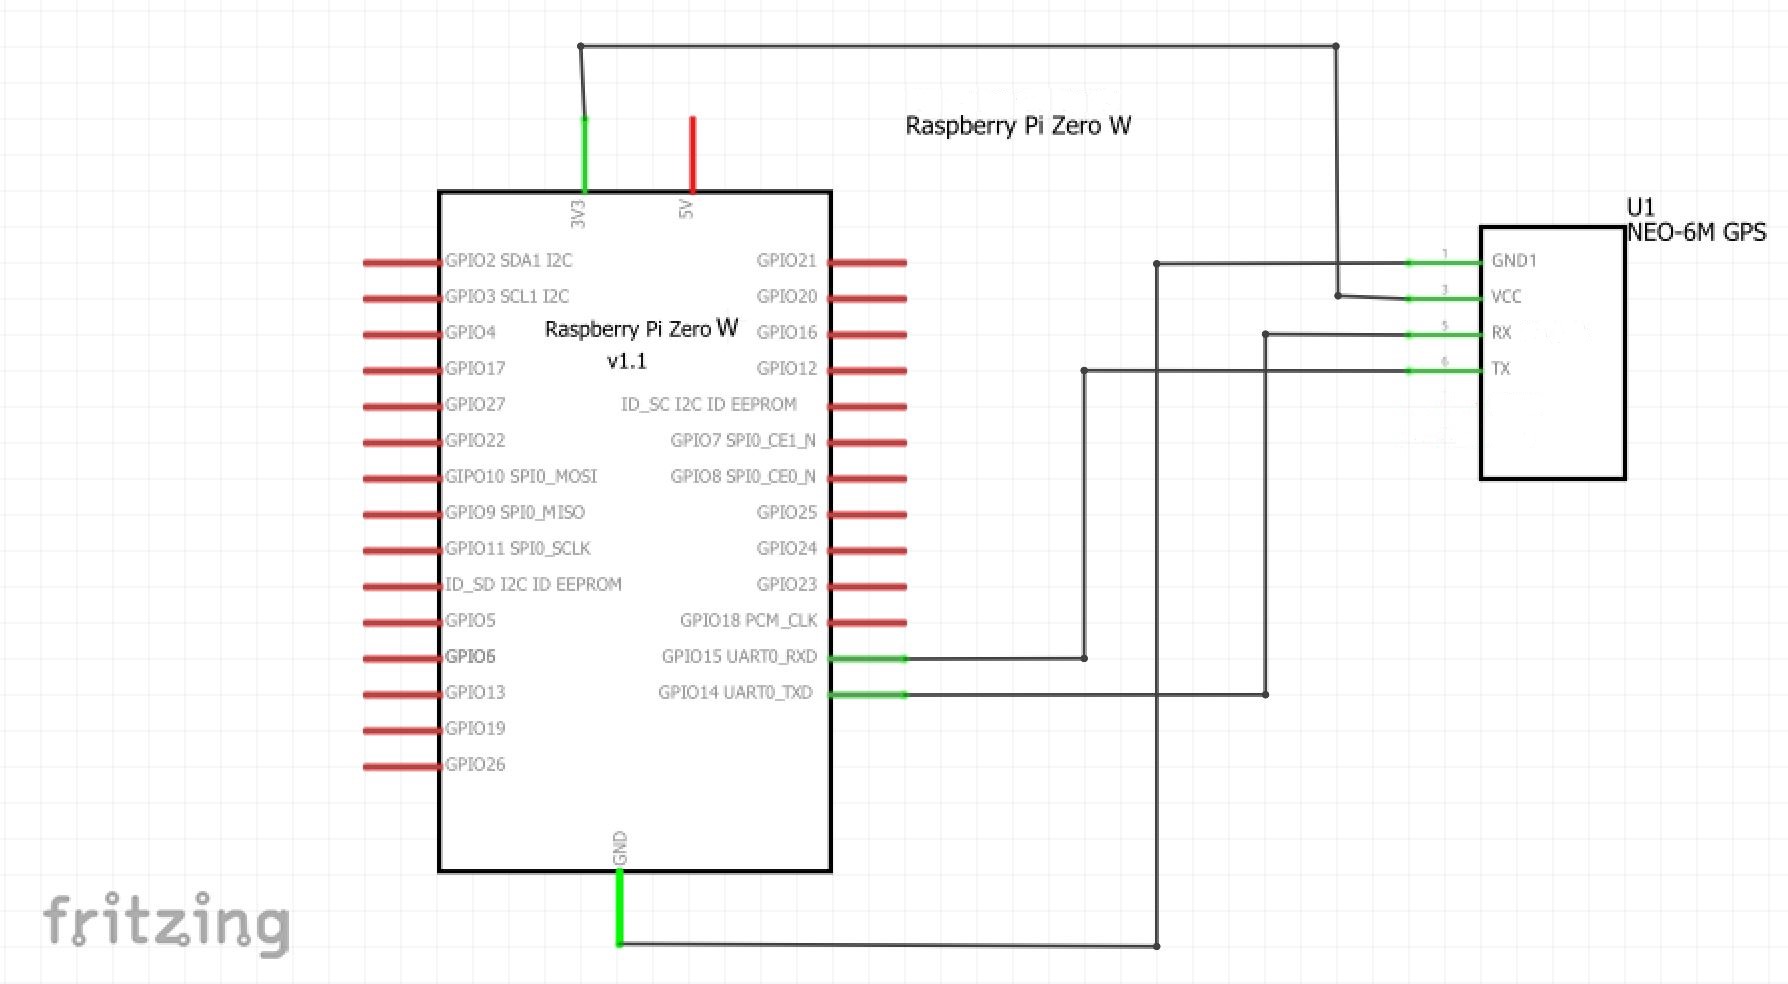
Installing the NEO-6M GPS is pretty easy. You have Vcc, Transmit, Receive and Ground wires to connect. If you have soldered on headers, it is just four jumper wires.
Also note that the Transmit and Receive wires are crossed, that is Transmit on the GPS goes to Receive on the Pi, and Receive on the GPS goes to transmit on the Pi.
The connections are:
- Pi Pin 1 (3.3V) -> Vcc on the GPS
- Pi Pin 10 -> TX on the GPS
- Pi Pin 8 -> RX on the GPS
- Pi Pin 6 -> GND on the GPS
Once the connections are made it's time to test out the GPS.
Testing the GPSThis tutorial goes pretty deep into setting up the NEO-6M on a Raspberry Pi. It also includes links to the Data Sheets. It will walk you through the process of testing your GPS.
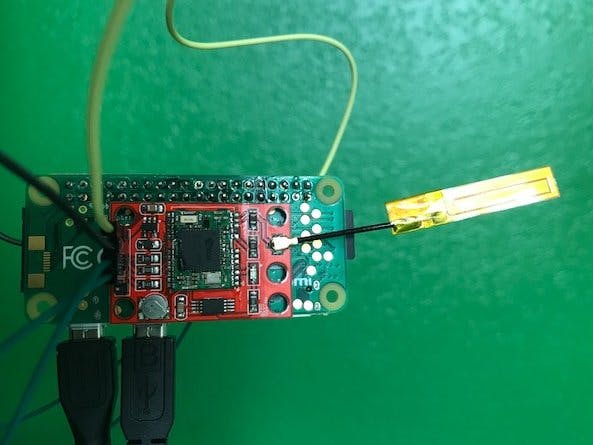
One thing I noticed was that the ceramic antenna included with the NEO-6M GPS module did not perform well, so I tried the smaller patch antenna which was meant for the cellular network. It seemed to work much better. This antenna is pictured in the image at the top of the project.
CodeNow that (hopefully) your GPS is working, we can look at some Python code to send messages.
The following code is the main procedure that:
- Starts the serial port
- Waits for a valid NMEA string from the GPS (one that contains the string 'GGA')
- Parses the string with pynmea2
- Adjusts the signs of the Latitude and Longitude based on direction
- Connects to the Hologram Cloud
- Sends a Google Maps link containing the current Latitude and Longitude
- Prints the result for debugging
- Closes the connection
import serial
import pynmea2
from Hologram.HologramCloud import HologramCloud
str = ''
#Get GPS Location
serialPort = serial.Serial("/dev/ttyAMA0", 9600, timeout=5)
#Wait until we have a valid location
while str.find('GGA') == -1:
   str = serialPort.readline()
#parse the string for latitude and longitude
msg = pynmea2.parse(str)
#print msg
#print msg.lat
#print msg.lon
latitude = msg.lat
longitude = msg.lon
#Set the sign of the latitude based on the direction (N/S)
if msg.lat_dir == 'S':
   latitude = '-' + latitude
#Set the sign of the longitude based on the direction (E/W)
if msg.lon_dir == 'W':
   longitude = '-' + longitude
#Get a hologram instance and connect
credentials = {'devicekey':'<your device key>'}
hologram = HologramCloud(credentials, network='cellular')
#Attempt to connect
result = hologram.network.connect()
if result == False:
   print ' Failed to connect to cell network'
#Our message will be a google maps link that will show the current location
message = "https://www.google.com/maps/?q="+latitude+","+longitude
#print message
#Send the message
response_code = hologram.sendMessage(message,topics=["gmail"])
print hologram.getResultString(response_code)
#Disconnect
hologram.network.disconnect()
Suppose the above code is in a file named gmail.py. This code can be called by another Python script.
This gives us the flexibility to continuously send messages at intervals, as in the following code that sends a response every five minutes:
import time
while True:
   execfile("gmail.py")
   time.sleep(300)
Another example is to send the location when asked. In this case, sending a text message to the phone number of the Hologram Nova device will prompt a message to be sent:
   while True:
       hologram.enableSMS()
       print 'waiting for 60 seconds...'
       time.sleep(60)
       hologram.disableSMS()
       sms_obj = hologram.popReceivedSMS()
       if sms_obj is None:
           print 'No messages yet...'
       else:
           print 'sender:', sms_obj.sender
           print sms_obj.timestamp.strftime('%c')
           print u'message:', sms_obj.message
           execfile("gmail.py")

Comments
Please log in or sign up to comment.