Hackster is hosting Hackster Holidays, Finale: Livestream & Giveaway Drawing. Watch previous episodes or stream live on Tuesday!Stream Hackster Holidays, Finale on Tuesday!
Costis
Published © GPL3+

Arduino Breath Controller for Cheap (USB-MIDI)

Admit it, you always wanted to play around with a breath controller but couldn't justify the expense. Well, you have no excuse now.

BeginnerFull instructions provided2 hours17,621
Arduino Breath Controller for Cheap (USB-MIDI)

Things used in this project

Hardware components

Arduino Micro
Arduino Micro
You could probably lower the cost with a clone but I recommend the original. Only the Micro (ATmega32U4) will work due to the native USB capabilities.
×1
Solderless Breadboard Half Size
×1
MPS20N0040D-D Pressure Sensor
Dirt cheap and quite easy to find.
×1
LM358-N Op Amp
We'll use the popular LM358 op amp to amplify the sensor's signal.
×1
Resistor 1M ohm
Resistor 1M ohm
×2
Hook Up Wire Kit, 22 AWG
You don't need a full kit of course, just a few cm of solid core wire.
×1
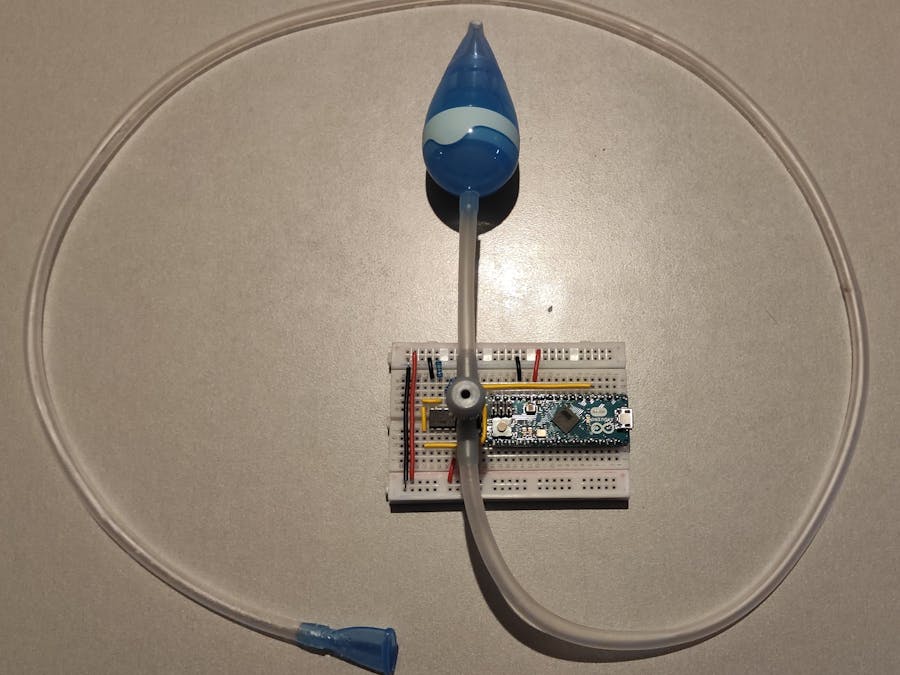
Baby Nasal Aspirator
Yup, you read right. We'll be using the parent-side mouthpiece and the baby-side aspirator. There are dozens of manual aspirators of the same type around (for example Physiomer Nasal Aspirator, Chicco Physioclean etc.). Choose the mouthpiece type you find more comfortable.
×1
5mm aquarium airline tubing
Optional, if the tubing of the aspirator is not long enough. Standard aquarium airline tubing will do.
×1
3-way air tubing connector
This specific Chinese OEM one can be found easily in aquarium shops under different names. It fits directly on the sensor.
×1

Software apps and online services

Arduino IDE
Arduino IDE

Hand tools and fabrication machines

Wire Stripper & Cutter, 32-20 AWG / 0.05-0.5mm² Solid & Stranded Wires

Story

Read more

Schematics

Schematic

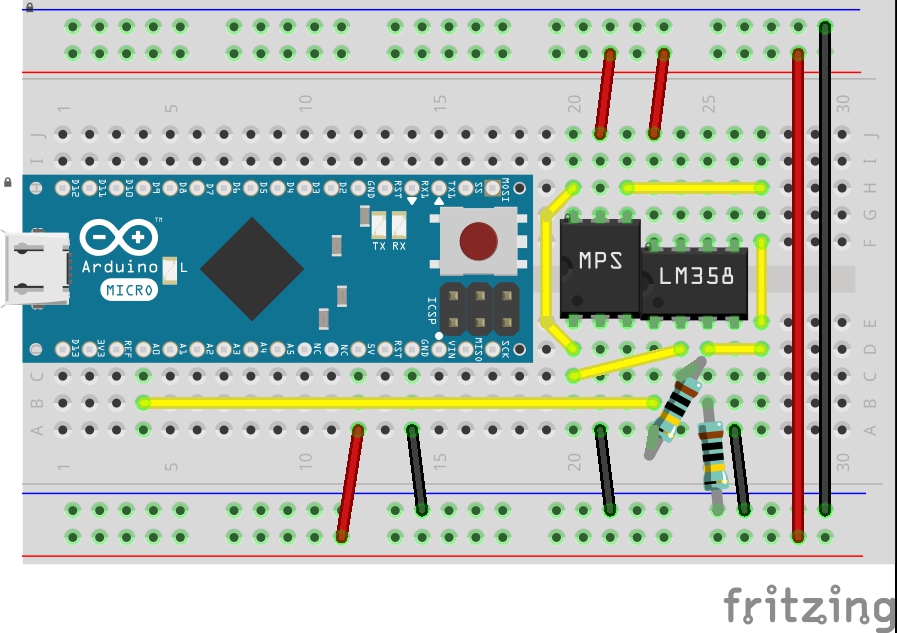
Fritzing Schematic

Circuit

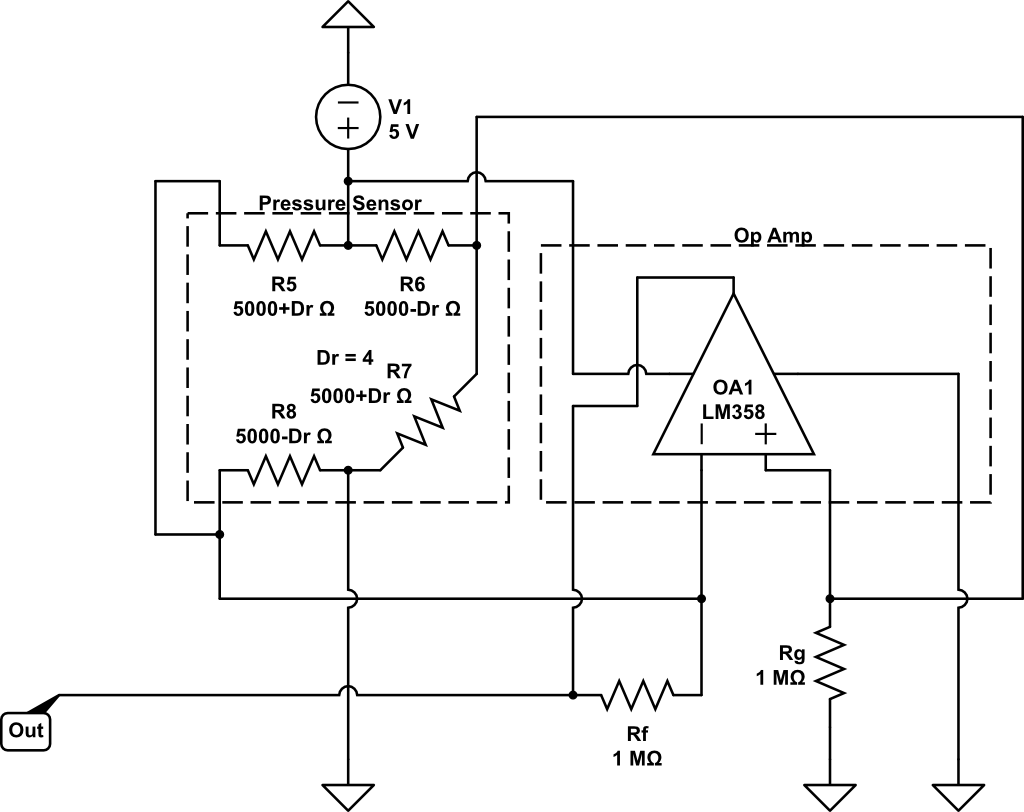
Circuitlab schematic

Code

Breath controller code

Arduino
Upload this code to your breath controller via Arduino IDE
/*
  Breath Controller
*/

//Libraries used - install them from Tools->Manage Libraries
#include <Oversampling.h>
#include <USB-MIDI.h>

//Debug mode (uncomment to enable)
//#define DEBUG 1

//Creation of the USB MIDI interface
USBMIDI_CREATE_DEFAULT_INSTANCE();

//Oversampling init
Oversampling adc(10, 13, 6);

// ***************** User Setup ***************** 
// Values ending in 1 correspond to blowing while those ending in 2 to drawing in air
// Pin setup
const int sensorPin1 = A0;    // select the Arduino input pin for the Sensor/Op Amp output

// Range Calibration. Adjust this manually so that you can reach maximum but not too easily.
int sensorRange1 = 800;
int sensorRange2 = 800;

// Output controller number. Select from below table
// 0-127: regular control change messages
// 128: monophonic aftertouch
// 129: Pitch Bend Up 
// 130: Pitch Bend Down 
int controllerNumber1 = 2;  // Controller sent when blowing
int controllerNumber2 = 2;  // Controller sent when drawing in air


// Output controller channels
int controllerChannel1 = 1;
int controllerChannel2 = 1;

// Safety thresholds for lowest and highest values to avoid fluctuations when at rest or max. 
// If multiple messages are sent when at rest increase the lowThreshold. 
// If multiple messages are sent when at max increase the highThreshold. 
const int lowThreshold1 = 5;
const int lowThreshold2 = 5;

const int highThreshold1 = 0;
const int highThreshold2 = 0;

// Curve definition. Tables can have any legth equal or larger than 2. Values can be 0-127 . Tables should have the same number of elements and "in" tables should be in ascending order.
// Conversions are done at a readings level so loss of definition is minimized.
int in1[]   = {0, 127};
int out1[]  = {0, 127};

int in2[]   = {0, 127};
int out2[]  = {0, 127};

// Example curves (modify sensor number accordingly)

//Soft
//int in1[]   = {0, 6,24,78,127};
//int out1[]  = {0,32,64,96,127};

// Reduced range
//int in1[]   = {50, 100};
//int out1[]  = {50, 100};

// Refresh Cycle (milliseconds). Lower values mean more messages are sent during operation.
int refreshCycle = 0;

//  ***************** Implementation  ***************** 
// Do not modify from this point and onward if you do not intent to alter the operation of the sensor.

// Internal Value of Sensors
int sensorValue1 = 0;
int sensorValue2 = 0;

// Minimum sensor values 
int sensorMin1;
int sensorMin2;

// Output controller values
int controllerValue1 = 0;
int controllerValue2 = 0;

// Previous cycle values used to avoid repetition of identical messages
int previousControllerValue1 = 0;
int previousControllerValue2 = 0;

// Range conversion variable init
int outputRange1;
int outputRange2;

int sensorLow1;
int sensorLow2;

int sensorHigh1;
int sensorHigh2;

void setup() {
  MIDI.begin(1);

#ifdef DEBUG
  Serial.begin (115200); //Only for debug mode
#endif

// Calibrate sensor's rest point by averaging 10 first values. Do not use the sensor while booting the device.
  sensorMin1 = adc.read(sensorPin1);
  sensorMin2 = 0;

// Determine output ranges for the controllers chosen
  outputRange1 = outputRange(controllerNumber1);
  outputRange2 = outputRange(controllerNumber2);
}

void loop() {
// read the value from the sensor:
  sensorValue1 = adc.read(sensorPin1); // Blowing air
  sensorValue2 = sensorMin1 - sensorValue1; // Drawing in air

// Store previous values
  previousControllerValue1 = controllerValue1;
  previousControllerValue2 = controllerValue2;
  
// Usable range limits for sensor up/down
  sensorLow1 = sensorMin1 + lowThreshold1;
  sensorLow2 = sensorMin2 + lowThreshold2;

  sensorHigh1 = sensorLow1 + sensorRange1 - highThreshold1;
  sensorHigh2 = min(sensorMin1,sensorRange2) - highThreshold2;

// Convert internal values to output range (0..127 for controllers/aftertouch 0..+/-8191 for Pitchbend Up/Down) using the curves defined in "in" and "out" tables.
  controllerValue1 = map(mapToCurve(constrain(sensorValue1,sensorLow1,sensorHigh1),sensorLow1,sensorHigh1,in1,out1,sizeof(in1)/sizeof(int)),sensorLow1,sensorHigh1,0,outputRange1);
  controllerValue2 = map(mapToCurve(constrain(sensorValue2,sensorLow2,sensorHigh2),sensorLow2,sensorHigh2,in2,out2,sizeof(in2)/sizeof(int)),sensorLow2,sensorHigh2,0,outputRange2);

// Send MIDI messages  
  if (controllerValue1 != previousControllerValue1) sendSensorOutput(controllerNumber1, controllerValue1, controllerChannel1);
  if (controllerValue2 != previousControllerValue2) sendSensorOutput(controllerNumber2, controllerValue2, controllerChannel2);

// Debug

#ifdef DEBUG
// Sensor (input) values (uncomment for debug)
//  Serial.print (sensorValue1);
//  Serial.print (",");
//  Serial.print (sensorValue2);
//  Serial.print (",");
  
// Controller (output) values
  Serial.print (controllerValue1);
  Serial.print (",");
  Serial.println (controllerValue2);
#endif
  
// stop the program for for <refreshCycle> milliseconds:
  delay(refreshCycle);
}

// Function used to send MIDI messages according to controller number
void sendSensorOutput (int number, int value, int channel) {
  if (number < 128) MIDI.sendControlChange(number, value, channel);
  else if (number == 128) MIDI.sendAfterTouch(value, channel);
  else if (number == 129) MIDI.sendPitchBend(value, channel);
  else if (number == 130) MIDI.sendPitchBend(-value, channel);
}

// Function used to determine the range of a specific controller. This is due to the fact pitch bend has a larger range than regular controllers.
int outputRange (int number) {
  if (number > 128) return 8191;
  else return 127;
}

// Modified multiMap function used to create curves. Original by Rob Tillaart.
int mapToCurve(int val, int sensorLow, int sensorHigh, int* _in, int* _out, uint8_t size)
{
  // take care the value is within range
  // val = constrain(val, _in[0], _in[size-1]);
  if (val <= map(_in[0],0,127,sensorLow,sensorHigh)) return map(_out[0],0,127,sensorLow,sensorHigh);
  if (val >= map(_in[size-1],0,127,sensorLow,sensorHigh)) return map(_out[size-1],0,127,sensorLow,sensorHigh);

  // search right interval
  uint8_t pos = 1;  // _in[0] already tested
  while(val > map(_in[pos],0,127,sensorLow,sensorHigh)) pos++;

  // adjusting range from ..127 to sensor range
  int inPos = map(_in[pos],0,127,sensorLow,sensorHigh);
  int outPos = map(_out[pos],0,127,sensorLow,sensorHigh);
  int inPrv = map(_in[pos-1],0,127,sensorLow,sensorHigh);
  int outPrv = map(_out[pos-1],0,127,sensorLow,sensorHigh);

  
  // this will handle all exact "points" in the _in array
  if (val == inPos) return outPos;
  
  // interpolate in the right segment for the rest
  return ((long)val - (long)inPrv) * ((long)outPos - (long)outPrv) / ((long)inPos - (long)inPrv) + (long)outPrv;
}

Credits

Costis
2 projects • 8 followers

Comments