Thanks To JLCPCB.
$2 for 1-4 Layer PCBs.
Get SMT Coupons: https://jlcpcb.com/RTA
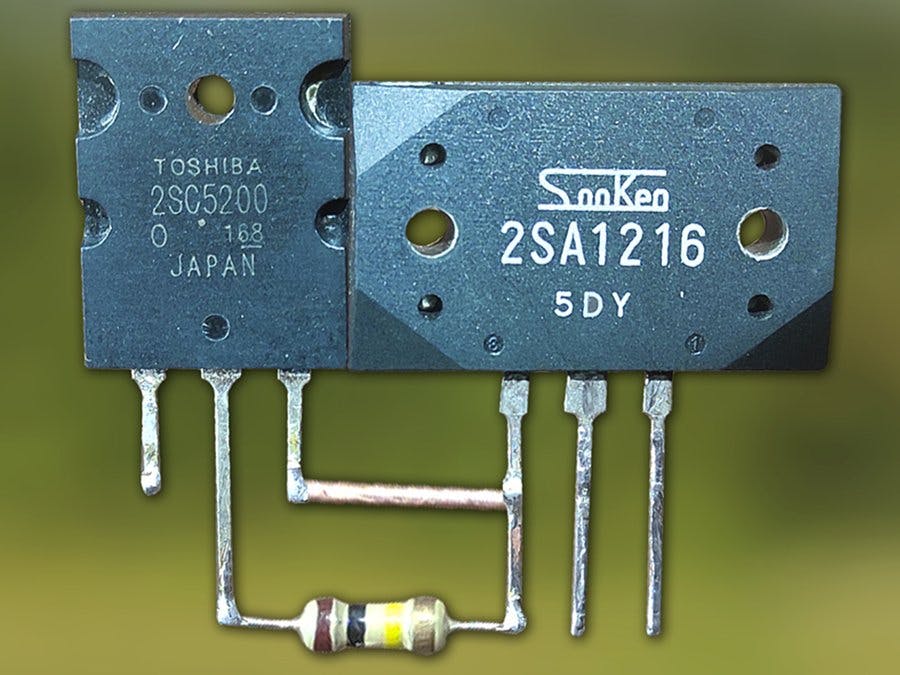
DescriptionWe Connect 2SC5200 Collector With 2SA1216 Base. Then We Connect 2SC5200 Emitter With 2SA1216 Collector. Then We Connect 100 K Ohm Resistor With 2SC5200 Base & 2SA1216 Emitter. Now Connect 0.47 Ohm Resistor With 2SA1216 Emitter. Now Connect 1000µf/16v Capacitor Positive Leg With 2SC5200 Base.
It Is The Time To Connect Audio Input Cable. In This Cable There Are Two Terminal. 1st Terminal Have 3.5mm Audio Input Jack And 2nd Terminal Have Two Cable. Between This Two Cable One Is Ground (-) Cable And Another Is L/R Cable.
Now Connect Audio Input Ground (-) Cable With 2SA1216 Collector And Connect Audio Input L/R Cable With 1000µf/16v Capacitor Negative Leg.
Now We Connect DC 12 Volt For Power Source. Connect DC Positive Cable (+) With Speaker And Connect A Blank Cable With Other Leg Of Speaker. Now Connect The Blank Cable With Empty Leg Of 0.47 Ohm (5 Watt) Resistor.
Connect DC Negative Cable (-) With 2SC5200 Emitter.
Our Circuit Is Ready For Use.
Finally Enjoy The
Comfortable & Powerful Amplifier Circuit Using (2SA1216+2SC5200)
Today We Will Make A Awesome Electronics Amplifier Project Using Only A Few Electronics Component. It Is A Very Simple And Powerful Amplifier Circuit. Using This Amplifier Circuit You Might Hear Clear & Crystal Sound. You Can Use This Amplifier Circuit At Home, Office, Cultural Program, Bike, Car, Truck Or Other Palaces Too. It Is A Very Comfortable Amplifier Because This Amplifier Can Be Operated Only DC 12v. To Make This Amplifier Circuit, We Might Need Some Electronics Component.
Those Component List Have To Been Given Below.
Component List :
1. Transistor - 2SA1216 & 2SC5200
2. Resistor - 100 K Ohm & 0.47 Ohm (5 Watt)
3. Capacitor - 1000uf/ 16v
4. Volume - B 100 K
5. Power Source - DC 12v
6. Sound Speaker
Note - To Make This Amplifier Circuit We Use 2 Type Transistor. Here 2SA1216 Is PNP transistor And 2SC5200 Is NPN Transistor.
Step No – 1
First We Connect 2SC5200 Transistor Collector With 2SA1216 Transistor Base. Then We Connect 2SC5200 Transistor Emitter With 2SA1216 Transistor Collector. Then We Connect 100 K Ohm Resistor With 2SC5200 Transistor Base & 2SA1216 Transistor Emitter. Now Connect 0.47 Ohm Resistor With 2SA1216 Transistor Emitter. Now Connect 1000µf/16v Capacitor Positive Leg With 2SC5200 Transistor Base.
It Is The Time To Connect Audio Input Cable. In This Cable There Are Two Terminal. 1st Terminal Have 3.5mm Audio Input Jack And 2nd Terminal Have Two Cable. Between This Two Cable One Is Ground (-) Cable And Another Is L/R Cable.
Though, It Is Mono Amplifier, It’s Have Two Cable. If It Is Stereo Amplifier There Are Three Cable. 1st Is Ground (-), 2nd Is “L” & 3rd Is “R” Cable.
Now Connect Audio Input Ground (-) Cable With 2SA1216 Collector And Connect Audio Input L/R Cable With 1000µf/16v Capacitor Negative Leg.
Now We Connect DC (12-24) Volt For Power Source. Connect DC Positive Cable (+) With Speaker And Connect A Blank Cable With Other Leg Of Speaker. Now Connect The Blank Cable (that connected with speaker) With Empty Leg Of 0.47 Ohm (5 Watt) Resistor.
Connect DC Negative Cable (-) With 2SC5200 Transistor Emitter.
Our Circuit Is Ready For Use. Now Connect Both Transistor With Heat Sink . Connect 3.5mm Audio Input Jack With Audio Source/Mobile & Connect Power Source.
Finally Enjoy The Music.
Comfortable-Powerful-Amplifier-Circuit-Using-2SA12


Comments
Please log in or sign up to comment.