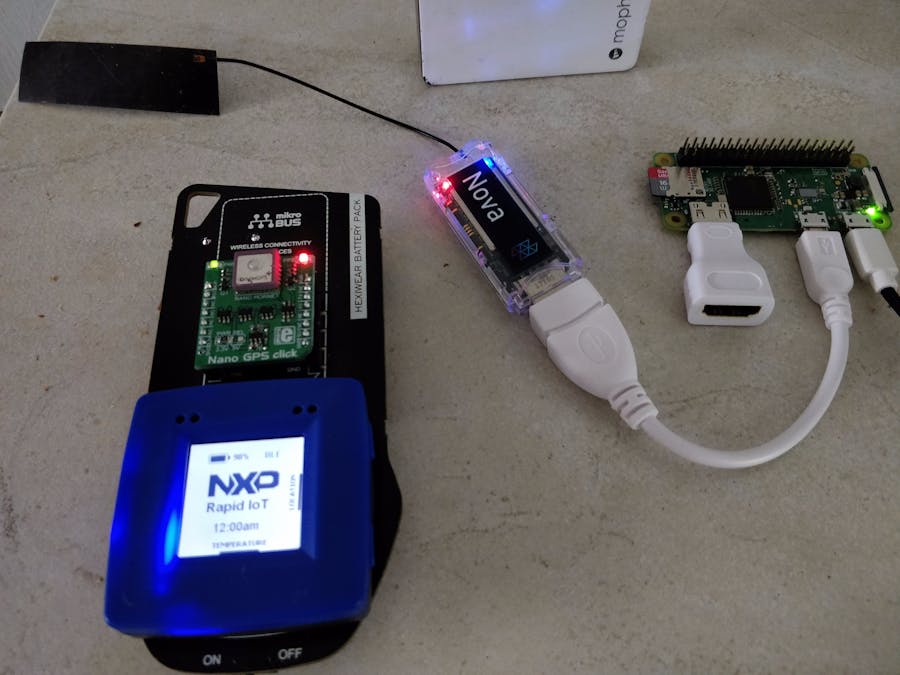
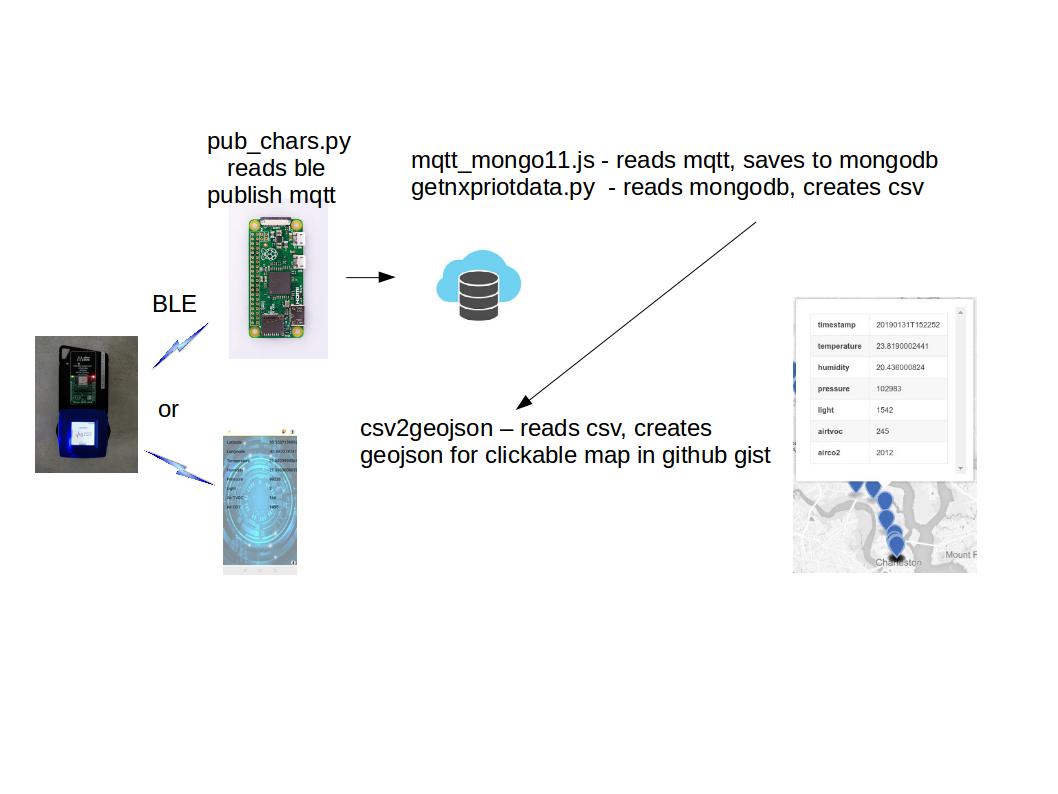
This is a showcase project of how to set up an NXP Rapid IoT project with an Android client, then use a Raspberry Pi Zero to create a portable wireless cellular connected sensor node for uploading sensor data along with GPS location to a cloud database. Then a script pulls the data for any time period and creates a file that can be used to create a clickable map of positions and sensor readings.
The first step after exploring the hardware capabilities is opening an account on the NXP Rapid IoT Studio to create the project. There you have a neat system for adding elements at 3 different levels, the NXP Rapid IoT device, cell phone handset Application and cloud. The device level has a rich selection of elements to program in many different behaviors, such as navigating a series of pages with the SX9500 touch pad or reading a sensor at regular intervals. A complete design will look partly like this
The above shows the element block for the Nano GPS Click board feeding a display screen on the device and also a couple of Bluetooth Low Energy characteristics so external devices like a cell phone or Raspberry Pi Zero W may read the values also. The Nano GPS Click board is a plugin module on the Hexiwear Battery Pack, which the NXP Rapid IoT device can also plug into and get power from 4 rechargeable AA cells. The device settings for an external mikroBUS™ device were not immediately obvious but studying the schematics for the connector on the main schematic and the docking board looks like it was in the slot for MIKROBUS1, with uart driver instance 2, signals uart2_rx, tx, MB1_PWM for power pin, and MB1_RST for reset. I had issues with MB1_AN so left it at MB3 and it still works, the device would not fully initialize with MB1_AN so left it and have not further researched it.
Once all the pages, sensors and Bluetooth elements are set up on the Rapid IoT Device the cell phone application can be laid out to display sensor readings like this:
While the Rapid IoT Design Studio has a further layer for cloud - I decided to develop my own as the data flows to the cloud only when the phone app is up and running, and I wanted a longer term collection device, something that could run for hours without the phone going to sleep and stopping reading data.
So another hackster project, the Hologram Nova cellular data with a Raspberry Pi Zero W, which has wireless WiFi and Bluetooth 4 capabilities was reconfigured for this project. After setting up the RPi Zero W with the latest Raspbian Stretch image, changing default password, expanding the sdcard filesystem to use all space, enabling sshd, keyboard, locale etc, I set up the device to be an access point using hostapd by following the instructions. An example hostapd file is provided in my github repo of scripts. That way the RPi can be remote away from any WiFi infrastructure but still accessible for maintenance by connecting to IT.
Once the RPi WiFi is set up, the Hologram Nova USB Cellular dongle can be set up for remote Internet where we want to collect sensor data. That is done mainly with this step
$ curl -L hologram.io/python-install | bash
Then I put a line in /etc/rc.local to automatically start the Hologram Nova on bootup
/usr/local/bin/hologram network connect
Once the Rapid IoT device is provisioned with the Atmosphere project in my github repo, Sensors4CloudGPS3a.atmo - by uploading the project to the NXP Rapid IoT Studio and compiling, downloading the bin and programming the device, it will be ready for BLE connection.
The device can be discovered with tools in the RPi
root@nxpriotgw:/home/pi# hcitool lescan
LE Scan ...
04:0B:DA:F8:67:EA (unknown)
88:4A:EA:8A:0E:F7 (unknown)
88:4A:EA:8A:0E:F7 Mooshimeter V.1
00:60:37:0A:AF:EF DAFEF
The device DAFEF is my Rapid IoT device, so using that I can connect with gatttool interactively and read a sensor
# gatttool -I -b 00:60:37:0A:AF:EF
[00:60:37:0A:AF:EF][LE]> connect
Attempting to connect to 00:60:37:0A:AF:EF
Connection successful
[00:60:37:0A:AF:EF][LE]> characteristics
handle: 0x0002, char properties: 0x02, char value handle: 0x0003, uuid: 00002a00-0000-1000-8000-00805f9b34fb
handle: 0x0004, char properties: 0x02, char value handle: 0x0005, uuid: 00002a01-0000-1000-8000-00805f9b34fb
handle: 0x0006, char properties: 0x02, char value handle: 0x0007, uuid: 00002a04-0000-1000-8000-00805f9b34fb
handle: 0x0009, char properties: 0x12, char value handle: 0x000a, uuid: 00002a05-0000-1000-8000-00805f9b34fb
handle: 0x000d, char properties: 0x02, char value handle: 0x000e, uuid: aa386521-826c-c0cd-accf-40096d5876de
handle: 0x000f, char properties: 0x02, char value handle: 0x0010, uuid: aa386522-826c-c0cd-accf-40096d5876de
handle: 0x0011, char properties: 0x08, char value handle: 0x0012, uuid: aa386523-826c-c0cd-accf-40096d5876de
handle: 0x0013, char properties: 0x12, char value handle: 0x0014, uuid: aa386524-826c-c0cd-accf-40096d5876de
handle: 0x0017, char properties: 0x28, char value handle: 0x0018, uuid: 01ff5551-ba5e-f4ee-5ca1-eb1e5e4b1ce0
handle: 0x001a, char properties: 0x04, char value handle: 0x001b, uuid: 01ff5552-ba5e-f4ee-5ca1-eb1e5e4b1ce0
handle: 0x001d, char properties: 0x1a, char value handle: 0x001e, uuid: bfe433cf-6b5f-4368-abab-b0a59666a402
handle: 0x0021, char properties: 0x12, char value handle: 0x0022, uuid: ee81b7c3-727e-46de-8624-d6f88da7abf4
handle: 0x0024, char properties: 0x12, char value handle: 0x0025, uuid: ee81b7c3-727e-46de-8624-d6f88da7abf5
handle: 0x0027, char properties: 0x12, char value handle: 0x0028, uuid: ee81b7c3-727e-46de-8624-d6f88da7abf6
handle: 0x002a, char properties: 0x12, char value handle: 0x002b, uuid: ee81b7c3-727e-46de-8624-d6f88da7abf7
handle: 0x002d, char properties: 0x12, char value handle: 0x002e, uuid: ee81b7c3-727e-46de-8624-d6f88da7abf8
handle: 0x0030, char properties: 0x12, char value handle: 0x0031, uuid: ee81b7c3-727e-46de-8624-d6f88da7abf9
handle: 0x0033, char properties: 0x12, char value handle: 0x0034, uuid: ee81b7c3-727e-46de-8624-d6f88da7abfa
handle: 0x0036, char properties: 0x12, char value handle: 0x0037, uuid: ee81b7c3-727e-46de-8624-d6f88da7abfb
[00:60:37:0A:AF:EF][LE]> char-read-uuid ee81b7c3-727e-46de-8624-d6f88da7abf6
handle: 0x0028   value: d3 4d d3 41
The above value, 'd3 4d d3 41' comes from the temperature gatt characteristic which we find in the Rapid IoT design studio for the element connected to it
The full uuid is not visible but you can see the last part matches what was read above, ee81b7c3-727e-46de-8624-d6f88da7abf6. The VALUE read is the 4 bytes of a floating point number which may be decoded with python2 struct library
>>> import struct
>>> struct.unpack('<f',b'd34dd341'.decode('hex'))[0]
26.413000106811523
Where '<f' designates the byte order (little endian) and float, to get 26 degrees Celsius. The script that reads the ble sensor updates and publishes them to a cloud mqtt server does not do any decoding of the bytes, they are all just concatenated into a long byte string and stored in mongodb for decoding AFTER extracting from mongodb. The script to now run on the RPi is pub_chars.py from my github repo. That uses the python gatt library to connect to the NXP Rapid IoT device, the paho.mqtt.client library to connect to a cloud mqtt server and publish the readings. Here is a sample run
root@nxpriotgw:/home/pi# ./pub_chars.py
latitude: 38.______
longitude: -81.______
temperature: 16.91
pressure: 98989
light: 327
air vtoc:  40
air co2: 668
humidity: 29.18
latitude: 38.______
longitude: -81.______
temperature: 18.02
pressure: 98918
light: 312
air vtoc:  51
air co2: 735
humidity: 28.60
watching the message queue on the mqtt servers gets the raw binary
$ mosquitto_sub -t /nxpriot -u user -P password
`���M�Ash�A��G(�
\jB`��-�A���Af�83�
Once the RPi is publishing sensor readings, we start a script to monitor the queue and stuff them into a mongodb with timestamps. The script is mqtt_mongo11.js from my github repo. I like to run these service scripts under pm2 (pm2 start ./mqtt_mongo11.js) so they are restarted if anything happens
$ pm2 list
┌─────────────────────┬────┬──────┬──────┬────────┬─────────┬────────┬
│ App name            │ id │ mode │ pid  │ status │ restart │ uptime │
├─────────────────────┼────┼──────┼──────┼────────┼─────────┼────────┼
│ mqtt_mongo11        │ 3  │ fork │ 4194 │ online │ 0       │ 11D    │
With that running, another python script getnxpriotdata.py may be run to retrieve data between any designated timestamps. Here it is being run to retrieve data collected on a trip home from vacation in Charleston SC, with the NXP Rapid IoT device in the back window of the car along with the RPi Zero W and Hologram.
$ ./getnxpriotdata.py 201901311400 201902032359
timestamp,latitude,longitude,temperature,humidity,pressure,light,airtvoc,airco2
20190131T151052,32.7909355164,-79.9424209595,14.5690002441,21.9409999847,103036,890,10,466
20190131T151152,32.7908782959,-79.9424514771,15.2559995651,21.577999115,103053,1036,10,466
20190131T151252,32.7909164429,-79.9424362183,15.9440002441,21.0550003052,103072,1165,15,500
20190131T151352,32.7909164429,-79.9424362183,16.6469993591,21.0680007935,103032,1264,22,548
< ... >
20190131T200602,36.0062942505,-80.8340454102,30.4750003815,5.68200016022,98906,1494,29,594
20190131T200702,36.022102356,-80.8244247437,30.6779994965,5.76800012589,99282,1061,29,594
20190131T200804,36.0385398865,-80.8194274902,30.8500003815,5.72100019455,99132,1127,30,597
If all 289 of those points are converted to geojson with
$ ./getnxpriotdata.py 201901311400 201902010400 > nxp_return_from_SC.csv
$ csv2geojson nxp_return_from_SC.csv > nxp_return_from_SC.geojson
and the output saved as a github gist a nice map of clickable points is created, which shows WHERE the NXP Rapid IoT device was along with the sensor readings, in the car, at the time.
The most interesting sensor in that collection might be the barometric pressure as we travel across country and change elevations. The discontinuity near the end was when I lost cell service south of the NC/VA border, and briefly resumed near much higher elevation near Beckley WV.
Using an online Air Pressure at Altitude calculator and google earth pro, I see that the starting point at 32.7909355164,-79.9424209595 is at 4 m elevation, the last point in NC at 36.0385398865,-80.8194274902 is at elevation 295m, and the first point in WV 37.8022079468,-81.2161254883 is at elevation 727m. Setting the air temp to zero (outside the car) and adjusting sea level pressure to the measured value of 103036 Pascals at the beginning on the coast, puts the measured pressure of 99132 at altitude of 307.70 m, an error of 12.7 meters from 295. Then changing the pressure to the measured value of 94005 in WV gets an altitude of 727.06m, very close to the google earth elevation of 727m at that location.
When the project first started fully working I created this map of walking around Charleston SC with the NXP Rapid IoT device in one hand and the RPi Zero W with battery in the other. Click on the markers to get a popup with the temperature, humidity, light level, barometric pressure and air quality along with the timestamp in UTC of the reading at each location.
Currently I manually startup the pub_chars.py script on the RPi after the NXP device is running, by logging into it from connecting to the WiFi AP or using the Hologram Nova SpaceBridge feature which is also nice. Further research is needed to create a robust python3 script to startup when the RPi system boots and automatically, reliably connect to the NXP device. The cloud services Mosquitto mqtt, mongodb and the topic watcher mqtt_mongo11.js run continuously. The 4 rechargeable AA batteries in the docking board can run the device with gps up to about 4 hours.


Comments
Please log in or sign up to comment.