


Hardware components | ||||||
_ztBMuBhMHo.jpg?auto=compress%2Cformat&w=48&h=48&fit=fill&bg=ffffff) |
| × | 1 | |||
 |
| × | 1 | |||
 |
| × | 1 | |||
 |
| × | 1 | |||
Software apps and online services | ||||||
 |
| |||||
Hand tools and fabrication machines | ||||||
| ||||||
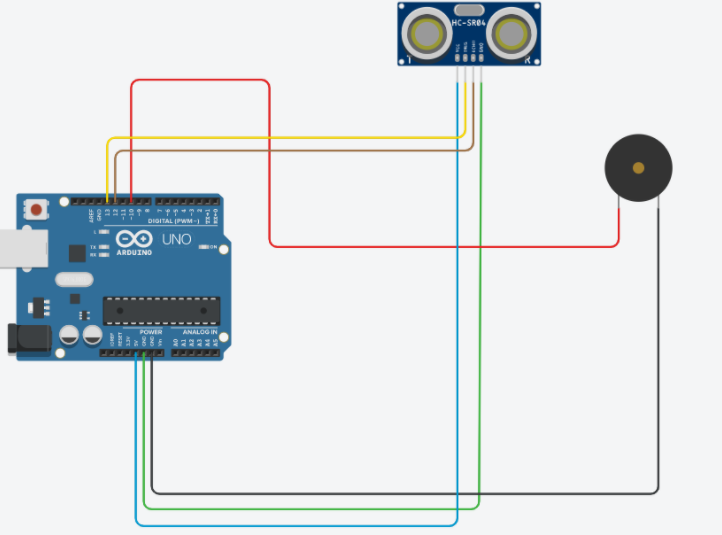
1. Plug in wires into the Arduino uno board into 10, 12, 13, 5V and into both GNDs next to the 5V as displayed below:
2. Plug in your Adafruit Piezo Buzzer by putting the red wire into the extension wire plugged into 10 and the black wire into the extension wire into one of the GNDs.
3. Plug in 12 into Echo on the ultrasonic sensor, plug 13 into Trig, 5V into VCC and GND into GND, as displayed below.
4. By now, your project should look like this:
5. Download the app, Arduino IDE by going to https://www.arduino.cc/en/main/software
6. Plug your Arduino uno board into your computer and open the app on your computer, Arduino IDE
7. Wait for the app to load up, you will know it has loaded when you see this:
1. First off, what you want to do is clear all text in the page by going ctrl-a then backspace.
2. Then, type in the defines below
#define trigPin 13
#define echoPin 12
#define led 10
What this does makes it so that we can refer to them in our code to help while coding.
3. Then, type this in to set up the ultrasonic sensor
void setup() {
 Serial.begin (9600);
 pinMode(trigPin, OUTPUT);
 pinMode(echoPin, INPUT);
 pinMode(led, OUTPUT);
}
void loop(){
 long duration, distance;
 digitalWrite(trigPin, LOW);
 delayMicroseconds(2);
 digitalWrite(trigPin, HIGH);
 delayMicroseconds(10);
 digitalWrite(trigPin, LOW);
 duration = pulseIn(echoPin, HIGH);
 distance = (duration/2) / 29.1;
What this does is connect the ultrasonic sensor with the Arduino board and make it run.
4. Then, insert the 'if' command:
 if (distance < 10){
   Countdown();
   Wait();
   Song();
 }
 else {
 Wait();
 }
 Serial.print(distance);
 Serial.println(" cm");
 delay(125);
}
This makes the ultrasonic sensor do what it is supposed to do. It tells us that if distance is less than 10, then play song, else, wait. If you were to test that now, it wouldn't work because we haven't told the Arduino board what Wait(); and Song(); are yet.
5. Connect the Wait(); to its code by inserting this:
void Wait() {
delay(100);
}
What this tells the Arduino board is simply to wait 100 milliseconds or 0.1 seconds when the code contains Wait();
6. Connect Song(); to its code:
void Song() {
 //Verse
 tone(10, 523.25, 100);
 delay(150);
 tone(10, 523.25, 100);
 delay(150);
 tone(10, 523.25, 100);
 delay(150);
 tone(10, 523.25, 100);
 delay(150);
 tone(10, 466.61, 100);
 delay(150);
 tone(10, 466.61, 100);
 delay(150);
 tone(10, 466.61, 100);
 delay(150);
 tone(10, 466.61, 100);
 delay(150);
 tone(10, 415.3, 100);
 delay(150);
 tone(10, 415.3, 100);
 delay(150);
 tone(10, 415.3, 100);
 delay(150);
 tone(10, 415.3, 100);
 delay(150);
 tone(10, 392, 100);
 delay(150);
  tone(10, 392, 100);
 delay(150);
  tone(10, 392, 100);
 delay(150);
  tone(10, 392, 100);
 delay(150);
  tone(10, 311.13, 100);
 delay(150);
  tone(10, 349.23, 100);
 delay(150);
  tone(10, 349.23, 100);
 delay(150);
  tone(10, 349.23, 100);
 delay(700);
  tone(10, 311.13, 100);
 delay(150);
  tone(10, 349.23, 100);
 delay(150);
  tone(10, 349.23, 100);
 delay(150);
  tone(10, 349.23, 100);
 delay(700);
//Chorus
  tone(10, 523.25, 200);
 delay(700);
  tone(10, 466.16, 200);
 delay(700);
  tone(10, 415.3, 200);
 delay(700);
  tone(10, 392, 200);
delay(700);
tone(10, 311.13, 100);
 delay(150);
  tone(10, 349.23, 100);
 delay(150);
  tone(10, 349.23, 100);
 delay(150);
  tone(10, 349.23, 100);
 delay(700);
  tone(10, 311.13, 100);
 delay(150);
  tone(10, 349.23, 100);
 delay(150);
  tone(10, 349.23, 100);
 delay(150);
  tone(10, 349.23, 150);
 delay(700);
  tone(10, 523.25, 200);
 delay(700);
  tone(10, 466.16, 200);
 delay(700);
  tone(10, 415.3, 200);
 delay(700);
  tone(10, 392, 200);
  delay(700);
  tone(10, 349.23, 100);
 delay(150);
  tone(10, 349.23, 100);
 delay(150);
  tone(10, 349.23, 100);
  delay(150);
  tone(10, 523.25, 2000);
delay(2000);
  tone(10, 466.16, 2000);
  delay(2000);
  tone(10, 415.30, 2000);
delay(2000);
  tone(10, 392, 2000);
 delay(2000);
}
Basically, we are using the tone function to tell the Piezo, (buzzer) that it has to play a certain amount of hertz. Basically, when we say tone(10, 392, 2000); we are basically saying that tone(pin number for output, how many hertz, and how long for); The hertz above are played to notes you would here on a piano.
7. Finally, press the button circled in red then test it out!


Comments
Please log in or sign up to comment.