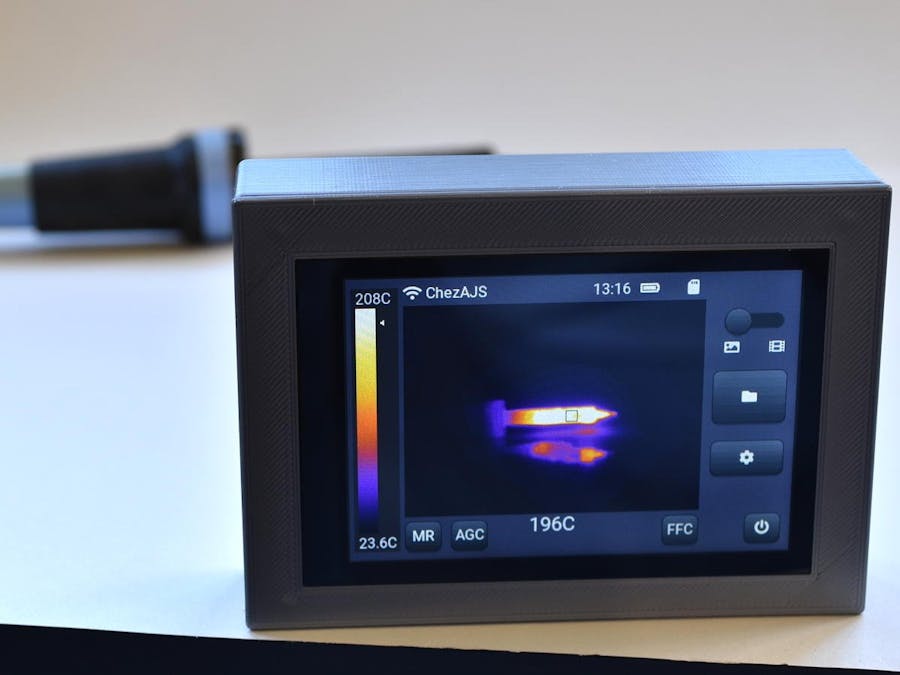
tCam has the following features
- Flir Lepton 3.5 radiometric thermal imaging sensor
- 480x320 pixel capacitive touch display
- Local Micro-SD card storage for images and videos
- Wifi interface for remote access and control
- LiPo battery for portable operation
- Fully open-source
It's supported by a desktop application that runs on Linux, Mac OS X and Windows, Android and iOS apps and a python driver for custom applications.
Like many projects we makers embark upon, tCam came about for many reasons. I always wanted my own thermal imaging camera simply because they are very cool. I wanted to monitor circuit boards I designed as they heated up remotely from my desktop computer. I thought it might be useful for others if the camera makes the raw radiometric data easily available for non-traditional applications such as analysis using machine learning systems. And finally I thought the challenges involved in making a comprehensive system including supporting software would be both fun and educational. Of course it ended up being a lot more work than I initially envisioned.
During the process of developing tCam I ended up splitting the problem into two pieces, partly because of the complexity and partly because a single ESP32 could not manage all the things the camera had to do in real time. I first designed a camera called tCam-Mini that provided remote access to images taken by a Flir Lepton 3.5. With that camera I created a remote access protocol and supporting software to view and record data from the camera. Then I combined work on another project - a general purpose ESP32 development board called gCore - with tCam-Mini to create tCam. I documented my travails in a hackady.io project if you're interested in more details.
AssemblytCam is built from the following parts (complete list in the tCam repo).
You'll need a few supplies and to feel comfortable soldering headers to PCBs.
Complete instructions for assembly are documented in the github repo and in the following video. You can source the parts yourself or buy a complete kit from Group Gets. Note that the group gets kit uses slightly different screws but the overall assembly is the same (they improved my enclosure design). If you source the parts yourself then you'll have to 3D print the enclosure using the STL files in this write-up (see below) or in the tCam repo.
Notes if you individually buy the parts
tCam-Mini and a Lepton 3.5 can be found in the Group Gets store. gCore can be found in my tindie store.
Be sure the 3.7V LiPo battery will fit the enclosure and comes with the common Adafruit/Sparkfun style JST connector. A few battery supply links (As of March 2023): Adafruit,AliExpress,eBay,Sparkfun.
I used the following sized connectors and headers with the 3D printed enclosure design in the repo.
You'll also have to buy a Micro-SD card. 8-16 GB storage size should be fine and will be capable of storing a lot of images and videos.
Assembly Steps
Download the appropriate version of tCam Serial Updater for your computer type from my website and use it to load the current tCam firmware into gCore (be sure to select the "tCam firmware" type). To do this you simply plug gCore into your computer via USB, turn it on and select the serial port associated with it in the updater. Then press the Program button in the updater.
tCam-Mini comes with firmware pre-loaded so you don't need to worry about it. The Group Gets kit also includes a pre-programmed gCore.
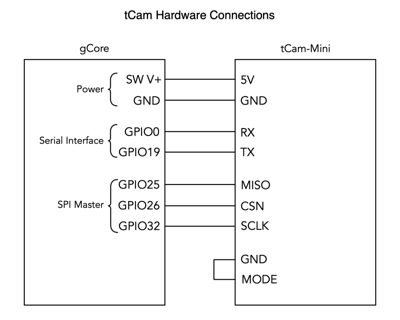
The 10-pin male header is soldered into the Slave IF portion of the tCam-Mini expansion area. A 2-pin jumper connects MODE to GND. Use a Q-tip dipped in the isopropyl alcohol to carefully clean off any remaining solder flux. Be careful handling the tCam-Mini because the Lepton is very fragile (it is very easy to damage the shutter on the front of the Lepton). Probably better to carefully remove the Lepton and then re-install after soldering on the header (be sure it is fully seated in the socket).
The 8-pin female connector is soldered to gCore as shown below. Use the second Q-tip dipped in isopropyl alcohol to clean off any remaining solder flux.
The battery and tCam-Mini are installed in the enclosure base. Use the pan-head screws to mount tCam-Mini and the double-sticky tape to mount the battery.
Then gCore and the enclosure IO assembly are carefully inserted into the enclosure so the 8 free pins on tCam-Mini plug into the 8-pin header on gCore. Remember to plug the battery into gCore before inserting it into the enclosure.
Finally the front bezel is screwed to the base using the flat-head screws. It may help to pre-screw the bezel with the screws to thread the 3D-printed standoffs. Don't screw so hard that you damage the bezel. Apply a little pressure to hold the bezel down as you screw the two pieces together.
Insert your Micro-SD card into the side of the camera.
Congratulations, you've just made a thermal imaging camera!
Quick test
Press the power button on the side of the camera to turn it on. You should see the following screen. It takes a couple of seconds to sync to the stream coming from the Lepton. If you see the screen but no image then it's possible the Lepton isn't fully seated in the socket. Sadly you'll have to disassemble the camera to carefully press it down into the socket (try not to touch the lens).
After the camera is turned on the power button on the side becomes the shutter button. Pressing it will either save an image (tjsn format) to the Micro-SD card or start recording a video (tmjsn format) based on the Image/Movie switch on the display. Press the Power Off button on the display to turn the camera off.
Touching the top or bottom of the Palette Bar will switch between the built-in palettes.
The battery is charged by plugging a USB-C charger into the connector on the side of gCore (never plug it into the tCam-Mini while the tCam-Mini is plugged into gCore).
Complete operating instructions can be found in the repo.
App Support
The Desktop application provides the ability to view a live stream from the camera, graph temperature data, manage images and offload the Micro-SD card as well as update the tCam firmware remotely.
The Android and iOS apps let you view a live stream, save and export images.
And the python driver lets easily get raw radiometric image data for incorporation in your own applications.


Comments
Please log in or sign up to comment.