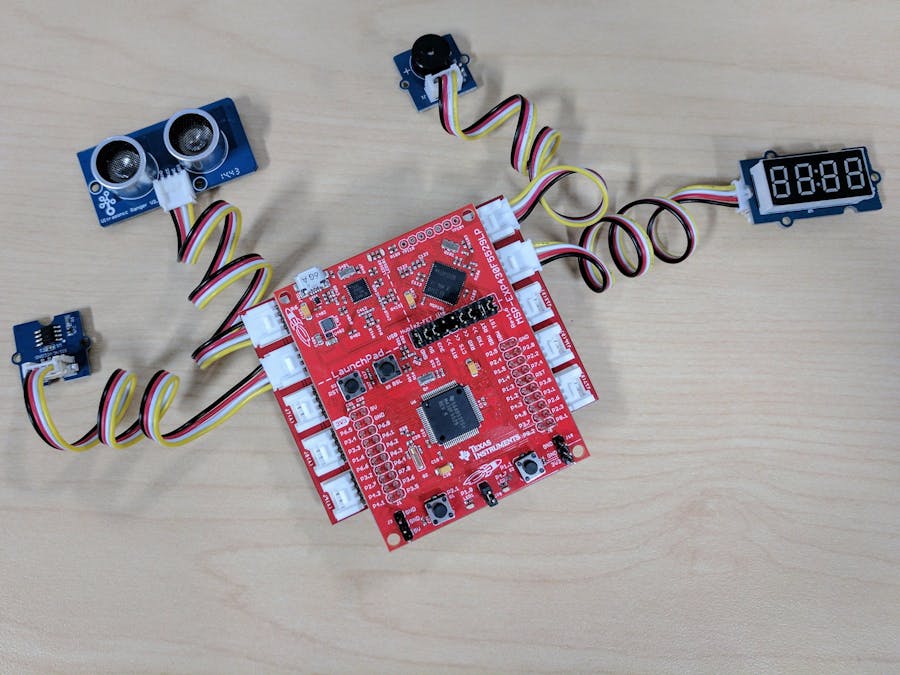
The purpose of this guide is get you up and running with an MSP430F5529 LaunchPad, the Seeed Studio Grove BoosterPack, and several Grove modules.
LaunchPad is an ecosystem of low-cost, powerful, and easy-to-use microcontroller development kits from Texas Instruments.
Add-on boards called BoosterPacks add functionality to the LaunchPad development kits like Wi-Fi, motor control, sensing, and displays.
Grove modules are low-cost sensors, actuators, and displays from Seeed Studio that let you rapidly prototype. They use a standard cable and plug and connect to the LaunchPad with the Grove BoosterPack.
For this workshop we will use the Energia IDE to write code and program the LaunchPad. Energia is very similar to the Arduino IDE but is written specifically for TI LaunchPad boards.
Before we begin, please ensure you:
- Download the Energia IDE to your local machine at www.energia.nu/download (be sure to chose the correct OS).
- For Windows, download the drivers here: http://energia.nu/files/ezFET-Lite.zip. Extract the .zip file and run DPInst64.exe.
To make sure Energia is installed properly and that your LaunchPad is working, we will flash a program to the LaunchPad called "Blink" that will just blink an LED.
Instructions:
1. Plug in your LaunchPad with the supplied USB cable.
2. Open Energia.
3. From the Tools menu at the top of the window, select Boards -> MSP-EXP430F5529LP.
4. From the Tools menu at the top of the window, select Serial Port, and then pick the serial port associated with your MSP430 Launchpad.
5. From the File menu at the top of the window, select Examples -> 01. Basics -> Blink. This will open the blink example program.
6. Examine the code to see the basic structure of the program.
- a. All Energia programs have two required functions: setup() and loop(). Setup is run one at startup and then loop runs continuously.
- b. pinMode is used to set the direction of a GPIO.
- c. digitalWrite is used to set the state of a GPIO.
- d. delay pauses execution for a given number of milliseconds.
7. Click the red arrow pointing to the right at the top left of the Energia window. This will compile and upload your program to the board.
8. After programming completes verify that the red LED is blinking on your LaunchPad.
9. To take this a step further try:
a. Fading the LEDs by changing the calls from digitalWrite to analogWrite.
b. Try using the other colored LEDs on the board (RED_LED and GREEN_LED).
3. Seeed Studio Grove ModulesWe will be using 4 different Grove modules for this workshop
- Temperature sensor (connected to J6)
- Ultrasonic sensor (connected to J5)
- Buzzer (connected to J13)
- 4 Digit Display (connected to J14)
First, plug in the grove sensors using the provided cables to connectors mentioned above. Then, plug your LaunchPad and BoosterPack together making sure the pins are aligned and the BoosterPack is oriented correctly. Your setup should match the image below.
Next, we need to install a couple of libraries from Seeed Studio to make the modules work.
Download the folder here: www.energia.nu/grovekitcode
- Windows: copy the contents of the "libraries" folder into "My Documents\Energia\libraries"
- Mac/Linux: copy the contents of the "libraries" folder into "~/Documents/Energia/Libraries"
For this lab, we will use the Ultrasonic ranger and print the measured distance on the 4 Segment display.
#include "TM1637.h"
#include "Ultrasonic.h"
/* Macro Define */
#define CLK               39                  /* 4-digital display clock pin */
#define DIO               38                 /* 4-digiral display data pin */
#define BLINK_LED         RED_LED            /* blink led */
#define ULTRASONIC_PIN    23                 /* pin of the Ultrasonic Ranger */
/* Global Varibles */
TM1637 tm1637(CLK, DIO);                  /* 4-digital display object */
Ultrasonic ultrasonic(ULTRASONIC_PIN);    /* Ultrasonic Ranger object */
int distance = 0;                         /* varible to store the distance to obstacles in front */
int blink_interval = 0;                   /* led delay time */
int8_t bits[4] = {0};                     /* array to store the single bits of the value */
/* the setup() method runs once, when the sketch starts */
void setup() {
   /* Initialize 4-digital display */
   tm1637.init();
   tm1637.set(BRIGHT_TYPICAL);
   /* declare the red_led pin as an OUTPUT */
   pinMode(RED_LED, OUTPUT);
}
/* the loop() method runs over and over again */
void loop() {
   distance = ultrasonic.MeasureInCentimeters();   /* read the value from the sensor */
   memset(bits, 0, 4);                             /* reset array when we use it */
   for(int i = 3; i >= 0; i--) {
       /* get single bits of the analog value */
       bits[i] = distance % 10;
       distance = distance / 10;
       tm1637.display(i, bits[i]);                 /* display by 4-digital display */
   }
   delay(100);
}
For this lab, we will use the Temperature Sensor v1.2 and the Buzzer modules to make an alarm that goes off when the temperature gets too high.
#include <math.h>
const int B=4275;                 // B value of the thermistor
const int R0 = 100000;            // R0 = 100k
const int pinTempSensor = 24;     // Grove - Temperature Sensor connect to A5
void setup()
{
   Serial.begin(9600);
   analogReadResolution(10);
   pinMode(40, OUTPUT);
}
void loop()
{
   int a = analogRead(pinTempSensor);
   float R = 1023.0/((float)a)-1.0;
   R = 100000.0*R;
   float temperature=1.0/(logf(R/100000.0)/B+1/298.15)-273.15; //convert to temperature via datasheet
   temperature = (temperature * 9.0)/ 5.0 + 32.0; //convert from C to F
   Serial.print("temperature = ");
   Serial.println(temperature);
   if (temperature > 83) // Sound the alarm if the temp is too high!
     {
       for(int i = 0; i < 10; i++ )
       {
         digitalWrite(40, HIGH);
         delay(10);
         digitalWrite(40, LOW);
         delay(10);
       }
     }
   delay(100);
}
Now that you have seen how all 4 Grove modules work, combine them all into a single Energia sketch. You could use the 4 Digit Display to print the temperature and the buzzer to make a proximity alarm, or anything else you can think of!


Comments
Please log in or sign up to comment.