This post is the continuation of my previous post around deploying using Azure DevOps. In this one I will quickly go through the steps of ensuring it also works when you are referencing libraries, which is probably what most case scenarios will be about, and start looking at how we can improve the pipelines.
We will basically use the particle-cli to create the local project, add a library and improve our previously created build pipeline to build and release to our device(s).
I ended up making a video of the full process. (Note that all the login/passwords ended up being marked as secrets as it was easier to manage a more fluid recording).
For those who prefer it in writing or just want to jump through the highlighted steps, let's get properly started as follows...
1. Create the project using the Particle CLIDocumentation on creating a project with the particle-cli: https://docs.particle.io/tutorials/developer-tools/cli/#creating-a-project1.1 Create the project
Using the terminal in a repository location of choice, start by creating the project with the following command.
particle project create
First, your project needs to add a reference to the library it requires, of which you can search the name by using part of the name with `particle library search internetb` command.
particle library add internetbutton
That basically adds it to the particle references to your source, so that particle cloud knows to make that library available at compile time.
Then, you need to make sure you add the reference in code.
#include "InternetButton.h"

InternetButton b = InternetButton();// Instantiation to ensure it is being used
For a basic example, feel free to use this sample, or even import this git repo (note the branch is not master) into your Azure DevOps.
1.3 Local testIf you are already logged into your particle account, you can also try and compile to sure you commit "working" code.
particle compile photon
If you have already read the previous article, we will be setting up the pipelines a bit differently:
- the build pipeline will build the firmware and publish it as an artefact
- the release pipeline will pick up that artefact and publish it to our device(s) ;)
That breakdown will allow for new functionality to be packaged and versioned as working increments. That working increment can then be deployed/released to one or more devices.
That also means that our devices can be seen as "environments" and it will be up to you to then have a "test device" (over 1 or more stages) prior to releasing to "production".
2.1 Build pipelineFor the build pipeline, we will effectively reproduce the steps from previously set up pipeline with the following main changes:
- add task to version your firmware
- replace flash with publishing artefacts
Note: If you need more details consider checking this post first for the previously configured build pipeline2.1.1 Tasks we will be using
We will be using the following tasks:
- Replace Token: you may need to add that task for free to your account's library if have not already
- npm: to install the cli
- bash: x2 for login and compile
- Publish Build Artifacts
- Replace token: you should only need to change the location which is you.ino file but using a wildcard for simplification. we are assuming token will be surrounded by '#{' and '}#' such as #{buildinfo}#. I used '$(Build.Repository.Name)-$(Build.BuildId)' as the value.
- npm: set to custom command, and use 'install --global particle-cli" or abridged as "i -g particle-cli" as seen in the screenshot
i -g particle-cli
- Login:
particle login --username $(Particle.Username) --password $(Particle.Password)
- Compile:
particle compile $(Particle.DeviceType) --saveTo $(Build.StagingDirectory)/firmware.bin
- Publish: no changes needed, it will make the firmware available to the release.
... so you can reuse it for the release.
Under the variables tab of your build pipeline, there is a possibility to link to your variable group.
We will be reusing these variables later. So in your library, go ahead and recreate these variables and call it "particle login".
You can now launch a build. On successful build, you should be able to confirm firmware.bin is part of the artifacts that will be passed on to the release.
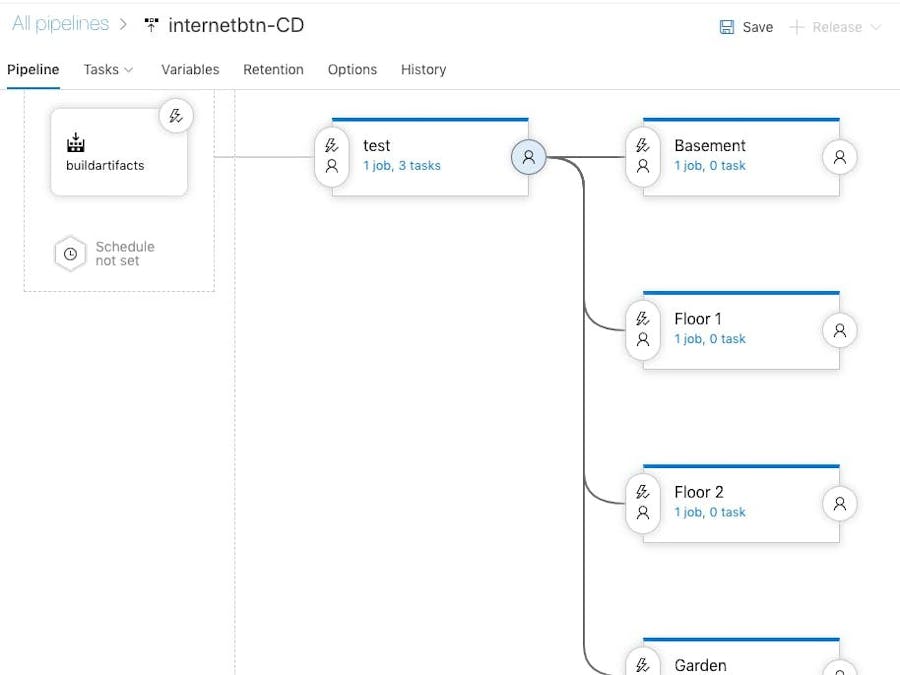
2.2 Release pipelineIt is then up to you whether you would need a button is every room of your house, is all your meeting rooms or all on the same wall, but you could end up with an release pipeline similar to the below outline where once it has been tested, you can release to the wider group/the rest of your targeted devices.
Hopefully that was helpful, but I can already see a few a few improvements:
- Most of the time spend on the build comes from the npm install command: might be useful to explore container agent using an image with that npm package already available
- we have made the device type and id available for override but the build being separate, it does not make that much sense without being a bit complicated and restricted to 1 type only (either a Photon, or a Xenon, or an Argon etc...). A possible solution would be to publish the source code as artifact (version number could become buildinfo and releaseinfo so it is even more accurate - think logs if it comes to that). Basically build the source in the CI to ensure it compiles, then for each device update versionning info and compile and flash as part of the release. => that means being able to compile and deploy to say 1 argon and N Xenons at the same time for example.
- version being a variable you can query, it would be possible to use it to ensure deployment was successful as a basic check/smoke test
- finally group the deployment tasks so that they are easily reusable with just the two expected parameters for each release


Comments
Please log in or sign up to comment.