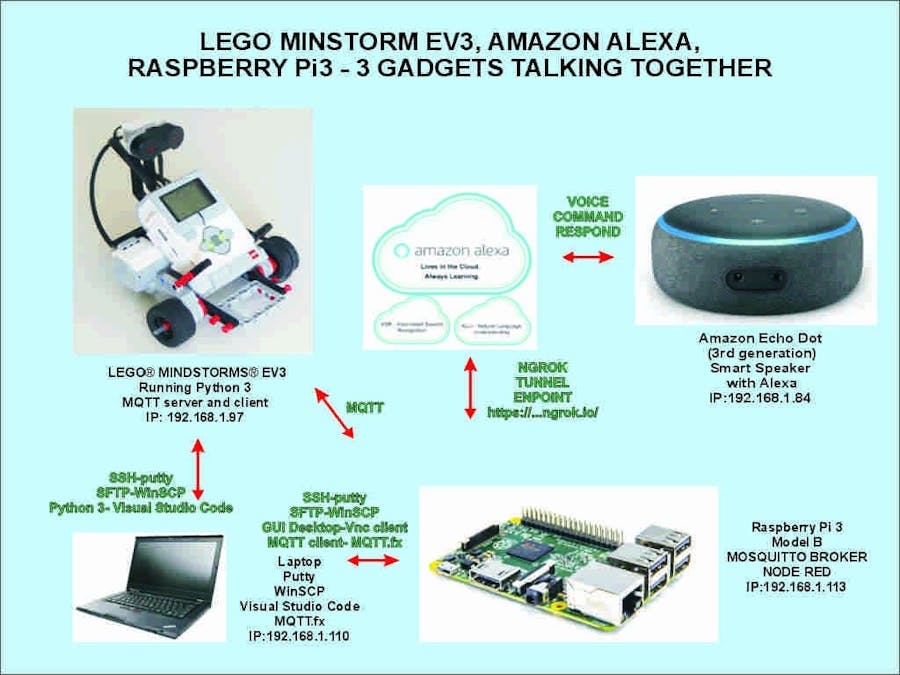
I have tried to make this project as simple as possible, to enable children to reproduce my idea and make their own robots. Intents is: visual programming when it is possible.
1. Build your robot, I have built simple EXPLOR3R, from this instructions:
http://robotsquare.com/2015/10/06/explor3r-building-instructions/
2. prepare software for robot, read carefully excellent instructions for setup
https://www.hackster.io/alexagadgets/lego-mindstorms-voice-challenge-setup-17300f
Install EV3Dev: ev3dev is open source software that allows you to program your EV3 Brick using Python 3.
Install and Set up Visual Studio Code on Your PC or laptop that you can program Lego robot using Python 3.
Install nice tools on your computer to help you to communicate with robot and rpi3, and transfer files between them.
putty - https://www.putty.org/
WinSCP - https://winscp.net/eng/download.php
After you prepare SD card with EV3Dev and first start your Lego robot ( must wait a while, boot process is little long), you can try to connect with putty to robot.
You must know IP address of robot ( my is 192.168.1.84), activate wi-fi network on you robot using wi-fi dongle, you must have internet to download software for robot :
https://www.ev3dev.org/docs/networking/
https://www.ev3dev.org/docs/tutorials/connecting-to-ev3dev-with-ssh/
Connecting to Ev3dev Using SSH
Login as: robot, password:maker
You have now full working linux system on Lego Ev3, you can prepare it with some commands:
robot@ev3dev:~ sudo pip install paho-mqttI will use mqtt library in my python program, I can communicate over wifi to rpi3 running mosquitto broker, and Node red.
3. prepare software for raspberrypi3
Nice tutorial You can find here, you must install Rasbian as OS, and then Mosquitto.
From terminal you must install node-red-contrib-chatbot :
pi@raspberrypi:~ $ cd ~/.node-red
pi@raspberrypi:~/.node-red $ npm install node-red-contrib-chatbot
Wait few moment to the end..
+ node-red-contrib-chatbot@0.17.8
added 1305 packages from 1437 contributors and audited 16686 packages in 1581.321s
pi@raspberrypi:~/.node-red $
Most important tools on PC for raspberry: putty, winscp, VNC viewer
You can start mosquitto broker and monitor traffic with command:
mosquitto -vYou must install also Ngrok ( secure introspectable tunnels to localhost) with:
sudo npm install --unsafe-perm -g ngrokLater you will start ngrok with:
ngrok http 127.0.0.1:18804.Create your Alexa skill. Sign in with your Amazon developer account at developer.amazon.com. If you don't have an account yet, you can create new one.
Then from the top menu select Alexa -> Alexa Skills Kit.
Press Create Skill button and provide a name and default language for your new Alexa skill, enter skill name and chose Custom model and Provision your own.
Give skill invocation name: lego robot
After that make some custom Intents: movef, moveb, movel, mover, stop
After that you can edit intents to add aditional words ( commands ), for me:
movef: move forward, forward, go
moveb: move back, back, go back
movel: move left, left, turn left
mover: move right, right, turn right
stop: lego stop ( you can not use only stop because this is command to close conversation with robot )
After editing your skill save model, and build.
And last step and very important: ENDPOINT
1. here put address which you can see when you start ngrok in rpi3 terminal
in this example something like this:
https://5b581529.ngrok.io/redbot/alexa/test
this numbers and letters you must read from your instance of ngrok and will be valid for 8 hours, after that you must start ngrok again and put here new value.
After that your skill is complete, and you can test it in alexa simulator:
You can speak commands if you have microphone on your pc or type it. You will see something like this:
All is OK !!! Now You can test it on your alexa dot3 vith voice commands.
Putting It All Together:1. Turn on lego robot, after booting switch on wifi connection. With putty start
phyton program mqtt-11.py :
robot@ev3dev:~/mqtt$ sudo python3 mqtt-11.pyThen connect with vnc to rpi.
mosquitto -vIn another terminal start ngrok:
ngrok http 127.0.0.1:1880Open alexa developer console and edit ENDPOINT, save and build model.
On RPI3 start NODE RED CONSOLE which will start NODE RED FLOW:
Function node is main part with definicion of: speed, time and direction
This is only part of flow which send commands from RPI to LEGO robot over MQTT. You can open it on PC, mobile phone or tablet in Internet browser with adress:
192.168.1.113:1880You also have nice dashboard with command buttons to test robot moving.
You can open it on PC, mobile phone or tablet in Internet browser with adress:
Another part is connection with alexa cloud:
Thanks to this man this is working wonderful:
https://github.com/guidone/node-red-contrib-chatbot/wiki
Alexa receiver node is very simple:
Most important is here RULES NODE, with multiple outputs, every output for single command from alexa skill.
Output 6 is message on start
Every output is connected to Speech node where you define answer to command. It is also connected as input to function node on MQTT part to give MQTT command to robot.
Very useful tool for PC is MQTT.fx where you see all comunications
That is all for now, I will try to integrate lego sensors in part 2.


Comments
Please log in or sign up to comment.