Perfect Parking
Parking is a magnet that attracts traffic. More parking, more traffic jams. But
An Efficient Parking System Saves Time.
Economic and population growth have led to rapid urbanization and changes in the metropolitan infrastructures. Rapid motorization and inadequate space to support it are one of the most important factors influencing the mobility and accessibility in a city.
As a result of the development induced changes, demand for facilities like parking is increasing. Tremendous pressure on parking spaces have led to serious concerns like traffic congestion, accidents, disproportionate demand and supply ratio, environmental hazards etc. Excessive consumption of the private vehicles negatively impacts the environment and it takes excess time for finding a parking space in urban cities.
There are cities in the world which lags in terms of the availability and quality of parking space. Transportation experts have been demanding for many years that a solution for efficient parking in limited parking space. So i have a project idea to solve the problems caused due to parking.
- Project Overview
Perfect Parking is my solution to the traffic problems that has been occuring during car parking.
I chose this category because I am a nature lover and conservation actions look great to me. I hope I can help.
I did an investigation about the current parking difficulties on the following websites :
In these above news reports I found that there is a need for an effective parking systems to be implemented.
The prototype I want to develop uses ultrasonic sensor to detect the presence of car in a parking slot and it sends the corresponding data to google cloud service which is known as firebase. When this project is at commercial stage there will be equal no of ultrasonic sensor as of no of parking slots. The data that is received by the firebase cloud service from the sensors is accessed by an android app by the car driver. This data include status of the parking slot, whether there is a vehicle occupied the parking slot or not. This app also helps in navigation to the parking slot. It also helps the user to book the parking slot for a period of 5 s.
In the android app car parking slot is represented as buttons which changes color according to the presence of car in the slot. For free slot this app shows green in the corresponding button and for the other we use red color. When the driver click the parking slot the app provide navigation to the corresponding location of the parking slot.
So by using this app the driver could see the free parking slot in his/her smartphone and he/she could easily park in the free parking slot.
Above I show the diagram of my prototype, at the end I could only build a prototype because of the lack of high level components and a powerful board, but making one is enough to show that it works.
Need for this type of project
- It cut out stress and lead the drivers to most convenient space.
- Huge traffic problems that are caused by the waiting of drivers to get a parking space is completely solved by this project.
- The android app gives instant data about the available free/non-free parking slots in which the driver intends to park his/her vehicle.
Steps to build the effective parking system prototype.
The WIZ750SR module
So, I decided to create an Arduino to Android through the use of Wiz750SR. The WIZ750SR module with its Ethernet interface and Cortex-M0 SoC was a great candidate to implement such a device.
The WIZ750SR is a Serial-to-Ethernet module from WIZnet:
The WIZ750SR is an ethernet to Serial convertor IC. This device allows controlling serial devices over an Ethernet network.The board is powered by the W7500P SoC. The W7500P, according to its datasheet, uses an ARM Cortex-M0 core and along UART also supports I2C, SPI and standard GPIO.. It has a 10Mhz internal oscillator and 128kb flash memory. From the datasheet we can see that the WIZ750SR works on the 3.3V logic.
Configure Wiznet WIZ750SR Serial to Ethernet module
The first step in this project is to configure the Wiz750SR. For this we can use the wiznet configuration tool. The link for downloading the tool is given below. We need to insert the WIZ750SR in the evaluation kit or connect the IC directly over the UART pins to PC. Python software is needed for running the configuration tool.
Download the Wiznet configuration tool from the given link:
https://github.com/Wiznet/WIZnet-S2E-Tool-GUI
Download the Wiznet configuration tool from the given link:
https://www.python.org/downloads/
Steps:
Run the main-gui.py file in the “Wiznet Configuration Tool” folder which was downloaded from the above link.
- In Windows platform, locate the configuration tool directory in cmd window and enter 'python main_GUI.py' and press enter.
- On Linux machine, go to terminal, locate to the required directory and enter 'python main_GUI.py' and press enter. Python will be probably installed on the machine.
Connect the Wiznet evaluation board and press search. Select the device that shows up.
set the requirements of the device in here.
- Operation mode: TCP server
- Local IP:192.168.4.1
- Gateway: To get this type “ipconfig” in cmd window
- Local port: 80
- Baud rate: 115200
- Data bit: 8
- Parity: None
- Stop bit: 1
- Flow control: none
For completing the device configuration click the Setting Tab in the wiznet configuration tool. Device will be configured when a dialog box showing “Device configuration has done” occur when setting tab is clicked.
Setup Arduino Uno R3
In this project i’m using Arduino Uno R3, since it is can be used to interface components very easily. It is not much costly in my opinion.
Steps
First download the Arduino Software Package from the link below and install the softwares.
Download the Arduino IDE:
https://www.arduino.cc/en/Main/Software.
Open the software “Arduino”. Connect Arduino to the PC with the provided USB-A to USB-B connector.
Open Tools>Port to find whether our Arduino is been detected by the software.
Download the code that I have attached with this page below. Paste the code in arduino ide code editor and press the compile button on the top left corner.
Open Tools menu>Boards>Arduino/Genuino UNO.
Open Tools menu>Port>"Select the port where arduino is attached".
Once this is done, press the upload button next to compile button. The uploading should complete without any error. The setting up of Arduino is done successfully.
pic
Interface Components
1. Ultrasonic Sensor
It emits an ultrasound at 40 000 Hz which travels through the air and if there is an object or obstacle on its path It will bounce back to the module. Considering the travel time and the speed of the sound you can calculate the distance.
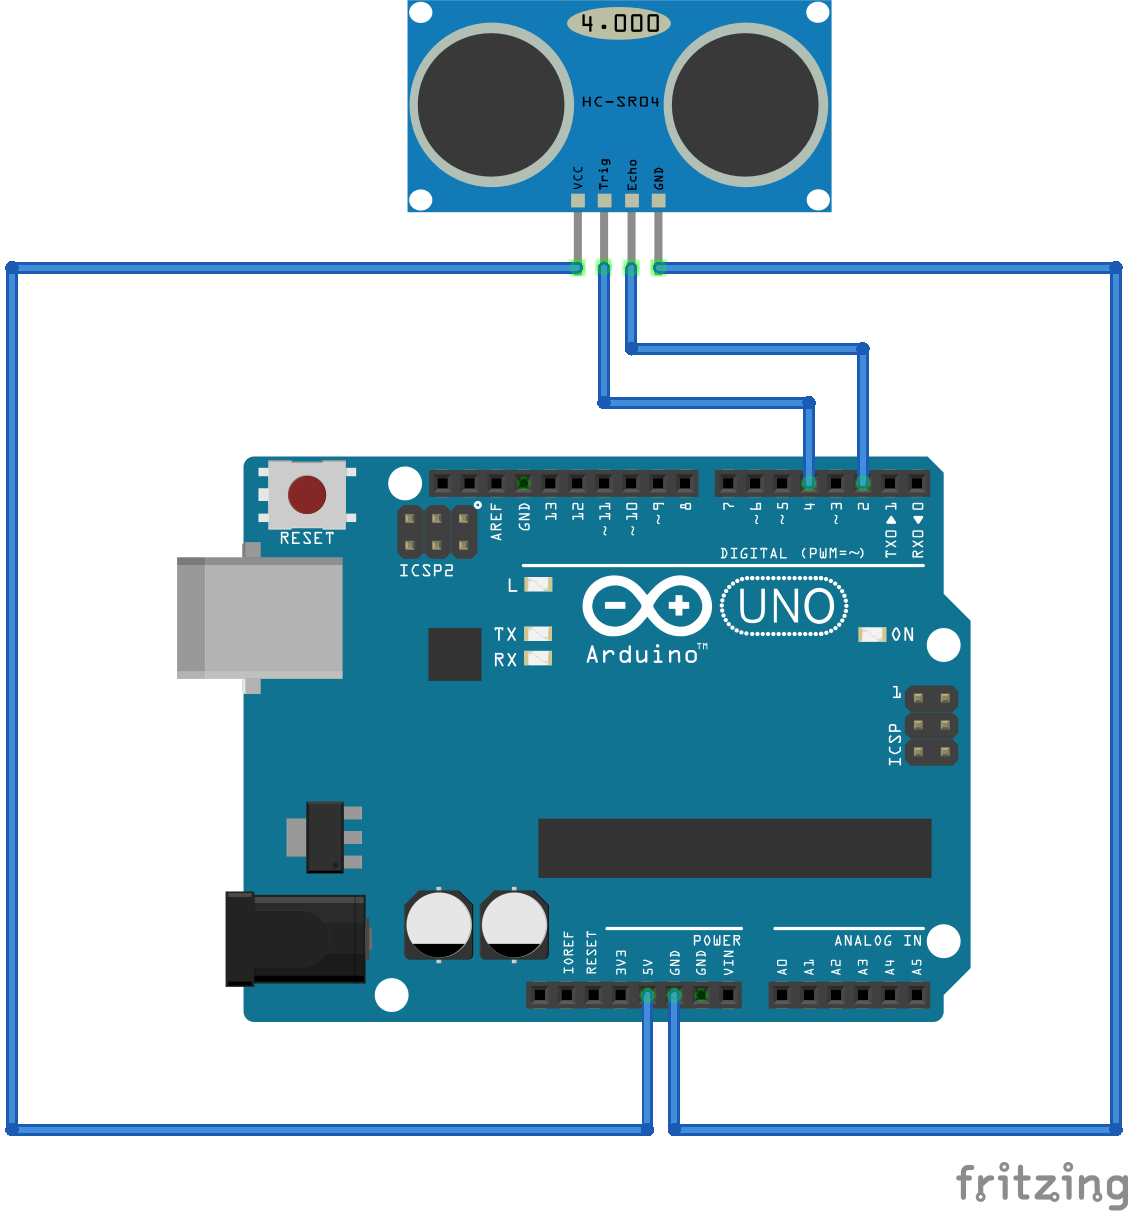
The HC-SR04 Ultrasonic Module has 4 pins, Ground, VCC, Trig and Echo. The Ground and the VCC pins of the module needs to be connected to the Ground and the 5 volts pins on the Arduino Board respectively and the trig and echo pins to any Digital I/O pin on the Arduino Board.
Steps:
- First you have to define the Trig and Echo pins. In this case they are the pins number 9 and 10 on the Arduino Board and they are named trigPin and echoPin.
- Set the trigPin as an output and the echoPin as an Input
- Start the Serial Communication for showing the results on the serial monitor.
2. Wiz750SR.
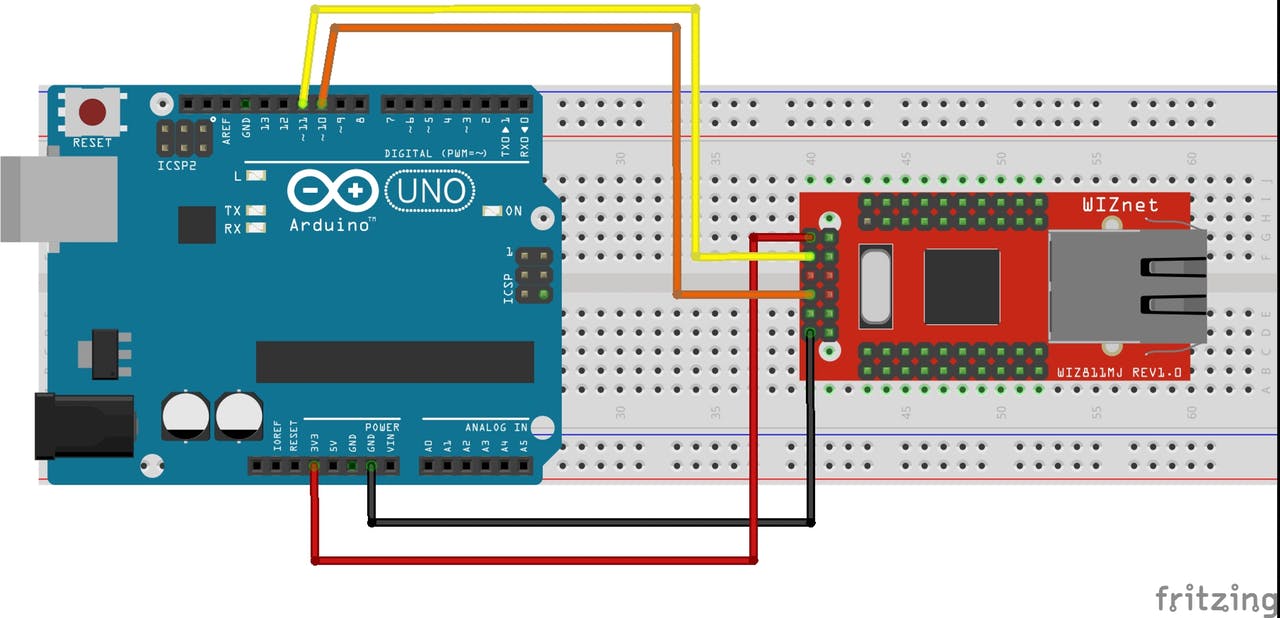
- Connect 3.3V from arduino to VCC of wiz750sr. Same for the ground too.
- Connect RX of Arduino to TX of wiz750sr.
- Since WIZ750SR is a device under 3.3V we need to create a potential divider so that the TX signal from Arduino which may be greater than 3.3V is been limited to 3.3V for safe working of the WIZ750SR.
After completing the above steps, make sure that all connections are correct. I have attached the schematic diagram for any clarifications.
After final verification, the connection of components are done.
Set up Google Firebase Database for the App
Steps:
- Create a free Firebase account
- To create a Firebase account, visit the Firebase homepage. Press GO TO CONSOLE in the top-right corner, and enter the credentials for your Google account, if you’re not signed in already. If you don’t have a Google account, you’ll need to create one first, which you can do here.
- You’ll then have a clean Firebase console created for you. Firebase database can be done with the free plan.
- For creating your first project, so click the + Add project button.
- In the dialog that appears, enter Perfect Parking as the Project name and select your preferred Country/region.
- Click CREATE PROJECT, wait for it to create and then press Continue to be taken to your project’s dashboard.
- You next need to change database settings. Go to the Firebase dashboard in your browser and select the Database option on the left, followed by Get started for the Realtime Database section.
- In the dialog for Security rules for Cloud Firestore, select Start in test mode and press ENABLE.
- In this project, you’ll use the Realtime Database instead of Cloud Firestore. Select the dropdown next to Database and pick Realtime Database.
- By default, the Realtime Database requires user authentication for reading and writing. When you selected test mode earlier, you set Firebase to always allow both, to make it easier during development. Select RULES and verify the following in the editor:
{
  "rules": {
    ".read": true,
    ".write": true
  }
}
- If they don’t match, replace them, then select the PUBLISH button to save your changes.
- Create labels in database as in the below attached files.
- Now your Google Firebase Database is ready to use.
Set up MIT App Inventor for the App
Steps:
- In your web browser, go to the App Inventor website at http://ai2.appinventor.mit.edu/ If this is the first time you are using App Inventor, you will see a blank projects page.
- Click on “Projects” tab. Click “Import Project(.aia) from my computer.
- Open the .aia file which is attached below.
- Project File and App can be downloaded here.
- After opening the project, Click “Build” tab to compile and build the “Perfect Parking” app.
In the App i have made facilities for only one slot, This can be increased according to the need. When we press the "Book Slot 1" option the user will have 5s to reach the location to park, during this period other users cannot book this slot. That's why i have made a delay of 5s. After 5s the "Book Slot 1" will be activated. "Get Location" button can be used to navigate to the parking slot.
Install node red in your PC
- Installing Node-RED as a global module adds the command
node-redto your system path. Execute the following at the command prompt:
npm install -g --unsafe-perm node-red
- Once installed, the simple way to run Node-RED is to use the
node-redcommand in a command prompt: If you have installed Node-RED as a global npm package, you can use the node-red command:
C:>node-red
- This will output the Node-RED log to the terminal. You must keep the terminal open in order to keep Node-RED running.
- Run the following command after you have done a global install of Node-RED (as described at http://nodered.org/docs/getting-started/installation.html)
- After installing node-red add firebase extension in your PC by the follwoing command in command prompt window.
sudo npm install -g node-red-contrib-firebase
- Now the required files are installed or the node-red.
- Open "http://127.0.0.1:1880/" in your browser. The hosted web address will be displayed in the command prompt. In my case it was "http://127.0.0.1:1880/
- Arrange and connect nodes as in the below diagram.
- Function for splitting the data in two.
var outputMsgs = [];
var words = msg.payload.split(":");
for(var w in words){
   outputMsgs.push({payload:words[w]})
}
return [outputMsgs];
- After deploying the node, the internal wiring has been completed. Make sure that everything works perfectly.
Final Product
Wiring
All the schematic diagram of connections are made using Fritzing Software
ConclusionsWell, that was fun. Of course, there’s so much more we could do, but it’s a solid start!. If this project is implemented in large scale the parking difficulties could be completely removed. Thus we can save our precious time and wealth.
The goal of the internet of things is to connect the things that are our daily life, now everything is useful and could give us important information or information to improve our lives.
Ultimately the goal will be to scale this up in a city (or cities!!!) and get to the point where we can really discover something new, and maybe even useful.


_ztBMuBhMHo.jpg?auto=compress%2Cformat&w=48&h=48&fit=fill&bg=ffffff)


Comments