


Hardware components | ||||||
_ztBMuBhMHo.jpg?auto=compress%2Cformat&w=48&h=48&fit=fill&bg=ffffff) |
| × | 1 | |||
 |
| × | 1 | |||
Software apps and online services | ||||||
 |
| |||||
This project focuses on the basics of animation using arduino and a 16 by 2 lcd. However this project can also be extended to lcds of other dimensions.
First we will start with the wiring of the lcd to the arduino, then with simple printing of a message to the lcd. Then we are going to move on to animation.
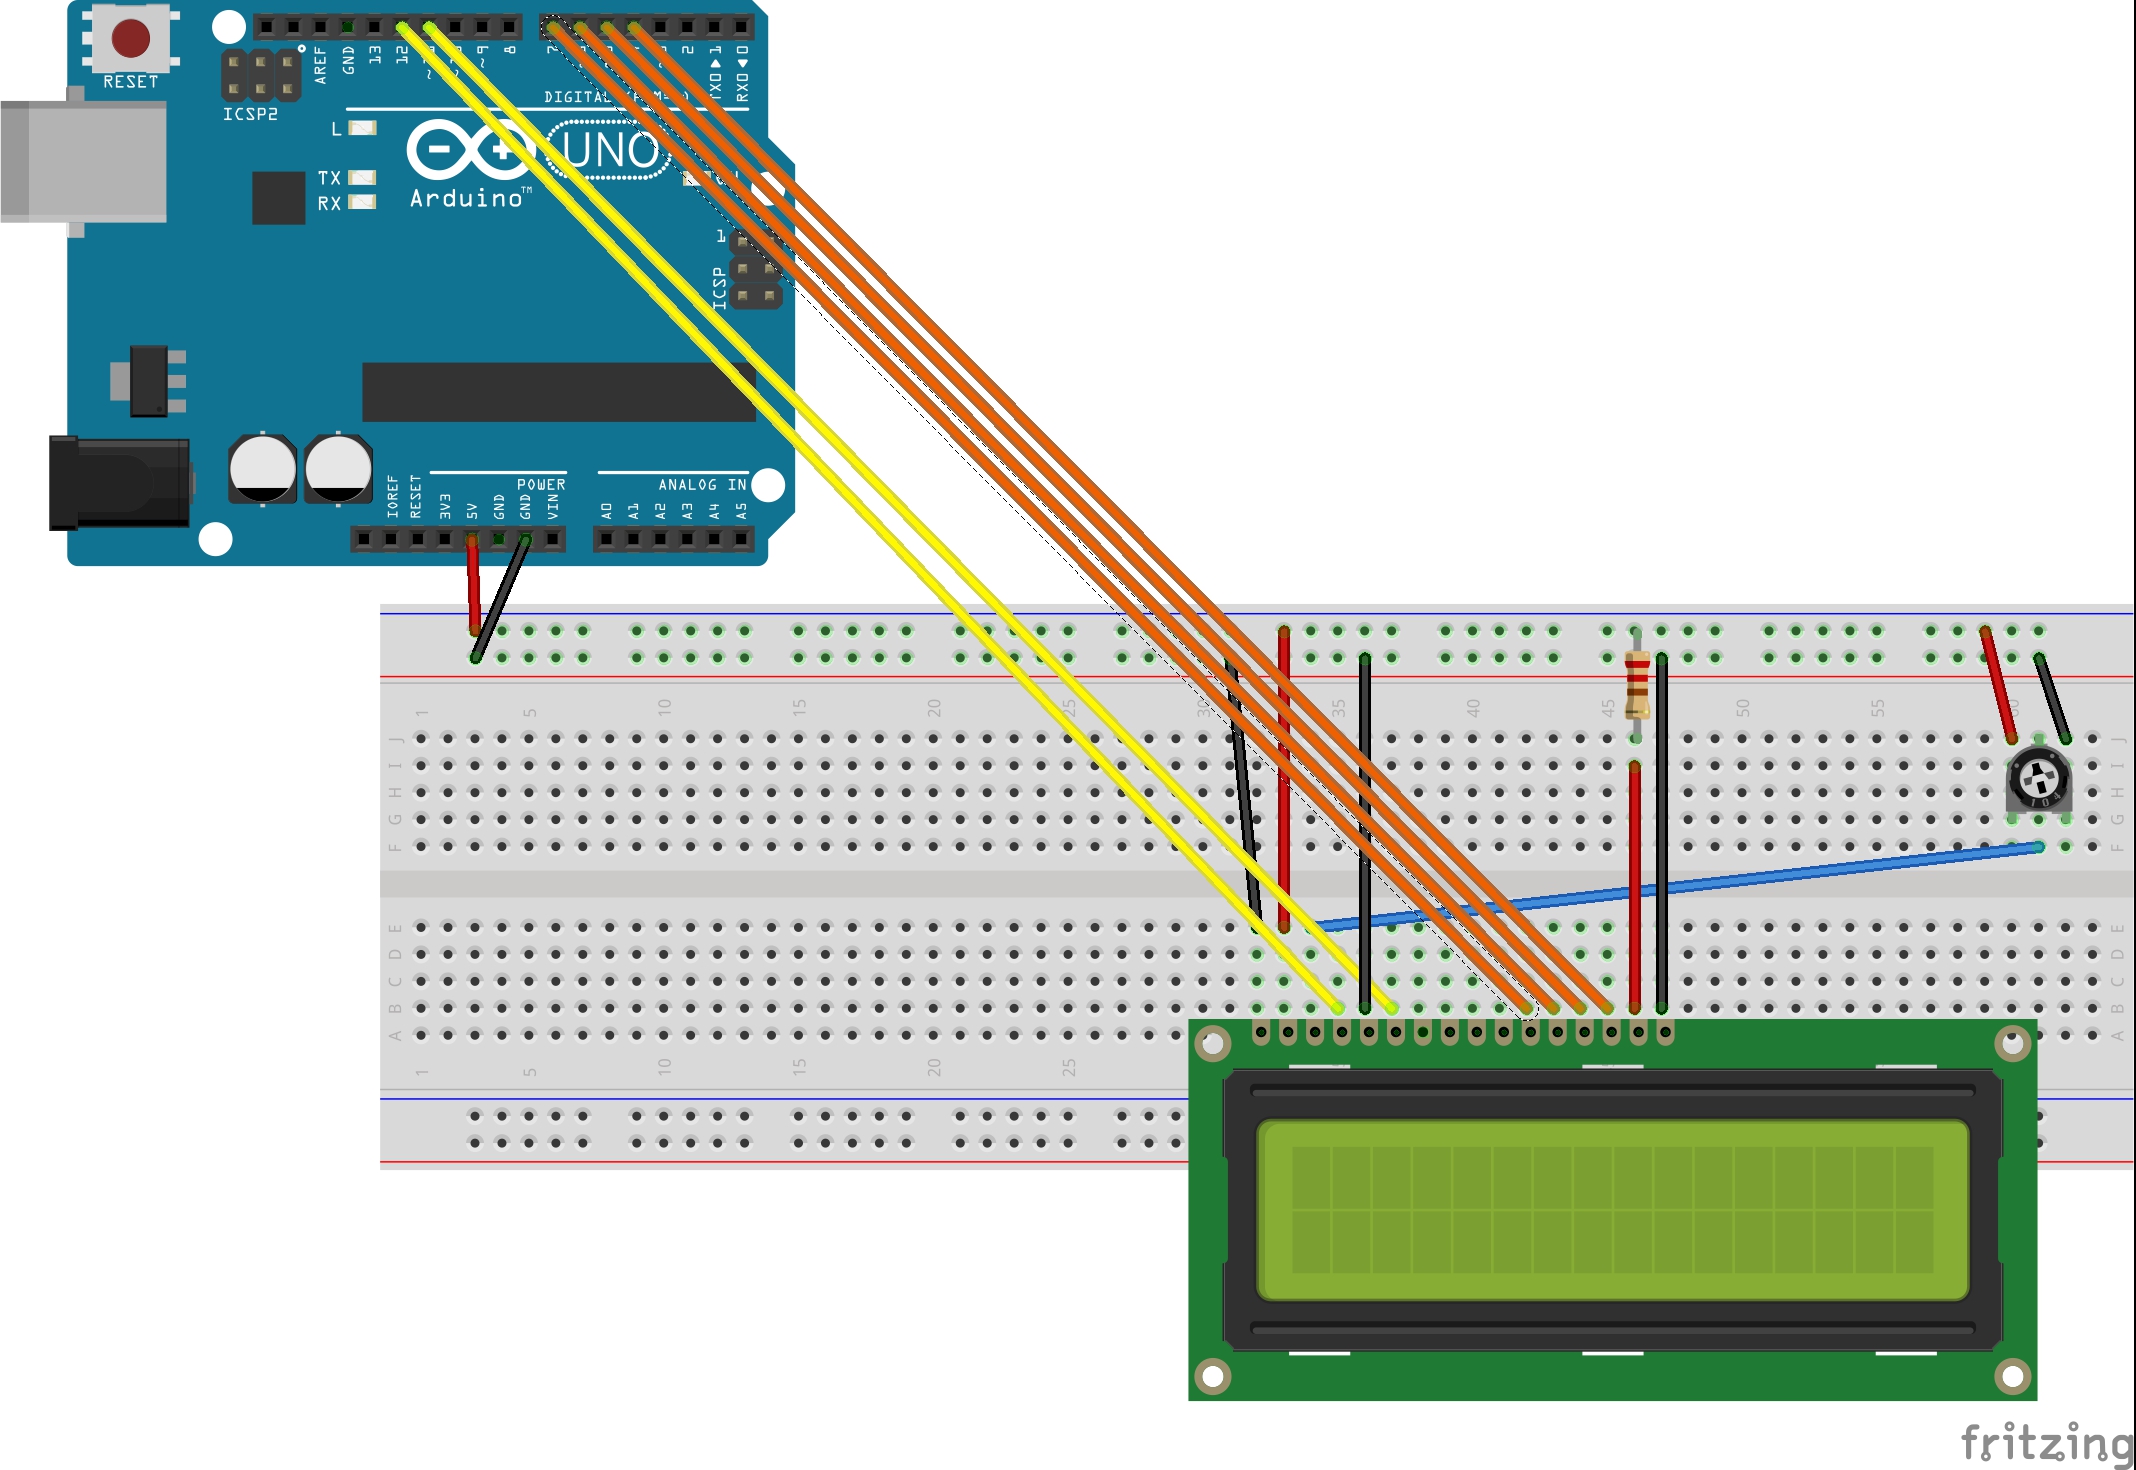
LCD wiringThis is the circuit as is diagramatically shown above.
LCD PIN
1:VSS:to positive rail of breadboard(attach 5v of arduino to positive rail too)
2:VDD:to negative rail of breadboard(attach GND of arduino here too)
3:VO(contrast):to wiper of potentiometer(attach side termianls of potentiomater to positive and negative rails)
4:RS(register select):to Arduino pin 12
5:R/W(read-write):to negative rail
6:E(enable):to Arduino pin 11
15:A(anode):to positive rail with 220 ohm resistance
16:K(cathode):to negative rail
We will not attach data pin right now.
Switch on power and if the bottom row lights up then your lcd is working. You must test this before starting to do anything else.
If lcd does not light up, check your soldering, wiring(recheck) and if it still does not light up it's highly probable your lcd is corrupt, so you need to replace it.
If your lcd works, Bravo! you have finished the first part of this tutorial.
After this, connect the data pins:
11:D4(data pin 4):to Arduino pin 4
12:D5:to Arduino pin 5
13:D6:to Arduino pin 6
14:D7:to Arduino pin 7
After this upload sample code
#include <LiquidCrystal.h>
LiquidCrystal lcd(12,11,4,5,6,7);//rs,e,d4,d5,d6,d7 respectively
void setup(){
lcd.begin(16,2);
lcd.setCursor(0,1);
lcd.print("Working");
}
void loop(){
}
After uploading if you see random characters or nothing at all, check your contrast(turn potentiometer dial up and down), check your pin solder(data pins should NOT be connected to each other even slightly), and finally your circuit and line 2 in the sample code(make sure that the pin numbers provided to LiquidCrystal match that in your circuit.
If still nothing happens, do not lose hope, if you have seen the bottom row light up in the first part, it means that your lcd screen is OK. play around with the circuit and the soldering untill it works.
If you see the message "Working", then you have succesfully wired your lcd and finished the second part of this tutorial. Leave your circuit as it is, we will not mess with it anymore, all we have to do now will be in software.
Explanation of Code in Part2LiquidCrystallcd(12,11,4,5,6,7);
This line declares an lcd object with interface pins as provided in the arguments. Now all your lcd interfacing will be done through this 'lcd' object.( note that you can name this anything you want but maintain that name all throughout).
lcd.begin(16,2);
This line declares our lcd screen to be of dimensions 16 columns and 2 rows, note that your lcd may not be 16 by 2, adjust the numbers accordingly.
lcd.setCursor(0,1);
This line will set the cursor at the first column and the second row(as counting in C++ starts with 0 not 1 !). Note that you cannot see the cursor, but the cursor is always there, it fixes the spot at which the next character will appear.
lcd.print("Welcome");
This line will print the message Welcome at the place the cursor is pointing, that is, 0 columns 1 rows.
Scrolling TextWell, we printed a message to the screen, but it isn't very attractive to sit staring at that same message, moreover it does not serve any purpose. Thus we will in this section print a message which will scroll from right to left as in the advertisement boards. Only the setup() and loop() functions will differ, thus I'm showing only those functions, rest all remains same.
void setup(){
lcd.begin(16,2);
}
void loop(){
int n;
char message[]="scrolling text!";
n=15;
char* ptr=message;
while(n!=-14){
lcd.clear();
    lcd.setCursor(n,1);
    if(n<0){
        ptr++;

}
    lcd.print(ptr);
    n--;
delay(250);
}
}
Note that to undestand this code you need a fairly good knowledge of pointers in C and C++, as Arduino language is really just AVR-C++ just lightly processed.
In the loop function we are defining your message as a constant string.
lcd.clear() is used to clear the screen for every iteration.
Then we set a pointer ptr to hold address of message. This pointer value will be incremented in order to fit the message in the lcd window even after the characters slip out of view to the left. We do this for the left extremity and not for the right as the LiquidCrystal library can handle it for the right extremity(text scrolling out) but cannot handle negative column addresses as is required for our program.
Then we have a while loop which will display the message at various locations left to right thus giving the illusion that the text is moving. Note that the delay() at the end is to make sure that we can read the text and it does not whizz right to left at unreadable speeds. If the animation seems too slow or too fast, you can change th delay value.
Custom CharactersFor all the uses of lcd.print() function, we cannot display, say a dinosaur, in the lcd screen. However we can do this using a feature of the LiquidCrystal library called Custom Characters.
For this we define a byte of data, whcih contains 1s for all the pixels on and 0s for all the pixels off, like this:
byte dino[]={
B01110,
B01110,
B01100,
B01111,
B11101,
B01010,
B01010,
B01010}
This is a custom character, which will display a dinosaur in the LCD screen. You can create your own characters here: https://maxpromer.github.io/LCD-Character-Creator/
After this we need to display them. However, these characters cannot be displayed using the normal lcd.print method; we need to use this:
void setup(){
lcd.createChar(0,dino);
lcd.begin(16,2);
lcd.setCursor(0,1);
lcd.write(byte(0));
}
With this code, we create a custom addressable character out of our arlier defined dino[] byte. Our custom character's address is given by lcd.createChar() method which defines character 0 as dino[]. We will then refer to this character as byte(0) which returns the address of our custom character, and finally print it on the screen using lcd.Write() method.
Shooting ArrowsThis program will finally teach you how to animate using lcd screens, read this carefully.
#include <LiquidCrystal.h>
LiquidCrystal lcd(12,11,4,5,6,7);
byte arrowhead[]={
B00001,
B00011,
B00111,
B01111,
B00111,
B00011,
B00001,
B00000
}
byte arrowbody[]={
B00000,
B00000,
B00000,
B11111,
B11111,
B00000,
B00000,
B00000
}
byte
B00011,
B00111,
B01111,
B11111,
B11111,
B01111,
B00111,
B00011
}
void
lcd.createChar(0,arrowhead);
lcd.createChar(1,arrowbody);
lcd.createChar(2,arrowtail);
lcd.begin(16,2);
}
void
int
while(n!=-1){
lcd.clear();
lcd.setCursor(0,1);
lcd.write(byte(0));
lcd.write(byte(1));
lcd.write(byte(2));
n--;
delay(50);
}
}
Here we use three custom characters to simulate an arrow. The rest is familiar to you. While running this on your lcd, you may notice a trail behind the arrowtail making it look longer than it is, do not woory, it is only the residue of the earlier arrow position.
That's it! You have finished your first animation with Arduino and LCDs! Play around with the code, and combine this with button inputs to transform this into a full-fledged game!
LCD GameFinally we can make a game! However during this tutorial I'm not going to start off with a very complicated game, but a very simple game quite similar to the early arcade games.
Objective of This Game
Before we start the game, we need to figure out an obejctive for the gameplay.
In this game, the objective is as follow:
There is the hero, a person on row 1 (note that the first row is row 0)(normally) at whom a series of arrows are going to be fired. If the hero is hit, the game is over. The hero is going to avoid the arrows by jumping to row 0, which we are going to manipulate by a button. (button press=row 0 not=row1). The score is incremented per loop and displayed at the right hand corner.
This is actually an extension of the eariler arrows animation, thus I'm going to include only the parts which have changed.
byte man[] = {
 B01110,
 B01110,
 B00100,
 B01110,
 B10101,
 B00100,
 B01010,
 B10001
};
void setup() {
 // set up the LCD's number of columns and rows:
 lcd.createChar(0,arrowhead);
 lcd.createChar(1,arrowbody);
 lcd.createChar(2,arrowtail);
 lcd.createChar(3,man);
 lcd.begin(16, 2);
 attachInterrupt(0,buttonin,CHANGE);
 randomSeed(analogRead(A0));
 // Print a message to the LCD.
 //lcd.print("hello, world!");
}
 int n;
void loop() {
 // set the cursor to column 0, line 1
 // (note: line 1 is the second row, since counting begins with 0):
 //lcd.setCursor(0, 1);
 // print the number of seconds since reset:
 //lcd.print(millis() / 1000);
 n=15;
 int rnd;
 rnd=random(15,25);
 while(n!=-1){
   lcd.clear();
   delay(10);
   drawman();
   lcd.setCursor(n,1);
   if(n==1){
     if(level==1){
       stopgame();
       continue;
     }
   }
   lcd.write(byte(0));
   lcd.write(byte(1));
   lcd.write(byte(2));
   lcd.setCursor(10,0);
   lcd.print(score);
   delay(100-rnd);
   n--;
   score++;
   if(level==0)
     score--;
 }
}
void drawman(){
   lcd.setCursor(1,level);
   lcd.write(byte(3));
}
void buttonin(){
 if(digitalRead(2)==LOW){
   level=0;
 }
 else{
   level=1;
 }
}
void stopgame(){
 lcd.clear();
 lcd.setCursor(0,0);
 lcd.print("Game over");
 lcd.setCursor(10,0);
 lcd.print(score);
 level=1;
 score=0;
 n=15;
 delay(3000);
 return;
}
Not all of this code is about the lcd, but ALL is important for game dev.
We start with the character defintion of man[] which will store the byte for man character(our hero). Then we have the setup function, where only two lines have changed. Both the lines are representative of only a part of the vast group under which they fall, namely interrupts and random numbers. Both are very useful amenities, more information about which you can find in the arduino.cc website.
First we have the attachInterrupt function. Note that the defintion I'm going to give is not a very comprehensive one, but a short one is necessary to understand what is going on here.
Interrupts are fucntions which can be called upon an event's occurence NO MATTER WHERE THE EXECUTION is occuring. This is an important fact useful for implementing real-time input functions. Here we use it to make sure that no matter at which point of the execution the button is pressed we will take the appropriate action (atleast the program will).
Syntax for attachInterrupt:
attachInterrupt(pin_number-2,function_to_call_without_parenthesis,condition_for_calling);
CHANGE is a #define value used to signify that for any change in state in the pin_number input the function attached will be called.
Then we have a random number. One outstanding quality that physical processors like the Arduino possess which normal processors don't is that a random number generated by the Arduino is trully random as the analog noise present at pin A0 if pin A0 is floating (i.e. unconnected) is random as predicted by quantum physics (more or less).
randomSeed is used to set the seed for the random process. random() is a function with parameters MIN,MAX or MAX only to get the next random number in the sequence.
Then we have the Interrupt function buttonin() which checks if the button is pressed(LOW) or not pressed(HIGH) and changes the level(row) of our hero accordingly.
That's it, we have a fully functional game!!


Comments
Please log in or sign up to comment.