In this project I'm going to tell you about how to make a Raspberry Pi based low cost surveillance camera. This is really great thing, as you can installed this in your home or maybe in your office. So whenever any intruder will come you can identify him, as you can access this from anywhere in the world using any web browser even in your smartphone.
Software Used:a) Raspbian OS: This is the recommended OS for Raspberry Pi. You can also installed other OS from third party. Raspbian OS is Debian based OS. We can install it from Noobs installer. You can download here.
b) Python idle: This is the software we get in Raspbian OS. For this project we have used Python script.
c) Putty: we are using Putty for remote access of Raspberry Pi. You can download here.
d) Win32DiskImager: This software is used to burn Raspbian Os on SD Card. You can download here.
e) SDFormatter: This software is used to format memory card. You can download here.
Component Used:- Raspberry Pi
- Raspberry Pi Camera
- Power Supply
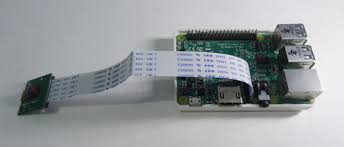
1. Raspberry Pi: This is the latest version of Raspberry Pi. In this we have inbuilt Bluetooth and Wi-Fi, unlike previously we have to use Wi-Fi dongle in one of its usb port. There are total 40 pins in RPI3. Of the 40 pins, 26 are GPIO pins and the others are power or ground pins (plus two ID EEPROM pins.) There are 4 USB Port and 1 Ethernet slot, one HDMI port, 1 audio output port and 1 micro USB port and also many other things you can see the diagram on right side. And also we have one micro SD card slot wherein we have to installed the recommended Operating System on micro SD card. There are two ways to interact with your Raspberry Pi. Either you can interact directly through HDMI port by connecting HDMI to VGA cable, and keyboard and mouse or else you can interact from any system through SSH.
2. Raspberry Pi Camera: The Raspberry Pi camera module can be used to take high-definition video, as well as stills photographs. It’s easy to use for beginners, but has plenty to offer advanced users if you’re looking to expand your knowledge. There are lots of examples online of people using it for time-lapse, slow-motion and other video cleverness. You can also use the libraries we bundle with the camera to create effects.
Working of ProjectFirst you need to update and upgrade your Raspberry Pi by giving commands
sudo apt-get update
sudo apt-get upgrade
After successful upgrade of your raspberry pi you need to clone one github repo on your terminal. Here are the commands:
git clone  https://github.com/DeligenceTechnologies/Raspberr...
cd  Raspberry-pi-based-HD-surveillance-camera/
chmod u+x *.sh
./install.sh
After successful installation of this you need to open your favourite browser, and type the IP address of your raspberry pi, and then here you will get one HTML folder so click on that, here you will get the live video streaming of your Raspberry Pi within the local area network. So for the local area you can install this setup in your office and you will get the real time video streaming of your office.
Now the question is how to make this setup publicly accessible, so for that you can do port forwarding in your router and by giving the public IP of your network and with forwarded port in your browser you can get the same result, but there are some third party options as well.
How to Use NgrokSo you can use ngrok. Ngrok is a tool which makes secure tunnels to localhost. There are some other options as well for that, one of that is pagekite, But pagekite free version is for 30 days. The advantage of pagekite is that you can give your pagekite name unlike ngrok where you will get some random alphanumeric, but any how you can chose anyone, here in this case we have chosen ngrok.
Download ngrok and unzip that by giving command:
$ unzip /path/to/ngrok.zip
now run ngrok by giving
./ngrok http 80
After giving this command you will see your localhost 80 port is forwarded to some random URL.
Now just paste that URL then click on HTTP you can see the live streaming from any network, here in this case you will get some latency, as you are tunneling your localhost, but that is minute and you will get the visuals of your live streaming.
You can learn more about ngrok here.


Comments