The metro cities all around the world are facing a lot of problem because of the increasing population, which is resulting in an exponential pollution rise, which is a very serious problem and needs immediate attention.
But the problem is that there is no proper monitoring device for these urban environments, so we are unable to get any reliable data. Even if there are devices to monitor the conditions, they are in limited number due to the current cost - to - reliability and accuracy count.
So, What's the Solution?The SparkUQM - designed specifically for urban environments. Please note that I have designed this device keeping in mind the Indian metro city conditions, as cities like Delhi are one of the most polluted cities in the world when it comes to air pollution.
So, let us get started!
Hardware ComponentsSo, the components are already mentioned in the project. But, let us have a look at each of them in brief:
1) The Spark fun Artemis Contest Kit 1 - This kit contains
- 1x SparkFun RedBoard Artemis ATP
- 1x SparkFun Micro OLED Breakout (Qwiic)
- 1x SparkFun Proximity Sensor Breakout - 20cm, VCNL4040 (Qwiic))
- 1x SparkFun Environmental Combo Breakout - CCS811/BME280 (Qwiic)
- 2x Qwiic Cable - 50mm
- 2x Qwiic Cable - 100mm
2) Various Seeed Grove Sensors. Note that normal sensors will be just fine. I am using these as I have a lot of them lying around. The sensors I have used are:
- Seeed Grove Button - A push button. To change between pages of my OLED.
- Seeed Grove RGB LED to show the result of my machine learning implementation.
- Seeed Grove Relay for Actuation Purpose
3) Particle Photon - This small WiFi powered development board will be used to add IoT capabilities to our project. This will fetch the sensor data serially and then send it to your desired cloud.
4) Apart from this, just a USB power bank will be required to power the whole device. That's all!
So, let us get started with the project:
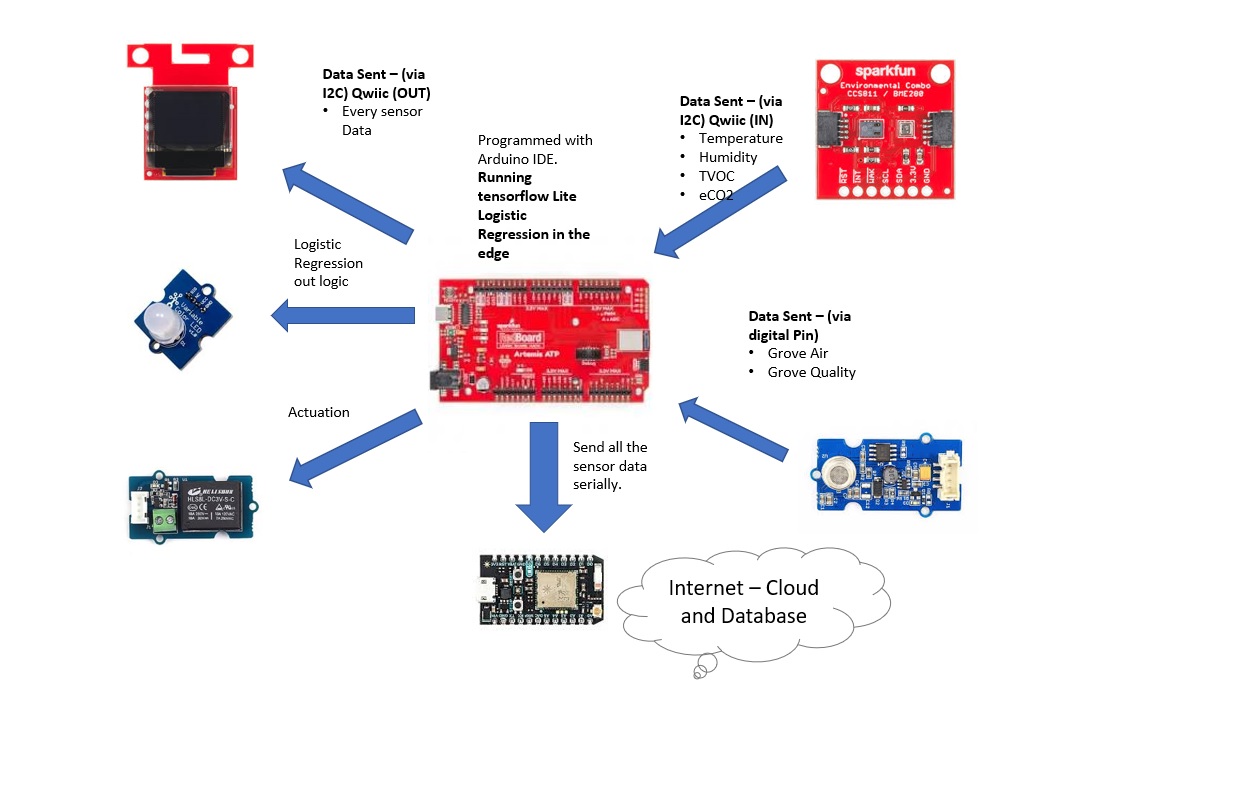
Hardware ConnectionNow, I will show the hardware connections for this project with a image. For more details, just go and have a look at the code in my Git repo. The main file is very well written and with comments for easy understanding.
I am really sorry that I could not create a flow chart of schematic diagram due to the shortage of time. But be sure that I will add all the additional details later for sure.
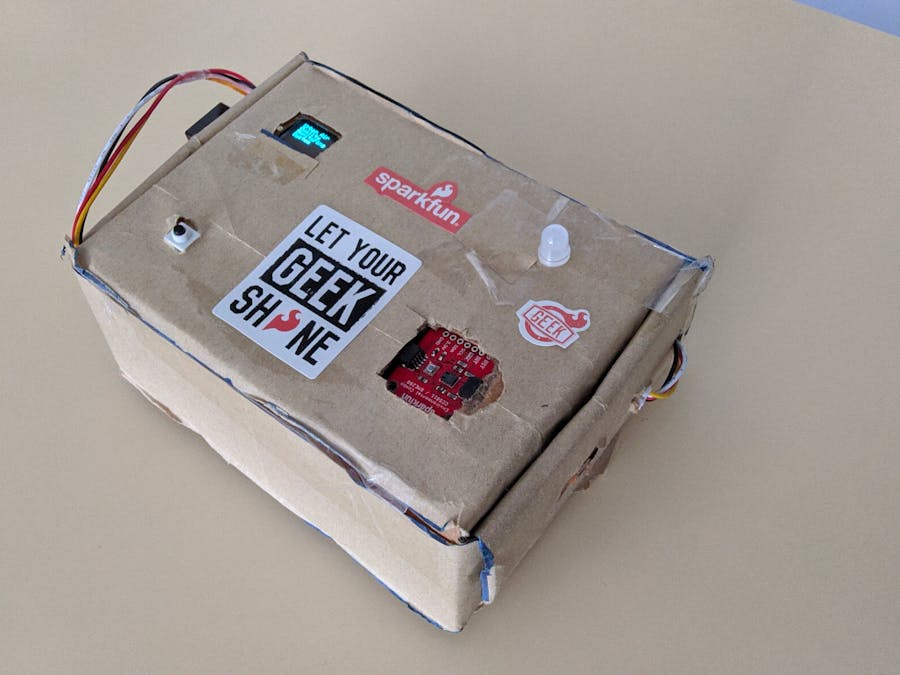
Now after the Hardware connections are done, we will get all these things into a cardboard enclosure that I created for this project. So, after everything is attached are glued or taped in its place, the final Hardware would look something like this:
Now that this is done, let us move to the software part!
Software PartThis part is divided into 3 parts, basically because I have developed my code like that. The first part is the normal code part in which I program the device to work with all the interfaced components.
In the part 2, I add machine learning functionality into the project.
In Part 3, I just describe the Particle Photon code. The code is a little complicated as I have used intensive commenting for easy understanding. So, let us start:
Part 1 - Basic Arduino Code (1-2 Hours)This is the basic Arduino IDE Code for the SparkFun Artemis ATP. The code is pretty much self explanatory if you see, so please just go through it. The name of the file is "final_code.ino".You can find the code in the Github repo of this project.
Sorry I will add detailed code explanation later for sure. The project shows all the sensor data on various pages created. These are displayed on the OLED screen. The pages are as follows:
Now that the basic code is all done, we can move on to the main part of this project, which is TensorFlow Lite implementation. I saw that there were just some speech and audio related examples given in Arduino TensorFlow Lite Library. But, they were quite complicated to start with and for some reason, I could not get them to work as expected.
Later, I did some tweaking with the parameters of the TensorFlow Micro speech example and it finally worked! So, I had 2 options now:
- Use transfer learning and use this same example as base to create my own audio powered application.
- Play with the sensor data using simpler regression algorithms.
I figured that adding voice functionality to this project won't do much good in terms of application, so I decided to go with the 2nd option.
Firstly, I just focused on 2 of the simplest algorithms:
1. Linear Regression
2. Logistic Regression
Linear RegressionBut I couldn't get the desired accuracy on my Linear regression model for predicting air quality (eCO2) values based on past values and the features I used were:
- Temperature
- Humidity
- TVOC
To know more about Linear regression in TensorFlow Lite, just go on and follow this tutorial. Believe me, it is great! Thanks to Particle blogs.
To get some reference data, I used the NXP Rapid IoT prototyping kit.
https://blog.particle.io/particle-machine-learning-101/
The same process can be followed for Arduino IDE too.
But the Loss was too much and I had a time constraint, so Instead I decided to go with Logistic Regression and build a simple binary classifier. But do not worry, I will add the Linear regression Model implementation soon.
Logistic RegressionNow, training a Binary Classifier can be time consuming when we use a large dataset. So, for this project, I just took into consideration the CO2 and TVOC values, and added an additional parameter AQI to generate training data output. It is pretty simple logic, if the value of TVOC and CO2 is greater than a particular value (in my case, I kept it 1000 just for demo), the AQI value will become 1, else zero.
To get some data, I created a demo program to print the desired data in CSV friendly form on serial monitor and left it running for an hour or tow on any Serial console (I used Putty).
Then I stopped it and downloaded that data in CSV format. The final data will ook something like this:
I managed to get 540 data points, which were more than enough for me. After that, I uploaded this data to google colab Logistic Regression Demo, and then trained the classifier. The link to the google colab notebook is:
https://colab.research.google.com/notebooks/mlcc/logistic_regression.ipynb?hl=en
This is the basic example, just change it according to the data you use.
Now, just follow this process to convert the obtained model into.tflite format and finally into a C++ file with values of weights and biases stored in an array.
Convert Model to TFLiteOnce you have a trained model, the next step is to convert that model into something that TensorFlow Lite can work with. TensorFlow proper supports a number of different model file formats, while TensorFlow Lite supports only one, the tflite FlatBuffer format, which is optimized for size and thus perfect for constrained devices.
export_dir = 'saved_model/'
tf.saved_model.save(model, export_dir)

# Convert the model to an in-memory object
converter = tf.lite.TFLiteConverter.from_saved_model(export_dir)
tflite_model = converter.convert()

# Write to a file
tflite_model_file = pathlib.Path(‘linear_regression_model.tflite')
tflite_model_file.write_bytes(tflite_model)
Once you have a TFLite model, you’ll need to convert it to a C array for use. Many MCU’s (including Particle devices) do not have native filesystem support, which means you’ll need to load your TFLite model into memory in order to use it. The recommended way to do this is to convert your model into a C array and compile it into your project.
On most operating systems, you can do this with the xxd command.
xxd -i linear_regression_model.tflite > linear_regression_model_data.cppThat will yield something that looks like this:
unsigned char g_linear_regresion_model_data[] = {
0x1c, 0x00, 0x00, 0x00, 0x54, 0x46, 0x4c, 0x33, 0x00, 0x00, 0x12, 0x00,
0x1c, 0x00, 0x04, 0x00, 0x08, 0x00, 0x0c, 0x00, 0x10, 0x00, 0x14, 0x00,
0x00, 0x00, 0x18, 0x00, 0x12, 0x00, 0x00, 0x00, 0x03, 0x00, 0x00, 0x00,
// Many more lines here
};
This completes the Machine Learning Part.
Part 3 - Particle Code (1 Hour)Now that everything is set in the SparkFun side of the project, let us move on to the particle photon side, which helps adding IoT capabilities to the project.
The Arduino code sends all the sensor data in JSON Format (using the Arduino JSON Library ) and so we will use the same library to parse this JSON and then we can do anything with this data.
Example: Send it to a database like Firebase so it can be accessed in an Android application. See my earlier project for documentation on this.
This completes our project. Please like if you like this project and follow me for more such content. Thanks to Sparkfun for this wonderful opportunity!.
Adios!


_3u05Tpwasz.png?auto=compress%2Cformat&w=40&h=40&fit=fillmax&bg=fff&dpr=2)

Comments
Please log in or sign up to comment.