


Hardware components | ||||||
_ztBMuBhMHo.jpg?auto=compress%2Cformat&w=48&h=48&fit=fill&bg=ffffff) |
| × | 1 | |||
 |
| × | 1 | |||
 |
| × | 1 | |||
 |
| × | 1 | |||
 |
| × | 10 | |||
 |
| × | 1 | |||
Using map() is an easy way to convert values read from the analog inputs into something more useful. But, using map() without fully understanding what's going on can lead to some strange output. This project shows an example of how to do it correctly. And, it's not as obvious as you might think.
Lights and dialsCOVID isolation is a great time for Arduino tinkering. Recently, the tinkering involved a 10-segment bargraph LED, a potentiometer, and an exclamation of, "Hey, let's make different LEDs light up when you turn when you turn the dial!"
This bargraph volt meter is a great idea for a beginner project. It demonstrates several foundational concepts:
- How to drive LEDs using the Arduino digital pins.
- How to use current limiting resistors for LEDs.
- How to read the a voltage using an Arduino analog input pin.
- How to construct an adjustable voltage divider with a potentiometer.
- How to manipulate the thousand or so discreet input values to light up only one of ten possible LEDs, or maybe none at all if the analog value is low enough.
The focus of this demo is on the last bullet point, using the map() function to turn a 0..1023 range into a 0..10 number. I will assume you are already familiar with reading analog inputs and driving LEDs with digital pins. If not, there are many wonderful tutorials written on these subjects.
If at first you don't succeed...The first attempt at translating the 0..1023 analog input to a 10-segment LED looked like this: int y = map(x, 0, 1023, 0, 10); where x was the value collected from the analog input.
Seems reasonable, doesn't it? And it fits with the example shown on the Arduino reference page at: https://www.arduino.cc/reference/en/language/functions/math/map/
There was a switch-case statement in there too, to light the appropriate LED on the bargraph depending on the value of y.
But, we noticed something strange. When the potentiometer was turned all the way up, the 10th LED on the bargraph would light up, but the 9th would occasionally flicker.
The first thought was something software related, so we added some Serial.print() statements to debug the 0..10 output. Sure enough, it was alternating between 9 and 10. But why?
The second thought was a dirty potentiometer. I had dug them out of some twenty-five year old kits from my university days. But swapping the potentiometer had no effect.
The next thought was to start isolating parts of the program and see where exactly it was getting this strange 9/10 alternating value and why. This involved replacing the potentiometer and analog input value with a simple for loop of 0..1023 to simulate turning the dial.
An interesting discoveryThe problem was immediately apparent. The last few lines of debug output explain it all.
y = map(x, 0, 1023, 0, 10): x = 1019, y = 9
y = map(x, 0, 1023, 0, 10): x = 1020, y = 9
y = map(x, 0, 1023, 0, 10): x = 1021, y = 9
y = map(x, 0, 1023, 0, 10): x = 1022, y = 9
y = map(x, 0, 1023, 0, 10): x = 1023, y = 10
Using the map() function as shown as part of the debug output, it would seem like we're mapping 0..1023 to 0..10. And, in fact, we are, but not like you would expect.
Notice how only a value of exactly 1023 gives 10 as a result. 1022 gives 9, as does 1021, and so on. I would have expected a more even distribution of values. Analog values of 819..920 all give an 8 as output. Analog values of 921..1022 give a 9. But only 1023 gives a 10.
Technically, the map() function is mapping 0..1023 onto 0..10, but it's not evenly distributed. How do we fix this?
The answer lies in the underlying mathematics. map() is really just a way of expressing a linear equation using slope intercept form. Wikipedia has a write-up on it already, so I will not repeat it here. I've included a slope-intercept version in the demo code as well, for comparison.
The moment of discovery came from figuring out the slope part of the slope intercept form. Slope is simply rise over run, or the output range over the input range. And therein lies the rub.
The range is 0..1023 and 0..10, but, because zero is included there are 1024 possible input values and 11 possible output values. So instead of a slope of 10/1023, what we actually need is a slope of 11/1024. This gives an even distribution of values for the output.
The fixWith a simple tweak, the map() function will behave the same way. It now looks like this: y = map(x, 0, 1024, 0, 11);
Perhaps a better way to think of the map() function is not in fromLow, toLow and fromHigh, toHigh concepts, but as fromLowest, toLowest and inRange, outRange. Because, even though 1024 will never be received from an analog input and 11 will never be output to a ten-segment LED bargraph, this is the only way to get an even distribution of numbers in the output.
But, don't take my word for it. Look at the debug output.
y = (int) 11 * x / 1024: x = 837, y = 8
y = (int) 11 * x / 1024: x = 838, y = 9
...
y = (int) 11 * x / 1024: x = 930, y = 9
y = (int) 11 * x / 1024: x = 931, y = 10
...
y = (int) 11 * x / 1024: x = 1023, y = 10
I've included only the transitions between 8 and 9, and 9 and 10, as well as the maximum value and removed everything else for clarity. Notice how any value of input 931 or greater results in a 10, as oppose to the single value there was previously. And, there are just over 90 input values that will result in each output number.
Best of all, the bargraph LED lost its flicker.
The codeTwo example Arduino sketches are provided. One is the demo that has been discussed thus far. It does nothing more than send numbers to the serial output. Not very exiting. The second sketch is the code that translates a potentiometer position into a reading on the 10-segment LED bargraph.
Both pieces of code are written so that the lowest value is zero. In the LED bargraph sketch, zero is indicated by no LEDs being lit. If you see no LED output, adjust the potentiometer as a first step before troubleshooting.
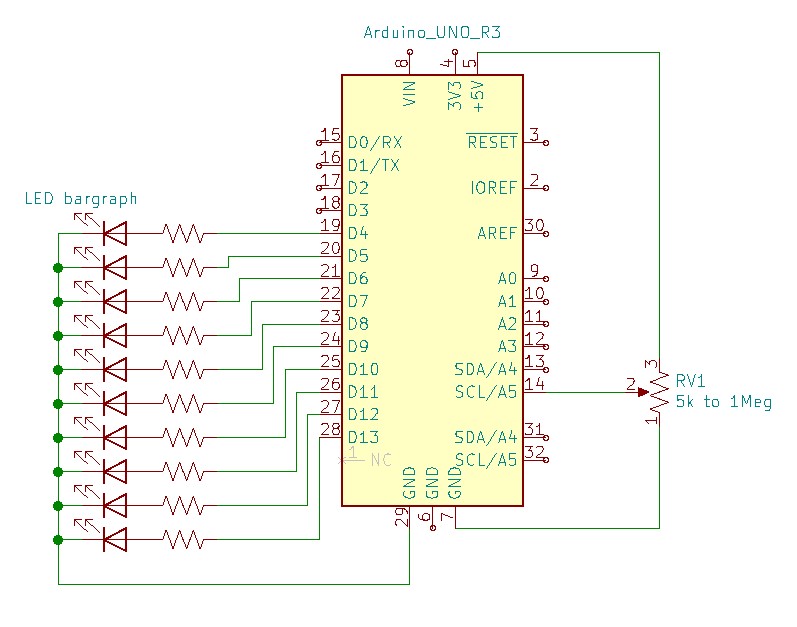
The schematicThe schematic is simple and is provided as a KiCAD schematic and as an image. The potentiometer value is not critical. Anything between 5k and 1Meg Ohm should be fine.
The current limiting resistors for the LEDs are not critical so long as they are 220 Ohm or above. But avoid values that are so high the LEDs are too dim to see. It is also possible to use a single, common resistor on the ground side. Since only one LED is being lit at a time, this will not affect overall brightness.

Comments
Please log in or sign up to comment.