


Hardware components | ||||||
 |
| × | 1 | |||
Software apps and online services | ||||||
| ||||||
| ||||||
 |
| |||||
In this project we will port the PYNQ framework to the ZC702 development board.
IntroductionThe ZC702 is an official development board from Xilinx. This board sports a ZC7020 ZYNQ FPGA SoC. The board comes with a number of peripherals including HDMI, CAN Bus, UART, embedded Digilent JTAG Programmer, Ethernet, SD card, USB host, I2C bus expander and a number of SMBUS enabled PMIC for monitoring the SoC rails.
PYNQ is a project by Xilinx that bring Python level productivity to FPGA's. It allows a designer to import hardare designs called overlays in PYNQ parlance and write Python code to address and configure the core.
This speeds up development by an order of magnitude compared to bare metal designs. As of 2020 PYNQ uses a Petalinux Kernels with a UBUNTU 28.04 Rootfs.
The ZC702 development board is not supported by the official PYNQ framework.
The official way to port PYNQ to a new board is to download the framework on a UBuntu host and create a custom board file that uses the board BSP and the board custom parameters.
Here we are going to take a shortcut that involves re-using the official PYNQ 2.5 image.
Porting PYQN the easy way.
Download the PYNQ image 2.5 and burn it to an SD CARD. This will partition the SD card with a FATFS partition that holds the kernel and device tree and an ext4 partition that holds the rootfs which in PYNQ's case is a UBUNTU 18.0 root file system.
To boot the board on the ZC702 we have to customize the default kernel of the PYNQ V2.5 image which targets the 400 pin version of ZC7020 to the 484 pin SOC on the ZC702.
Step #1Create a Vivado design. I created a custom Vivado design targeting the ZC702 with a BRAM, 1 GPIO targeting the built in LEDS's and switches and an AXI IIC core deployed on the PL that shares the same I2C pins located on the FMC.
Step #2Compile the design and export it . Also create an SDK FSBL app as well as a Hello world App. In addition create a folder called PYQN_ZC702 and export the generated bitstream and the.tcl file. We shall use this in the future to prove that the PYNQ framework works OK.
Step #3Install Virtual Box, install Ubuntu 18.0 and then install Vivado 2019.1 as well as Petalinux 2019.1. Then copy the complete Vivado project folder on the Ubuntu VM.
Step #4Make sure that both Vivado and Petalinux are in the user path. Then, from the project directory launch Petalinux and read the exported hdf project file.
Step #5Build a custom kernel for the ZC702. Change the rootfs boot setting so that it boots from the SD card. Then disable the net boot. Additionally enable common utilities such as i2cdetect and fpga-manager.
petalinux-buildAfter the kernel is build create the boot.img file by issuing the following
petalinux-package --boot --format BIN --fsbl ./images/linux/zynq_fsbl.elf --fpga ./images/linux/download.bit --u-boot
//run this from within image directory
This packs in one file the uboot bootloader, kernel. Finally use the SD card that we burned the PYNQ image before and overwrite the boot image file as well as device tree with the new files.
The steps above complete the process of porting PYNQ to the ZC702. Place the SD card on the ZC702 and change the position of the boot switches to all ON so that the SoC boots from the SD card.
Connecting the USB serial port shows that PYNQ boots correctly. You may needs to modify the uboot settings so that the uboot can read the rootfs from the second partition of the SD card.
Connect a Ethernet cable from a host computer to the ZC702
Once PYNQ boots up we can connect to it via the host laptop side. Then open a web browser and navigate to pynq:9090. This will bring the default page shown below. The default password for PYNQ is xilinx.
Now that we have booted PYNQ the next step is to test how it operates on the ZC702. Using WinSCP transfer the two files we created earlier on the PYNQ folder.
Testing PYNQ
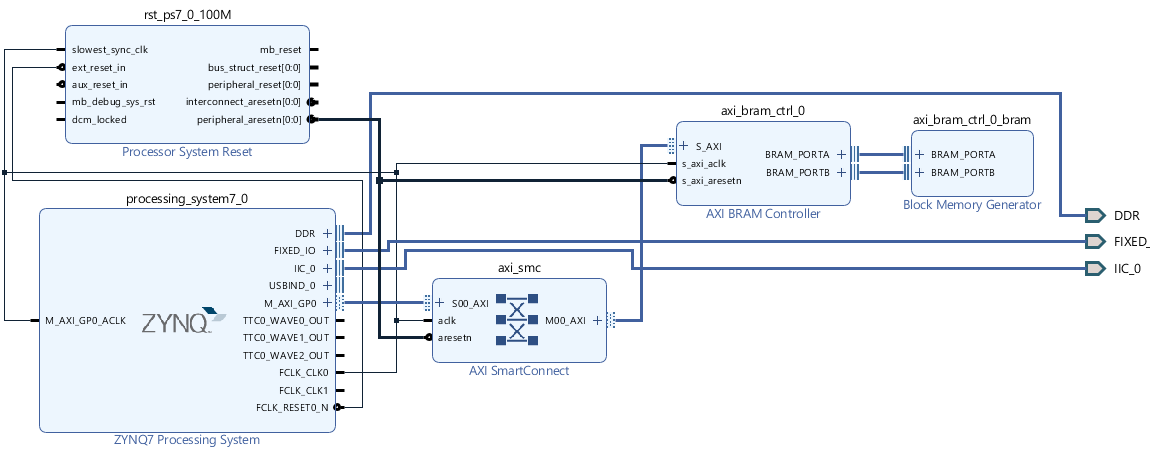
To test the PYNQ framework a custom Vivado design will be tested. The block diagram below shows a BRAM IP connected to the AXI interconnect. The purpose of this is to read and write to BRAM from the PS side.
Copy the folder with the iPython Notebook notebook, the tcl and bitstream files on the ZYNQ via scp and open it by navigating to pynq:9090\ folder location.
First the bitstream is loaded. Then the a number of data are generated and written to the BRAM via a memory mapped call. The data is then confirmed by reading it back and printing it on the Notebook.
Conclusion
This completes the demonstration. In this project we showed how to create a custom PYNQ distribution the easy way by avoiding the complete recompilation of the rootfs. The design was verified by reading and writing data to a BRAM IP.


Comments
Please log in or sign up to comment.