


_ZiWO1urrto.png?auto=compress%2Cformat&w=900&h=675&fit=min)
This post contains instructions to make your own image analyser.
Hardware Requirements- Raspberry Pi
- Camera for Raspberry Pi
- Character LCD
- Jumper wires
- Breadboard
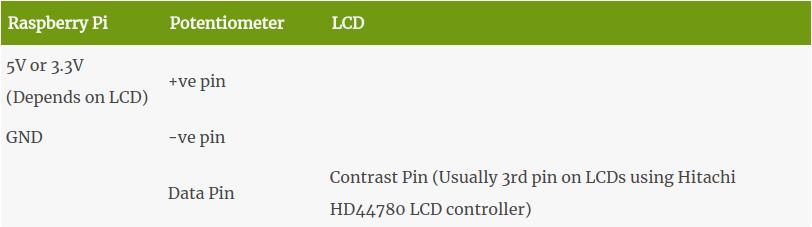
- Potentiometer (If your LCD supports contrast adjustment)
- Button
Please check the Schematics below for wiring diagram.
Software RequirementsWe are going to capture a photo when the button is pressed and then upload that image to Dropbox. We will then get a shareable link from Dropbox and make a Microsoft Computer Vision API call with that photo link. Results returned by API call will be displayed on Character LCD.
Installing the dependenciesAdafruit Python CharLCD libraryGet the LCD library from following Github link.
https://github.com/adafruit/Adafruit_Python_CharLCD
CD to the downloaded folder and run the following command.
sudo python3 setup.py install
sudo pip3 install requests
Login to your dropbox account and create an app to store captured images. You will also need an Access Token. The following links may be of assistance.
https://www.dropbox.com/developers/apps/create
https://blogs.dropbox.com/developers/2014/05/generate-an-access-token-for-your-own-account/
Install dropbox python client library by typing the following command
sudo pip3 install dropbox
You can get a free subscription key by visiting the following link. At the time of writing, Microsoft allows 5000 free transactions per month
https://azure.microsoft.com/en-us/try/cognitive-services/
import RPi.GPIO as GPIO
import picamera
import Adafruit_CharLCD as LCD
import os.path
import time
import requests
import dropbox
import json
Update the subscription_key variable with the key you got before.
subscription_key = 'YOUR_Subscription_KEY'
# URL will be mentioned when you obtain your
url = "https://westcentralus.api.cognitive.microsoft.com/vision/v1.0/analyze"
access_token = 'YOUR_ACCESS_TOKEN'
GPIO.setmode(GPIO.BCM)
btn = 16
GPIO.setup(btn, GPIO.IN, pull_up_down=GPIO.PUD_UP)
Corresponding Raspberry Pi GPIO pins for register select, instruction and data registers on LCD. We will use these variables later to initialize the LCD.
lcd_rs = 4
lcd_en = 17
lcd_d4 = 25
lcd_d5 = 24
lcd_d6 = 23
lcd_d7 = 18
Size of the LCD, If you have a character LCD of 16x2, then modify the lcd_columns variable to 16 and lcd_rows to 2. Since, I used 20x4 LCD, I will use the following values.
lcd_columns = 20
lcd_rows = 4
Initialise Dropbox, LCD and camera by calling the constructor methods provided by Dropbox, Adafruit and picamera libraries. If your LCD supports backlight, then you could pass in an additional parameter of backlight = 1 or backlight = 0 to turn it on or off.
# Initilaize Dropbox
dbx = dropbox.Dropbox(access_token)
# Initialize the LCD using the pins above by calling the construct method of Adafruit LCD library
lcd = LCD.Adafruit_CharLCD(lcd_rs, lcd_en, lcd_d4, lcd_d5, lcd_d6, lcd_d7, lcd_columns, lcd_rows)
# Initialize the camera
cam = picamera.PiCamera()
The main() function is the first function that gets called when program starts. It waits for the button press and when that happens, it calls other functions to capture the image, upload it to dropbox, gets the uploaded image link and then finally calls the predict_contents() function which calls the Vision API and display results on LCD. The main() function is called in last step to perform same steps when user presses the button again.
def main():
  while True:
    cam.capture('image.jpg')
    display_message('Uploading..')
    upload_image()
    display_message('Generating Image', 'link..')
    image_url = get_image_url()
    display_message('Analysing..')
    predict_contents(image_url)
    main()
Each function used here is described below in more detail.
The display_message() functiondisplay_function() function takes advantage of the message() function provided by Adafruit LCD library. You can pass in up to four strings while calling it and it will display each string on a new line. However it will display the message on multiple lines if you only pass in line1 parameter. lcd.clear() will clear any existing text on LCD and lcd.home() will bring the cursor to row 1 and column 1.
def display_message(line1 = '', line2 = '', line3 = '', line4 = ''):
  lcd.clear() # Clear the display
  lcd.home() # Bring cursor to row 1 and column 1
  if(line1 != '' and line2 == '' and line3 == '' and line4 == ''):
    lcd.message(line1)
  else:
    lcd.message(line1 + '\n' + line2 + '\n' + line3 + '\n' + line4)
This piece of code gets the previously captured image in working directory named image.jpg and uploads it to dropbox.
def upload_image():
  remote_file = '/image.jpg'
  f = open(local_file, 'rb')
  dbx.files_upload(f.read(), remote_file, mode=dropbox.files.WriteMode.overwrite)
This function makes a post request to dropbox to get a shareable link of image we uploaded at last step. The result is then converted to JSON. image_url.replace('www', 'dl') converts the https://www.rest-of-the-link to https://dl.rest-of-the-link so that it can be downloaded. This step is necessary otherwise the image opens in the dropbox web app. The access token obtained from dropbox earlier is used here to authenticate the request.
def get_image_url():
  headers = {
    'Authorization': 'Bearer ' + access_token,
    'Content-Type': 'application/json'
  }
  data = {
    "path": "/image.jpg"
  }
  r = requests.post('https://api.dropboxapi.com/2/sharing/create_shared_link', headers=headers, data=json.dumps(data))
  image_url = r.json()['url']
  image_url = image_url.replace('www', 'dl')
  return image_url
This function takes in the previously obtained image link as a parameter and post it to the computer vision API. The subscription key is used to authenticate the request and visualFeatures parameter contains details about what features do we want to analyse in the image. Vision API applies machine learning to identify the image and returns the result. Caption best summaries the image in a single sentence and tags contain information about what features are there in the image. The top 8 most confident tags are displayed after caption on LCD.
def predict_contents(image_url):
  params   = {'visualFeatures': 'Description'}
  data     = {'url': image_url}
  response = requests.post(url, headers=headers, params=params, json=data)
  response.raise_for_status()
  image_desc = response.json()['description']['captions'][0]['text']
  image_tags = response.json()['description']['tags']
  display_message(image_desc)
  time.sleep(5)
  display_message('{}, {},'.format(image_tags[0], image_tags[1]), '{}, {},'.format(image_tags[2], image_tags[3]), '{}, {},'.format(image_tags[4], image_tags[5]), '{}, {}'.format(image_tags[6], image_tags[7]),)
  time.sleep(10)
This is where we call the main() function and display "Program Stopped" when program is stopped.
try:
  main()
finally:
  display_message('Program Stopped.')
Finally, we are at a point to start the program and have some fun taking pictures. https://github.com/dsdilpreet/blog/blob/master/recognize-things-with-raspberry-pi-vision
Download the file from github, open up terminal and cd into the folder where you downloaded the file and run the following command.
python3 app.py
https://dilpreet.dev/blog/recognize-things-with-raspberry-pi's-vision/


Comments
Please log in or sign up to comment.