Since the declaration of the COVID-19 pandemic we have witnessed a warm, wholehearted response from Makers and the Open Source Hardware community worldwide. From 3D printed mask shields to ventilator designs and prototypes, the response from the communities has been exemplary.
I identified that what would complement well the community response would be a touch-less automatic soap dispenser device. We hear very often that the most effective measure against COVID-19 is, apart from social distancing, to wash effectively and often our hands. That inspired my idea to build an Automatic Soap Dispenser.
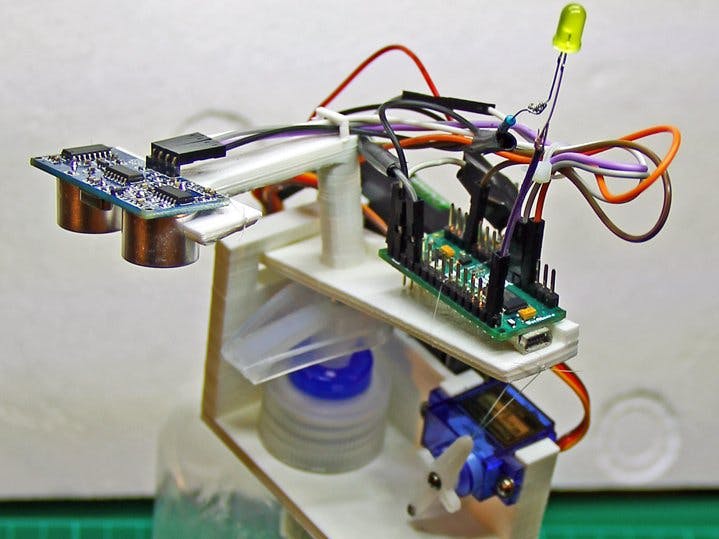
The deviceAn Arduino nano controls the Automatic Soap Dispenser which is triggered by an HC-SR04 Ultrasonic sensor upon detecting the hand under the soap pump. An SG90 stepper motor is used to push the pump by utilizing a lever mechanism and dispense the soap. After the soap dispensing process is completed, a blinking LED timer guides the user to wash the hands for at least 20 seconds - in line with the WHO guidelines. The design can be mounted on the most common soap pump in the market making it easy to re-fill or change the soap bottle. The device was made with 3D printed structural elements for quick, precise and replicable parts.
Design features summary- Touch-less, automatic soap dispensing operation of the pump triggered by an ultra sonic sensor.
- Use of a LED indicator to prompt the user to continue applying soap on his/her hands for 20 seconds rubbing them thoroughly before starting to wash with water, as the World Health Organisation recommends.
- Ability to mount on the most common soap pump in the market to allow for easy bottle refill/exchange.
- Use of 3D printable materials and design geometry that allows users to replicate the design locally.
- Use of cost effective electronics and motors as is the arduino nano or the SG90 servo motor.
- Device is power grid independent using the most common AA type batteries.
- Alternative program for dish washing liquids
- ON/OFF switch
Start by 3D printing the device basic structural elements. Use of PLA filament material is recommended but ABS would do also. You can download them here:
https://www.thingiverse.com/thing:4292022
Take the ASD_base and mount it on the soap bottle after removing the soap pump. Ensure it fits or trim the hole if needed. I have created the stl model with embedded tolerance to allow for a good fit when produced on an average 3D printer. Mount the soap pump and ensure all looks smooth. Remove the pump and the ASD_base from the bottle for further operations.
Take the SG90 servo motor and use the "cross" shaped arm. Mount it on the motor using the smallest screw that accompanies the motor set. Mount the SG90 servo motor on the ASD_base at the fork position and mark its position on the ASD_base through its mounting holes. Then remove the SG90 servo motor and drill the pads using an 1.5 mm drill bit for pilot hole. Re-mount the SG90 in position and use the two bigger mounting screws that accompany the motor in order to form threaded holes and stabilize the motor in its final position on the ASD_base. Ensure you mount the motor at the orientations that will allow the outer section of the arm to move 180 degrees on the vertical direction. Mount the whole sub-assembly on the bottle and fit again the pump. Your assembly should like the image below.
Take the ASD_lever component, mount the ultrasonic sensor and mark its position. Remove the U/S sensor and using the 1.5 mm drill bit open two clearance holes. Remount the U/S sensor and using the fish wire stabilize it in position. Stabilize the ASD_lever so that the U/S holder is in upright position and using a 3.2 mm drill bit drill carefully along the main holder axis. Ensure eccentricity of the hole. Make a pilot hole for guidance.
Screw the 12mm M4x0.5 bolt all the way in, leaving it protruding about 6 mm. This bolt is used to calibrate the pump flow. Feel free to experiment and adjust it for variable pump dosing.
Assemble the ASD structure by slotting the ASD_lever element into the top rectangular hole of the ASD_base. Get the fish wire through the ASD_lever end hole and around the SG90 servo motor arm. I found that using the 3rd hole from the rotor center gives the best torque results. Feel free to experiment here also and get a desiring pump calibration. Test the pump operation manually to ensure smooth lever function. You can see the assembly so far in the photo below.
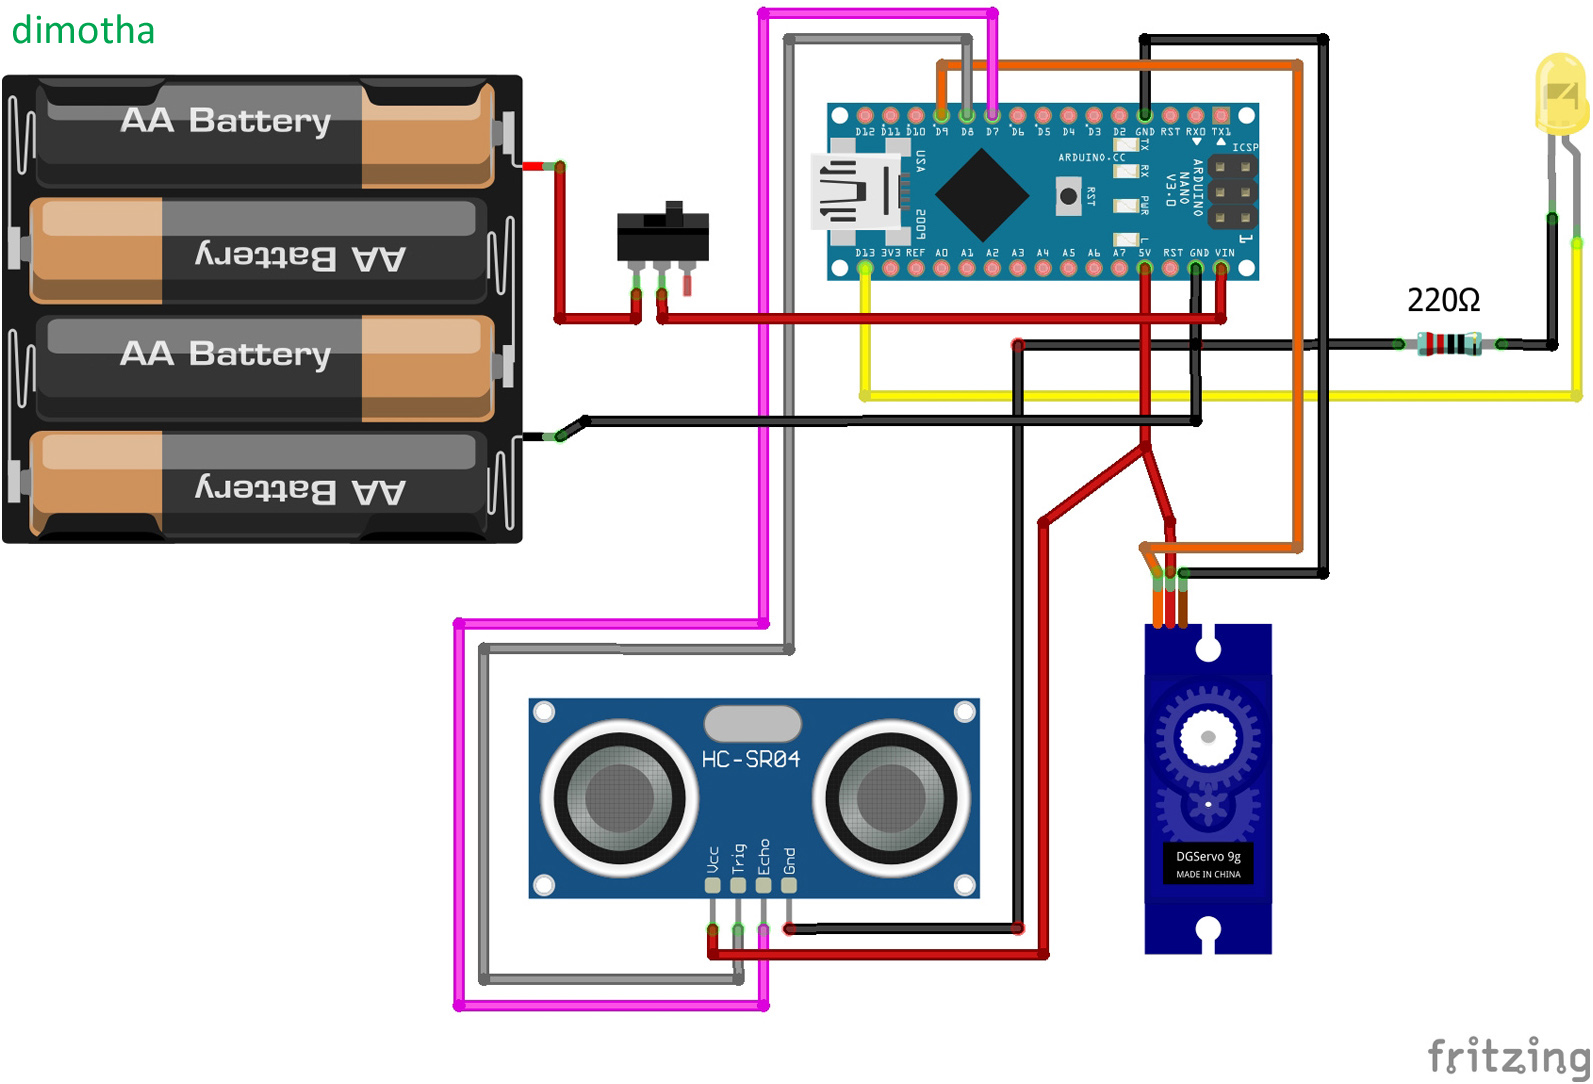
The very next thing would be to connect the Arduino nano with the SG90 servo motor and the U/S sensor. Use the corresponding part of the full connectivity diagram below to make this.
Now that we established the basic mechanism connected to the Arduino nano micro-controller, we will load the hand washing program to validate the correct operation of the mechanism. If you are an expert, I recommend you comment the relevant lines to allow for shorter execution times and speed up debugging/micro-tuning.
The hand washing program The hand washing program will trigger the soap dispensing sequence upon trigger from the Ultra-Sonic sensor. To trigger the U/S sensor the hand needs to be in a distance less than 7 cm from it. Upon trigger the servo motor will pull & release the lever 10 times for equal amount of soap dosing. After the dosing sequence is completed the LED will blink for 20 seconds to prompt the time advised for hand washing.
You can download the Arduino source code file here: Automatic_soap_dispenser_hands.ino
(on the same repository you can find Automatic_soap_dispenser_washliquid.ino which can be used for dish washing liquid)
When you arrive at this point, the mechanism and the program work well. You may need to do some dosing tuning by adjusting the M4 bolt at the bottom of the lever.
As a next step you will mount the 4xAA battery holder on the rear of the ASD_base using one 6mm M3x0.5 bolt. I recommend marking the surface and doing a pilot drill with the 1.5 mm drill bit first. Connect the remaining jump wires and also solder the mini SPDT slide switch between the battery holder positive pole and the Arduino nano Vin pin. This is the device ON/OFF switch. Supplying voltage via the 5V or 3.3V pins bypasses the regulator, and can damage your board so ensure you will be using rechargeable batteries with net output close to 5V.
Fix the LED on the top position and use a resistor of 220Ω. This is required as the Arduino will operate at 5V and this will burn your LED without an appropriate resistor.
Conclude the assembly by grouping the jump wires and affixing them with the cable strips. I affixed the Arduino nano on the ASD_lever by using some of the fishing nylon wire.
Your Automatic Soap Dispenser is ready. Turn the switch ON and enjoy!
Documentation & more projectsAll project details, 3D models, schematics and assembly guides can be also found along with other 3D printing and Arduino projects on my personal blog dimotha.wordpress.com for the benefit of the open source and wider communities. I am sure you will make some good use of it :)


Comments
Please log in or sign up to comment.