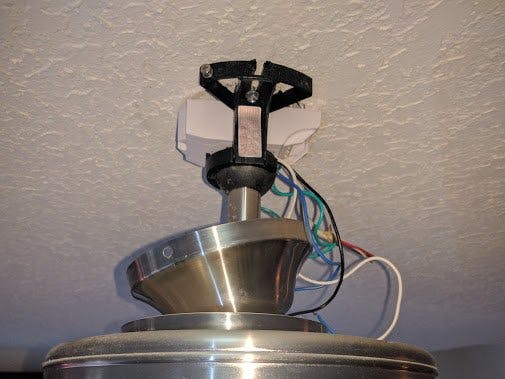
When Amazon announced the Echo Dot 2.0 at $50, I was ready to give Alexa a try. Since my young children were not tall enough to pull the chains on their ceiling fan, I typically ended up having to turn on or off their light or fan for them. After some research, I found https://github.com/arendst/Sonoff-MQTT-OTA-Arduino, which could turn an inexpensive https://www.itead.cc/sonoff-dual.html into a pair of Alexa controllable relays (one for the light, the other for the fan).
Verify sonoff worksI wanted to make sure the sonoff worked before hacking it. I installed the default EWeLink app on my phone and iPad. Unfortunately, it does require you to sign up. I then cutt a two conductor indoor extension cord in half, and connecting the sonoff in the middle. Then plugging in a desk lamp to it. Extension cords vary by country/region. In the United States, we have polarized plugs. The narrow lead is 'hot', and the wider lead is 'neutral'. I would recommend following that when connecting the sonoff. I have a digital multimeter that checks continuity.
Download firmware codeWhen I originally started, the sonoff didn't support the Amazon echo. They now advertise that works now out of the box. If you are happy with their implementation, jump down to the "connect to fan" section. I would still prefer to be in control of the software running in my connected home. I want the freedoms provided by free/open source, not just $0.00 to download the code.
If you want what I installed, then open a command line, and:
git clone -b dual-wemo
However, you may want to start with the 'upstream' (latest and greatest from the 'community')
git clone https://github.com/arendst/Sonoff-Tasmota.git
Alternately, you can download a zip from https://codeload.github.com/don-willingham/Sonoff-MQTT-OTA-Arduino/zip/dual-wemo or https://codeload.github.com/arendst/Sonoff-Tasmota/zip/master, respectively.
Compile firmwareI used the project's wiki as a guide. I used 1.8.0 of the Arduino IDE. Sparkfun's ESP8266 Thing Hookup Guide helped me get the Arduino IDE configured for the ESP8266. You will also need to install the pubsubclient.
Open sonoff\sonoff.ino in the Arduino IDE, ensure you have installed and configured for the Generic ESP8266 module. Edit user_config.h, and set STA_SSID1 and STA_PASS1 with your WiFi credentials. Then 'Export compiled Binary' under the Sketch menu in the Arduino IDE. You should now have a file named sonoff.ino.generic.bin in the sonoff subdirectory.
Also ensure, the esptool is installed. I run Fedora Linux, so it's as easy as
dnf install esptool
Ensure the sonoff is disconnected from AC/mains power. Completely remove it from the extension cord.
Uploading the firmware is where I struggled the most. Although my USB/FTDI adapter supports the correct 3.3v, it may not supply enough current. I didn't have a 3.3v regulator, but I did have a Raspberry Pi. So with a solderless breadboard, I hooked up the ground of the Pi, to the ground, of the FTDI to the 'test probes' to jam into the ground solder pad on the sonoff. Feel free to solder the headers onto the sonoff instead. Then connect the 3.3v power from the FTD and Pi together onto a different bus on the breadboard. Plug another test probe into the sonoff, but don't connect it to the 3.3v bus of the breadboard yet. Connect the TX from the FTDI to the RX of the Sonoff, and the RX from the FTDI to the TX of the Sonoff. Transmits connect to receive, and vice versa. To get the ESP8266 into Flash Mode, you need to ground GPIO0 while applying power. Once it's in flash mode, GPIO0 doesn't need to remain grounded. Then you can:
esptool read_mac
or
esptool flash_id
Which should provide the MAC address, and information on the flash memory chip. If those work, try flashing the firmware.
esptool --baud 921600 write_flash 0x0 sonoff.ino.generic.bin
This often failed, way more often without the additional 3.3v power. If download progress stalls, try again. Disconnect 3.3v power from the sonoff, ground GPIO0, apply power, and try again. I experimented with different baud rates, and different versions of the esptool.
Test new firmwareOnce it succeeds, keep it disconnected from AC/mains power, and ensure you can connect to it with a web browser (eg http://192.168.x.y). You may need to connect to your WiFi router to find it's IP address. If you can configure a DHCP reservation, I would recommend it. You should be able to toggle the relays, and hear them click. You should also be able to upload the firmware 'Over the air' now using a web browser instead of the FTDI serial interface.
Test with lamp with new firmwareNow that you have your own firmware loaded, disconnect the FTDI and additional 3.3v power. Install Sonoff in the extension cord again. Try toggling the relays now with a lamp. Use the Amazon Alexa app to search for smart home devices. Once found, name it accordingly.
Connect to fanOnce you're confident everything is good, it's time to install in the ceiling fan. Ensure you switch off the circuit breaker supplying power to your ceiling fan. I connected as follows:
- IN <- Black (house)
- Neutral <- White (house)
- Neutral -> N/C
- Neutral -> White (to fan)
- OUT -> Blue (to fan)
- OUT -> Black (to fan)
Don't make everything nice and neat until you're sure it works. Turn the breaker back on, and ensure the ceiling fans original pull chains are in the on position, try to control with Alexa and a web browser. Once complete, ensure the sonoff fits in the space above the fan. I had to trim away some of the plastic case to get it to fit.


_3u05Tpwasz.png?auto=compress%2Cformat&w=40&h=40&fit=fillmax&bg=fff&dpr=2)
Comments
Please log in or sign up to comment.