Wake up, open your phone to snooze your alarm, open up Blynk, press one button and BAM coffee starts brewing. For most Americans its not this easy. They have to walk all the way downstairs in to the kitchen or common room to start their coffee. Normally this happens after they've gotten ready for the day, which makes brewing coffee a tedious and time consuming task in a morning routine. Well not any more! With this set up your coffee will brew while you undertake the other rigorous early morning routines, so when you're ready to head out the door a warm (not scorching, but definitely not cold) cup of joe is ready to go!
If the convenient start up of a coffee pot would speed your morning routine up or be convenient for you at all, use these guidelines and the provided code to create your own Coffee Starter using Blynk.
Set-Up:
The picture above shows the inner-workings of the MainStays Coffee Maker purchased at Walmart for about $9. We cut the red wire, which supplied energy to the heater in the coffee maker. A separate wire provides energy to the pump, but the circuit connects all the wires together so cutting just the red wire gives control over the whole coffee maker. Both ends of the cut red wire were then stripped, attached to longer wires and sent out of the back of the coffee maker. Then, we put a sealed temperature sensor next to the heating coil, which is connected to the second photon. The temperature sensor is used to log the temperature as well help a photon signal to a second photon to start a timer that will eventually turn off the coffee maker.
The picture above shows the two wires mentioned above attached to our two channel relay (only one channel is necessary) and the circuit used to control the relay.
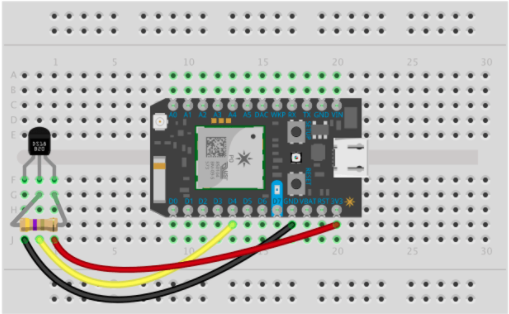
The picture above shows the temperature sensor wires connected to the second photon.
The temperature probe put in the coffee maker is read using code taken off a tutorial on the particle website and sent from the photon to the cloud under the event name of "coffeetemp". This data is sent from the photon to the cloud live on the particle website, which is pictured above. Then, the data was sent from the proton, through IFTTT to a google doc, which makes the data easily accessible and graph-able. The relevant data was graphed and shown below.


Comments
Please log in or sign up to comment.