

Hardware components | ||||||
_wzec989qrF.jpg?auto=compress%2Cformat&w=48&h=48&fit=fill&bg=ffffff) |
| × | 1 | |||
| × | 1 | ||||
| × | 1 | ||||
| × | 1 | ||||
| × | 1 | ||||
| × | 1 | ||||
Software apps and online services | ||||||
 |
| |||||
| ||||||
Hand tools and fabrication machines | ||||||
 |
| |||||
 |
| |||||
Hardware construction for this project is very easy. An Arduino Mega and a 7 inch Nextion display are the main components! But the software development can be as challenging as you want to make it. I have developed three games using this platform, and they are included as the software download. But my hope here is to get a few others to write game software for this platform, so that we can exchange software, and build a game library for it.
There are two software components to any game created for this platform - a graphical user interface (GUI) file for the Nextion and an Arduino sketch where you construct the game’s operation and logic.
The three games I am presenting here are Tic-Tac-Toe, Dots and Boxes, and Simon.
Everyone knows Tic-Tac-Toe. It can be made so that the computer is unbeatable, but I left out a couple of steps leaving a door open for the player to win.
Dots and Boxes is another game like Tic-Tac-Toe where you play against the computer. When you connect the dots and form a box, you get a point and another turn. Whoever gets the most boxes wins. The computer in this case is a good player, but it can be beat.
Simon is exactly like Hasbro’s memory challenge game of the same name. I used an image of the Simon game, so it looks and works just like it.
In a separate project, Arduino Game Console Part 2, I will show your two card games I have also developed for this platform: Blackjack and Five Card Draw Poker.
We will discuss each game in more detail later. In addition to the separate software for each game in the download, there is also a combination of the first three games in one app called Arcade.
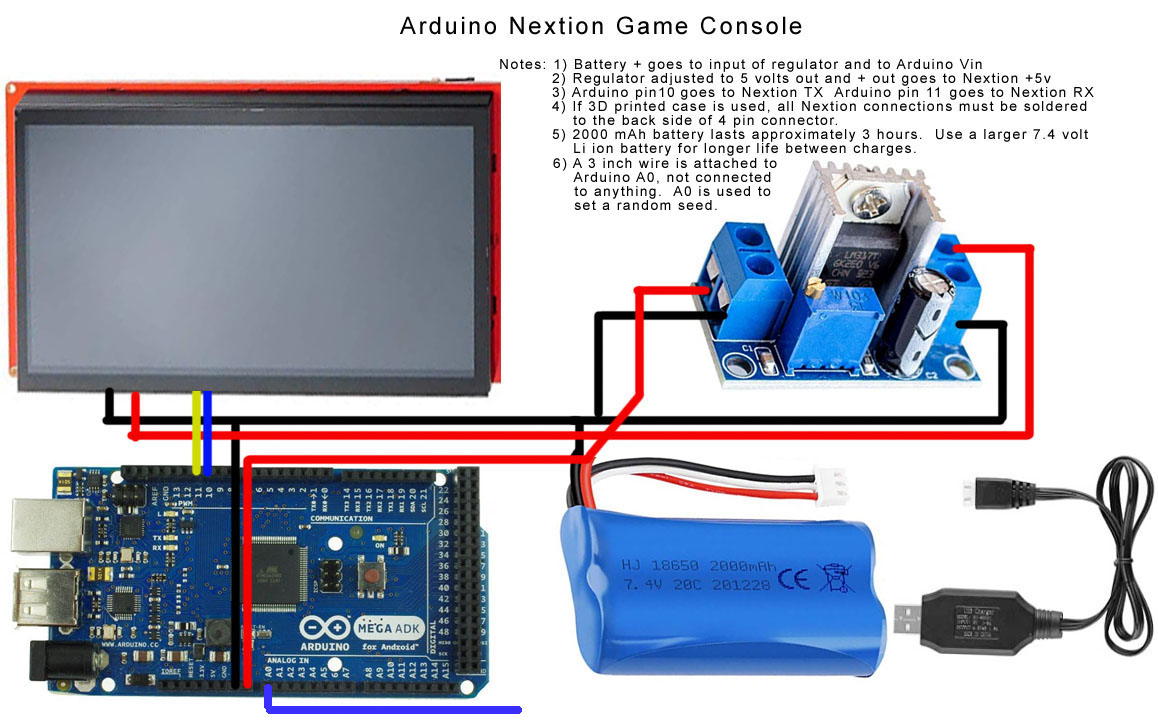
HardwareTo create a portable game console, in addition to the Arduino Mega and Nextion display, I added a 7.4 volt lithium ion battery, a switch, and a voltage regulator. The 2000 mAh battery lasts about 3 hours between charges. The schematic later on shows you how its wired up. The Arduino can run directly off the battery through the Vin pin, but the Nextion requires 5 volts. There are many ways to get the 5 volts, although the 5 volt pin on the Arduino is not one of them. The Nextion comes with several warnings that the Arduino can't handle Nextion's current requirements. I chose an LM317 variable voltage regulator module since I had one available. You just have to set the output voltage to 5 volts as it is a variable voltage regulator.
I have also included files for a 3D printed case, though you could probably make one out of plastic or light plywood if you don't have access to a 3D printer. Here are some photos of construction detail:
The picture above shows a couple of important things. The board comes with a nice 4 pin connector, but it plugs into the side. My 3D printed case didn't allow any room for that connector, so I soldered 4 wires directly to the backside of the connector. Also, it is important to note that Nextion's TX goes to Arduino RX (pin10) and Nextion's RX goes to Arduino's TX (pin11). We are using software serial here, so as not to tie up hardware serial pins 0, 1 which are used for programming the Arduino.
Both the charger plug and the Arduino Mega are held in place with large amounts of hot glue!
The empty case shown above actually went through a couple of iterations before I got it to accommodate all the stuff at the edges of the Nextion display.
Programming the Arduino is obviously done through the USB port, but the Nextion GUI file needs to be loaded onto a micro SD card and inserted in the slot on the back side of the Nextion. Just turning the Nextion on with an SD card in place causes the file to install. The SD card can then be removed for normal use.
One final note regarding hardware: I use analog input A0 on the Arduino to get a random value with which to set a random seed, since all these games use random numbers. To get a good random analog input, I attach a 3 inch wire to A0. It doesn't attach to anything. It's just an antenna to pick up stray electrical noise.
Working with NextionI didn’t specifically look for a Nextion display at the start of this project. I was simply looking for a large LCD screen I could use with an Arduino. Nextion is a lot more than just a LCD touch screen. It has its own processor, its own operating system, an application to design a graphical user interface, and a command language you can use from the Arduino to configure and control it.
Most projects I have seen here using Nextion treat it as just a tool they used for the user interface. I am going to attempt to delve a little deeper into what Nextion really is, as it became a critical piece of this project.
Nextion displays are intended to provide the human-machine interface for just about anything, but seem especially aimed at industrial control applications, i.e. a touch screen full for buttons you can use to control industrial machinery. In my opinion, it wasn’t particularly designed with hobbyists in mind, so it takes a little getting used to.
Building a project with Arduino and Nextion involves two very distinct and different steps – 1) using the Nextion Editor to create a graphical user interface or GUI, 2) developing an Arduino application that interacts with that user interface.
The Nextion Editor is the application on which you build the GUI. A lot of stuff can be done directly from the Nextion Editor. You can create buttons; you can assign colors to them, text, new colors when pushed, etc. You can create fonts, you can add pictures, even video or audio. You can create menus and various pages. If that all sounds familiar, it probably should, because it is almost exactly like building a website.
In fact, speaking of websites, the design and behavior of the Nextion system is very similar to a particular web technology platform: ASP.NET (Active Server Pages). In this case, Nextion is acting like your web browser running on your own computer, and the Arduino is acting like a remote server, taking action and responding to changes at the user interface, and then communicating them back to the Nextion.
The Nextion Editor is a very nice application! It is easy to learn and very powerful. It even has a simulator / debugger which simulates the Nextion display and allows you to test the user interfaces you create without the need to download it to the actual Nextion display.
Communication between Nextion and Arduino is accomplished in both directions with a simple serial connection. The protocol and command structure for this communication is Nextion’s own language. There is nothing complicated about it, but there are many different commands and a new language to learn! Several Arduino libraries are available which try to bridge the gap and handle all of Nextion’s commands. I am not sure any of them are particularly successful at that. Several articles I’ve read suggest the most straight forward approach is to skip the libraries all together and learn the Nextion language.
After looking at the various libraries and a lot of Nextion’s somewhat bewildering documentation, I ended up using Neo Nextion. It is a full featured library, with all the features of the official Nextion library, but comes with a lot of good examples and better documentation in general than the official one. But even with this library, it takes some time to figure out what you are doing on the Arduino side.
The basic idea with Nextion is that objects (like buttons, image boxes, pages, text boxes, etc.) in the user interface have properties, some of which can only be set by the Nextion Editor, but most of which can be set and changed from the Arduino. So, for example, I can change a picture in an image box or change the color of a button from the Arduino. So to build a game with this scheme, we create the user interface with the Nextion Editor, and we program the game’s logic with the Arduino.
Nextion identifies each interface object by both a name and ID number. Some commands use an object’s name; others use its ID. The libraries like Neo Nextion allow you to use only the name of an object for consistency. (One criticism I would make of the Nextion Editor is that if you delete an object, like a button for example, it changes the ID numbers of many of the other objects on the page – not a good idea – it really messes up your Arduino sketch!)
One other issue worth mentioning about all these libraries is that they implement a subset of the full Nextion control language. For example, Nextion supports images on buttons that can be changed dynamically. But the Neo Nextion library doesn’t support image buttons, so I had no way to control the image on a button from the Arduino.
I will finish this discussion of Nextion with a really quick overview of how the Arduino interacts with a button on the Nextion. Understanding that will go a long way toward understanding the Arduino code that is used with Nextion. First, on the Nextion side, the button has to be configured to send its ID to the Arduino, either when it’s pushed, when it’s released, or both. On the Arduino side, we need to set up an instance of the button in Neo Nextion and a “callback” which links the button to the routine that is executed when the button is pushed (or released). We also need to create the actual routine that will be executed. Then, in Arduino’s Setup, we need to send a “callback” instruction back to Nextion that gives Nextion the address of our “callback” routine. Finally, the only thing allowed in Arduino’s main loop is Nextion’s button polling routine. Everything else is built into the “callback” responses to button’s being pushed!
It all seems a bit confusing the first time you set up a button, but every button is the same, so creating a bunch of buttons is mostly a “copy and paste” exercise. And Neo Nextion has a bunch of great examples which show you how to do buttons and a whole lot more.
SoftwareAs we have already said, there are two pieces to the software: 1) creating a graphical user interface with the Nextion Editor, and 2) creating an Arduino sketch to generate all the game logic and responses to the user interface.
In the software download, I have included the Arduino sketch and the Nextion GUI file for each game individually and for the "arcade" combo of three games. If you just want to recreate what I have done, just use these files. The GUI file (.tft), by the way, needs to be downloaded to the Nextion via a microSD card. If you want to create your own games for this hardware, read on...
The Nextion Editor is easy to use and well documented, so I won’t spend a lot of time here explaining it. You need to select the specific Nextion display - ours is the 7 inch, Intelligent with Capacitive touch, and operating in Horizontal 0 mode. You drag buttons and image boxes from the toolkit to the active screen and configure them in the properties window. At the bottom of the app you can enable the actions of a button. One action is to send that object's ID to the Arduino, which you must enable if you want Arduino to respond. Actions you want Nextion to do on its own, like changing pages or changing a picture in a picture box need to be specified in the actions window. The actions are almost intuitive in most cases, like "page 1" to switch to page 1 or "p0.pic=3" to change the picture in picture box 0 to image number 3. You can refer to the Nextion instruction set for more information on these commands. The Nextion Editor has is own debugger where you can run your newly created user interface and test how it works - a really nice feature.
One detail I should mention at this point is matching the serial communication baud rate of the Nextion and Arduino. Nextion is set by default to 9600, but that's pretty slow. Each of my Nextion files sets the baud rate. (It is set by a pre-initiation action with a command like "bauds = 38400") The matching Arduino file is set to the same baud rate in Setup(). Everything I have done here is at baud 38400.
I used the higher baud rate in an attempt to speed up Nextion's reactions to changes I made on the Arduino. While it helped a little bit, it didn't do nearly as much as I would have thought. Apparently most of the perceived delay is a result of waiting for Nextion to acknowledge successful receipt of a request. This means we are sometimes waiting for buttons to become active.
Programming the Arduino to work with Nextion is not particularly intuitive but Neo Nextion has good examples to get you started. The Neo Nextion library seems to require a lot of initial code to get it started. "Includes" must be added for each part of the library you want to use, and every graphical object needs to be declared in Neo Nextion before it can be interacted with. Callbacks must contain the routines you want buttons to execute, and their addresses must be communicated to Nextion. Everything happens in the callback routines. The main loop doesn’t do anything except poll the buttons for activity.
If you want to use my Arduino sketches to get you started, I suggest using one of the individual games. The arcade with three games gets pretty complicated.
Tic Tac ToeThis was the first game I tackled. The grid is a background image and there is a large button filling each square. A very large font (144 pixel high) forms the Xs and Os inside those buttons.
The Arduino sketch basically has two parts: 1) interfacing with the Nextion buttons and 2) the logic required to actually play Tic Tac Toe.
The game logic tries to accomplish the following steps in order
- Block opponents win
- Create a fork where you can win two ways
- Block your opponent from creating a fork
- Take the opposite corner
- Take the center square
- Take any empty corner
- Take a middle square
If the above is all implemented, the computer cannot be beat. I left out the 2nd and 3rd steps (they are there in the code, but empty) involving forks on purpose to make it possible to beat the computer. It is still not easy to beat. There are just a couple of very specific sequences where you can beat the computer. Here is one:
The Nextion helps create nice graphics for the game. Images are used for the game title and the win, lose, tie graphics and can easily be turned on or off or switched under Arduino control.
SimonSimon is a simple memory test. It was the easiest of the four games to create, but very pleasing visually because it looks exactly like the real physical Simon game.
It is all done by swapping images. The sequence is generated at random and repeated over and over, each time adding one more to the sequence. Works exactly like its physical counterpart.
Dots and BoxesThis game is pretty simple. If you are not familiar with it, you can go online and see various online versions. (Or your children can probably teach you how to play!) I didn’t expect it to be a big challenge either from the user interface on Nextion or from the game logic on Arduino. But it was a tremendous challenge compared with Tic -Tac-Toe or the Simon game.
The first issue was the user interface. There are 30 vertical gates and 30 horizontal gates on our 5 x 5 game grid. That’s 60 buttons. The 25 cells each need to be colored green or red when taken by the player or computer respectively. I used the background color of empty text boxes so that’s 25 text boxes. Then there is an image box for the grid of dots, a start button, another image box to show the game title, a win image, a lose image, two number boxes to show scores, and one more text box to label the scores. That is a lot of graphical objects to create and configure with the Nextion Editor. And each one has a unique ID number and a unique name.
The Arduino code was a challenge as well. For one thing, each graphical object has a name and the names can include their position on the grid, but the names cannot be indexed. We can use an indexed array to define the status of each box (which sides are closed, how many sides are closed) but to translate that index to a particular object requires a subroutine that specifically makes the translation - one object at a time!
Each step in the Arduino code required to set up and configure a button has to be repeated 60 times. And since they can’t be indexed, that’s 60 lines of code for each step. Not a big deal, but a lot of copy and paste!
Game logic was not particularly easy either. Closing a particular gate causes several things to happen. We must first see that is was not previously closed. It then causes the side of the box on either side of it to be closed (above and below it in the case of the horizontal gates). Then we have to look to see if that gate closure resulted in either of those boxes being completely closed and claimed by either the player or the computer. All of that is true whether the player or the computer moves.
How the computer decides where to move is another set of issues. It first tries to close any box it can and claim that box, for which it gets another turn. When that can’t happen, it tries to find a box which doesn’t have two side closed already, as picking a gate next to one with two sides already closed would set it up the player to close it and claim that box. If that fails too, it picks from the remaining gates at random. That’s all it takes for the computer to be a very good player, but it takes looking at a lot of gates and the status of a lot of boxes to implement that relatively simple strategy.
The bottom line is Dots & Boxes was much harder to build and program than either Tic-Tac-Toe or Simon!
What's NextAs I said earlier, in Part 2, I will present additional software for this platform for two card games: Blackjack, and Five Card Draw poker. I am hoping someone else will build this game console and create some new games that we can share. Other ideas could include Texas Holdem, Hearts. Checkers, or any two person board game.


Comments