


Hardware components | ||||||
 |
| × | 1 | |||
Software apps and online services | ||||||
 |
| |||||
 |
| |||||
 |
| |||||
The holiday season is officially upon us and you’re running out of time to get gifts! You want something thoughtful and personal but are coming up empty on ideas. And really, what says “I care about you” more than a home-made, personalized IoT solution!?
Ok, ok, that type of gift probably isn’t perfect for everyone. But it doesn’t change the fact that you can create a simple and totally custom idea quickly and cheaply using some basic hardware and an instance of nio. Best of all, you can build all of this without needing to be a professional software developer, no code required!
For this blog post, we’ll make use of the Amazon AWS IoT Button for our hardware. These are Wi-Fi enabled buttons that are available for $15 and can arrive as soon as next-day from Amazon. While it may sound simple, the versatility that a button like this provides when it’s backed by a platform like nio can actually be quite impressive.
The use case we’ll be detailing in this post will be a “litter box reminder” application. Any cat owner knows how often the question “when’s the last time we cleaned the box?” gets asked. We’ll use the button and nio to help answer that question and also remind us when it’s time to clean the box next.
While the post will walk through how to build this specific application, there are many similar ones that can be built using the same hardware and nio. You could press the button when you water the plants and set up a reminder for that. You could press the button to send a text to that special someone telling them you’re thinking about them. You could press the button to log diaper changes or to turn on your internet-connected light bulbs. There are tons of ideas, but enough brainstorming, let’s get started!
If you’re more of a video person, the following 15 minute screencast will walk you through these steps and show you how it’s done:
Set Up the AWS Button
First things first, you’re going to need an AWS IoT Button and an AWS account. You can buy a button from Amazon and you can sign up for AWS here. Once you have an account, follow these steps to get the button set up. You can also follow the Amazon guide at this link: https://docs.aws.amazon.com/iot/latest/developerguide/iot-gs.html.
- Sign in to the AWS Console and go to the IoT Services page
- Register your button by clicking “Manage” from the left menu and then the “Create” button
- Click “Create a Single Thing”
- Name your button and then click Next
- Click “Create Certificate” and save the public key, private key, and certificate, you’ll need these later. Then click “Activate” to activate the cert, then click “Attach Policy”
- Select the IoT Device policy or if one does not exist create one that allows the “iot:*” actions on all (“*”) resources
- Click on the newly created “thing”, then select “Interact” from the left menu. Record the REST API Endpoint URL, you will need this later. It will look something like this: “xxxxxxxxxxxx-ats.iot.us-east-1.amazonaws.com”
You’ve registered your button with AWS, now it’s time to configure it for your Wi-Fi network. You’re going to change Wi-Fi networks to perform this, so make sure you have your certificates and the API URL saved from above before proceeding.
- Hold down the button on the device for a few seconds until it starts blinking blue
- Join the Wi-Fi network the button creates, it will look like “ConfigureMe - XXX”. The password is the last 8 characters of the serial number of the device (on the back)
- Navigate to http://192.168.0.1/index.html
- Enter your Wi-Fi credentials that the device will use to connect
- Provide the certificate and private key you downloaded earlier from the AWS console
- Provide the AWS region and subdomain from the API URL you recorded earlier. If your endpoint subdomain ends in “-ats” you can omit that from the subdomain. For example, if your API URL was “abcabcabc-ats.iot.us-east-1.amazonaws.com” your region is “us-east-1” and your subdomain is “abcabcabc”.
- Click “Configure” and your button is ready to go!
- You can test your device from the AWS Console’s “Test” portal. Follow the instructions here for details.
The button is ready to go, let’s connect it to nio! If you haven’t already, sign up for a nio account here: https://account.n.io/signup. You will need a local instance of nio for this tutorial (a managed cloud instance won’t work as we need to access the file system). Create that local instance if you don’t have one already by following the documentation here: https://docs.n.io/installation/nio/.
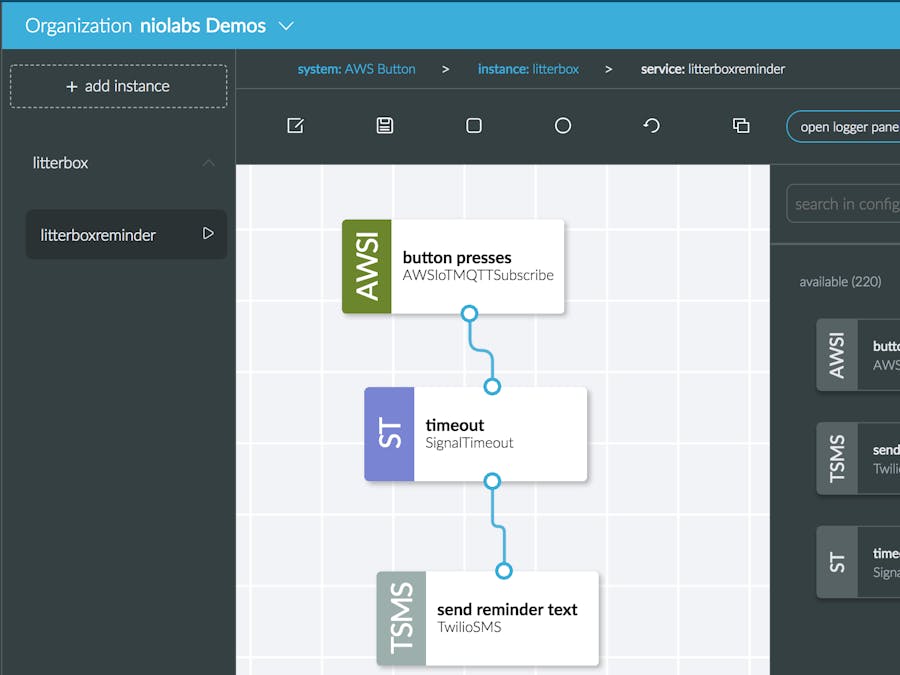
We’re going to use the AWSIoTMQTTSubscribe block to connect to AWS over MQTT and listen for button presses. Install the block and drag it on to a new service.
Drag the AWSIoTMQTTSubscribe block on to a service canvas on the nio System Designer. Configure it like so, if you changed any filenames in steps 1 or 2 adjust them here.
- AWS Credentials: leave blank, these are not needed for MQTT
- Certificate Path: [[PROJECT_ROOT]]/etc/certificate.pem
- Private Key Path: [[PROJECT_ROOT]]/etc/private_key.pem
- IoT Root CA Location: [[PROJECT_ROOT]]/etc/root_ca.pem
- MQTT Host: abcabcabc.iot.us-east-1.amazonaws.com (make sure to ignore the “-ats” if you use the Verisign root cert)
- MQTT Port: 8883
- Topic: iotbutton/+
- Copy the private key and certificate you downloaded from the AWS Console earlier to the nio project’s “etc” folder to “private_key.pem” and “certificate.pem” respectively.
- You will also need the root certificates for AWS. You can find those here. Download the Verisign root certificate and save it to the nio project’s “etc” folder as “root_ca.pem”.
- Connect a logger to the output of the block and start the service. Press the button and observe the information about the button press in the nio logs!
For the “litter box tracker” use case, we will press the button every time we clean the litter box. If no button gets pressed after a few days we will send a text message using Twilio to remind us that it’s time to clean the box. You will need a Twilio account (sign up for free here: https://www.twilio.com/try-twilio) and API keys to make this happen.
Add a SignalTimeout block to the output of the MQTT block. This block emits a signal if no signal is received in a certain amount of time. This is useful for detecting if streams run dry or if a device stops reporting. For this use case we’ll use it to tell if we haven’t cleaned the litter box in a while! Configure it like so:
- Add a “Timeout Interval” to the block
- Set minutes to 5 for testing, eventually we will set this to 2 days, or whatever we want the litter box cleaning interval to be.
- Leave “Repeatable” unchecked - if we checked this it would remind us every 5 minutes, we only want 1 reminder.
Add a TwilioSMS block to the canvas and configure it like so:Recipients: add new recipient
- Name: Your name
- Number: Your phone number
- SID: Your Twilio account SID (find this on your Twilio console)
- Token: Your Twilio auth token (find this on your Twilio console)
- From: Your Twilio phone number. This is the number the text message will be from, find this on your Twilio phone numbers page
- Message: It’s time to clean the litter box!
- Use the AWSIoTMQTTSubscribe block you configured in the previous steps
- Connect the blocks and start the service! Press the button, after 5 minutes you should get a text reminding you to clean the litter box. If that works, change the timeout on the SignalTimeout block to 2 days and restart the service. You officially have a litter box cleaning reminder running!
This is just one build idea that is made possible with a flexible software platform like nio and easy-to-use hardware like the AWS IoT Button. We can take this idea further and further just as easily. Here are some ideas on how to enhance this already useful workflow:
- Use the IoT button’s double press and long press features to distinguish who cleaned the litter box. If I clean the box I can double click the button, but if my wife cleans it she only clicks it once.
- Create a “scoreboard” of who cleans the litter box more. Who doesn’t like some friendly competition?
- When sending a reminder, notify the person who hasn’t cleaned the box in the longest time.
- Turn my Philips Hue bulb to red if the box needs to be cleaned in addition to texting me
If you ran into any trouble completing these steps feel free to reach out to nio support by clicking the blue chat icon on the System Designer. We are always happy to help troubleshoot, hear your build ideas, and brainstorm new ones. Don’t be shy!
Happy building!
About the AuthorFollow Matt Dodge on Twitter and Github to keep up with his latest development projects at niolabs.


Comments