


Hardware components | ||||||
 |
| × | 1 | |||
 |
| × | 1 | |||
 |
| × | 1 | |||
 |
| × | 1 | |||
 |
| × | 1 | |||
| × | 1 | ||||
 |
| × | 1 | |||
 |
| × | 1 | |||
 |
| × | 1 | |||
| × | 1 | ||||
| × | 1 | ||||
| × | 1 | ||||
Software apps and online services | ||||||
| ||||||
 |
| |||||
 |
| |||||
Hand tools and fabrication machines | ||||||
 |
| |||||
 |
| |||||
 |
| |||||
 |
| |||||
 |
| |||||
 |
| |||||
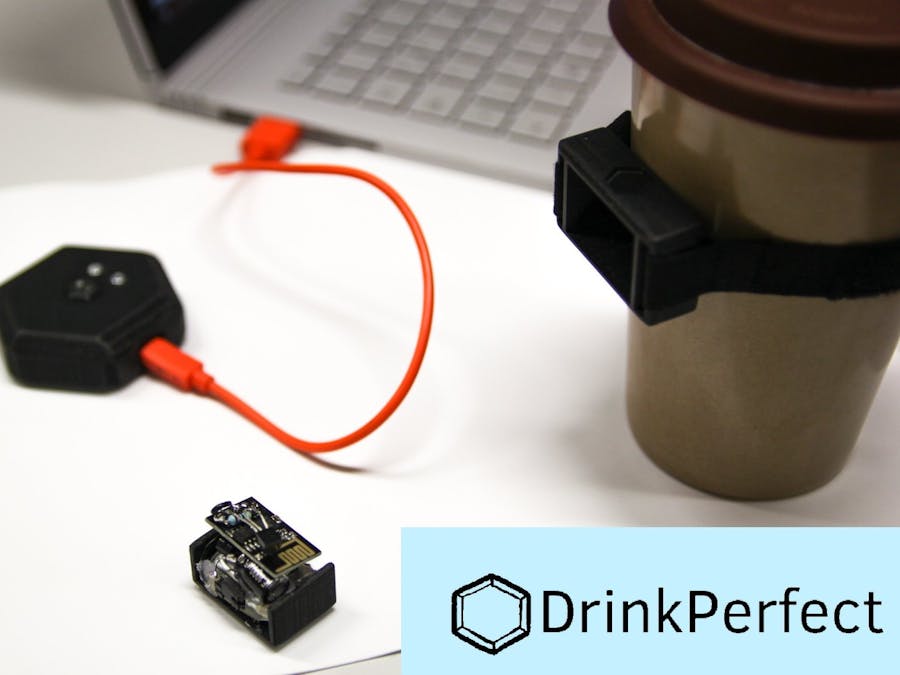
Everybody knows it: Friends come over to have a beer and chat a little. You forgot to put beer in the cooler, so now you have just one option left: put the beer in the freezer.
Your friends come and have bought some beer on the way. You talk for a while and have a nice evening. The next day you look into your freezer and everything you can see is broken glass and some frozen beer all over your stuff. You forgot the beer in the freezer the other night...
To avoid these moments and the annoying cleaning session afterwards, we've thought of a nice gadget to attach to your beer. In the app you can set the temperature and will get a push notificiation when the beer has reached the perfect temperature.
The gadget is not limited to beer, it can also be attached to other drinks like tea (Know exactly when to add the green tea), wine and more. The desired temperature can be set and saved in the app which will remind you via a push notification on your smartphone when that temperature is reached. Until that moment the actual temperature gets monitored in the app.
How To BuildWe have split the development process into four major steps. First, the necessary hardware of the DrinkPerfect device must be built. Second the backend software of the device must be adjusted and flashed onto the ESP. After that the user account in losant must be set up. Last the Unity code must be adjusted and build for the use on your smartphone.
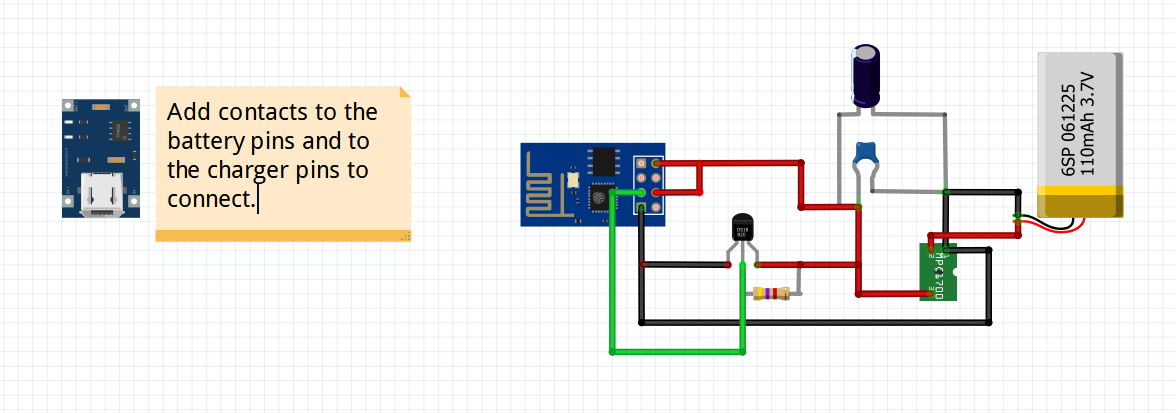
1. HardwareThe ESP requires a voltage of 3.3V. This must be set precisely, otherwise the ESP will not function properly. Even if the voltage is too high, the ESP cannot be operated. To use the device it's important for it to be designed as small as possible. A suitable 3.3V battery is not available for this application. For this reason we use a 3.7V battery and a limiter circuit with the MCP1700-3302E to adjust the voltage to constat 3.3V. The capacitors smooth the peaks offered by the LiPo battery and buffer it. Use at least one 1000µF Elko and one 100nF Cerko, that are ratet for 6.3V.
Connect the parts with solder directly on the ESP as shown in the figure below:
If you want to charge the LiPo you have to build an additional charging station. Therefore use the TP4056 charging module shown on the left side of the circuit. For better status recognition you can replace the two SMD LEDs with two 3mm LED (green, red).
For the gadget and the charging station you can print the added.stl file with your 3D printer. To place the gadget in charging position use two small neodymium magnet and fix them in small holes centered in the hexagon. Put one with the North and one with the South up. Use the same procedure in the gadgets hexagon.
For the charging contacts place two metal nails through the charging station and two through the gadget. Shorten them at the right length and connect the battery and the charging module to them. The charger can be connected via a micro-USB cable. As soon as the gadget is attached to the charger, the status of the battery is visualized via the LEDs on the charger. When the green LED lights up, the gadget is fully charged and ready for use.
To complete the device connect a wristband to the case of the gadget. To fix the wristband you can use a velcro fastener so that it can be adjusted to the diameter of any bottle or cup.
2. Software - BackendFor the backend software you need to install the latest version of the Arduino IDE (https://www.arduino.cc/en/main/software). You will have to install some libraries and do a few settings in order to run the attached software.
To make ESP appear as a board in the Arduino IDE, go to preferences. Add the following link to the "Additional Boards Manager URLs" field.
http://arduino.esp8266.com/stable/package_esp8266com_index.json
After adding this URL you have to restart the Arduino IDE. The next step is to open the Board manager at Tools -> Board -> Boards Manager. Change the Type field to Contributed and enter esp8266 in the search field. In the ESP 8266 entry change the version to 2.4.2 and click the install button. After this you have to restart the Arduino IDE again.
In the Tools menu you have to change the board to Generic ESP8266 Module and set it according to the figure below.
To run our software it is required to install a few libraries listed below.
In Arduino's Library manager:
- PubSubClient (a client library for MQTT messaging, version 2.6.0)
- ArduinoJson (version 5.13.2)
- OneWire (by Paul Stoffregen, version 2.3.4, accesing the 1-wire temperature sensor)
- DallasTemperature (by Miles Burton, version 3.8.0, library for Dallas Temp. ICs)
As zip file:
- Losant Arduino MQTT Client (https://github.com/Losant/losant-mqtt-arduino/archive/master.zip)
3. MQTT communicationIn order to use the software, you need to register in Losant to use their broker. There you will have to register the ESP and your smartphone.
Add your ESP as a device in Losant:
1. You need to add a new device and choose Standalone. There you can enter any name and save it.
2. Add an attribute called tempC and chose data type: Number. Safe the changes.
3. Go to devices and choose the one you have added as your ESP. Click on the three points on the right side and click on "create Access key". Download the file with the access key and access secret - you will need it later!
Before flashing the backend software onto the ESP, you have to add access key, access secret and the device ID in the corresponding line of your code. Additionally, you must add your WLAN network with the corresponding password, to which the ESP should log in.
After completing these steps, our software can be flashed onto the ESP. Here a stable power supply is very important. If you are using a laptop, it is essential to charge it during the flashing process. It may be that some repetitions are necessary until the flashing is successful.
The ESP will now send the current temperature to Losant every two seconds.
Add your Smartphone as a device in Losant:
1. You need to add a new device and chose Standalone. There you can enter any name and save it.
2. Add an attribute called tempC and chose data type: Number. Safe the changes.
3. Go to devices and choose the one that you have added as your smartphone. Click on the three points on the right side and click on "create Access key". Download the file with the access key and access secret - you will need it later!
Now you have registered your smartphone in Losant. After that you have to create a workflow with two simple blocks: Device State (from Triggers) and MQTT (from Outputs). Connect these two so the Device State triggers an MQTT message. This message includes the current temperature.
4. Software - FrontendNow download and install Unity 3D. Create an the app design and the app components or use the design from github. If you'd like to design the app by yourself you can use the github code for reference.
If you want to create the app yourself, you will have to download the mqtt-library, which you can find here:https://m2mqtt.wordpress.com/.
To enable the mqtt communication you need to change some parameters in the mqtt part of the code:1. Change your client ID into your smartphone-device ID of Losant2. Set your access key as username and the access secret as password.3. Set the device ID of the ESP at the topic subscription part in order to receive the messages of your ESP.Now it should look like: losant/"your esp device id"/state
If you need more help with that part you can look it up in the mqtt documentation: https://m2mqtt.wordpress.com/using-mqttclient/.
Now build the app as Android Application and you should be ready to go :)
In the video below you can see an example of how the app works.
This project has been part of a university's student research project. Because of that we didn't have enough capacities to improve it any further. Our ideas for further improvement:
1) Distinguish different materials of the drinking vessel (glass, plastic, etc.)
2) Expand the functionality of the application
3) Redesign of the app illustrations
4) Redesign of the device case
5) Implement the communcation independently from losant
We would be happy for any feedback or inspiration and are looking forward to hear your experiences with our project.


Comments