I recently held a workshop to teach students about e-textiles, and so I was looking for a cheap way to allow learners to make something that's programmable, and that lights up and plays music. The instructions for the participants had to be easy to follow as well. I eventually came up with the idea of sewing a circuit onto a felt patch using a LilyTwinkle. Based on the ATTiny, the LilyTwinkle is a fraction of a cost of the LilyPad Arduino and can still provide good entertainment. The felt patch can be used as an applique onto any wearable you want. You can sew, hot-glue, or velcro it onto a sweater or pillow.
Programming the LilyTwinkle was a challenge but doable using the great resources from SparkFun.
Bill of materialsThe materials for this project cost about $20 for the consumables for each participant, plus about $30 more for the tools you need to program each wearable. This makes it doable for a class and fairly affordable. We created decals for holiday sweaters. I've included code to play "Rudolph the Red Nosed Reindeer", and will add comments with the notes for Frosty the Snowman and Jingle Bells as well.
The biggest challenge of the e-textile workshop, really, was teaching students how to sew. I'm no expert, but by now my wearable projects generally stay together and don't short out, so I have some techniques that work for me.
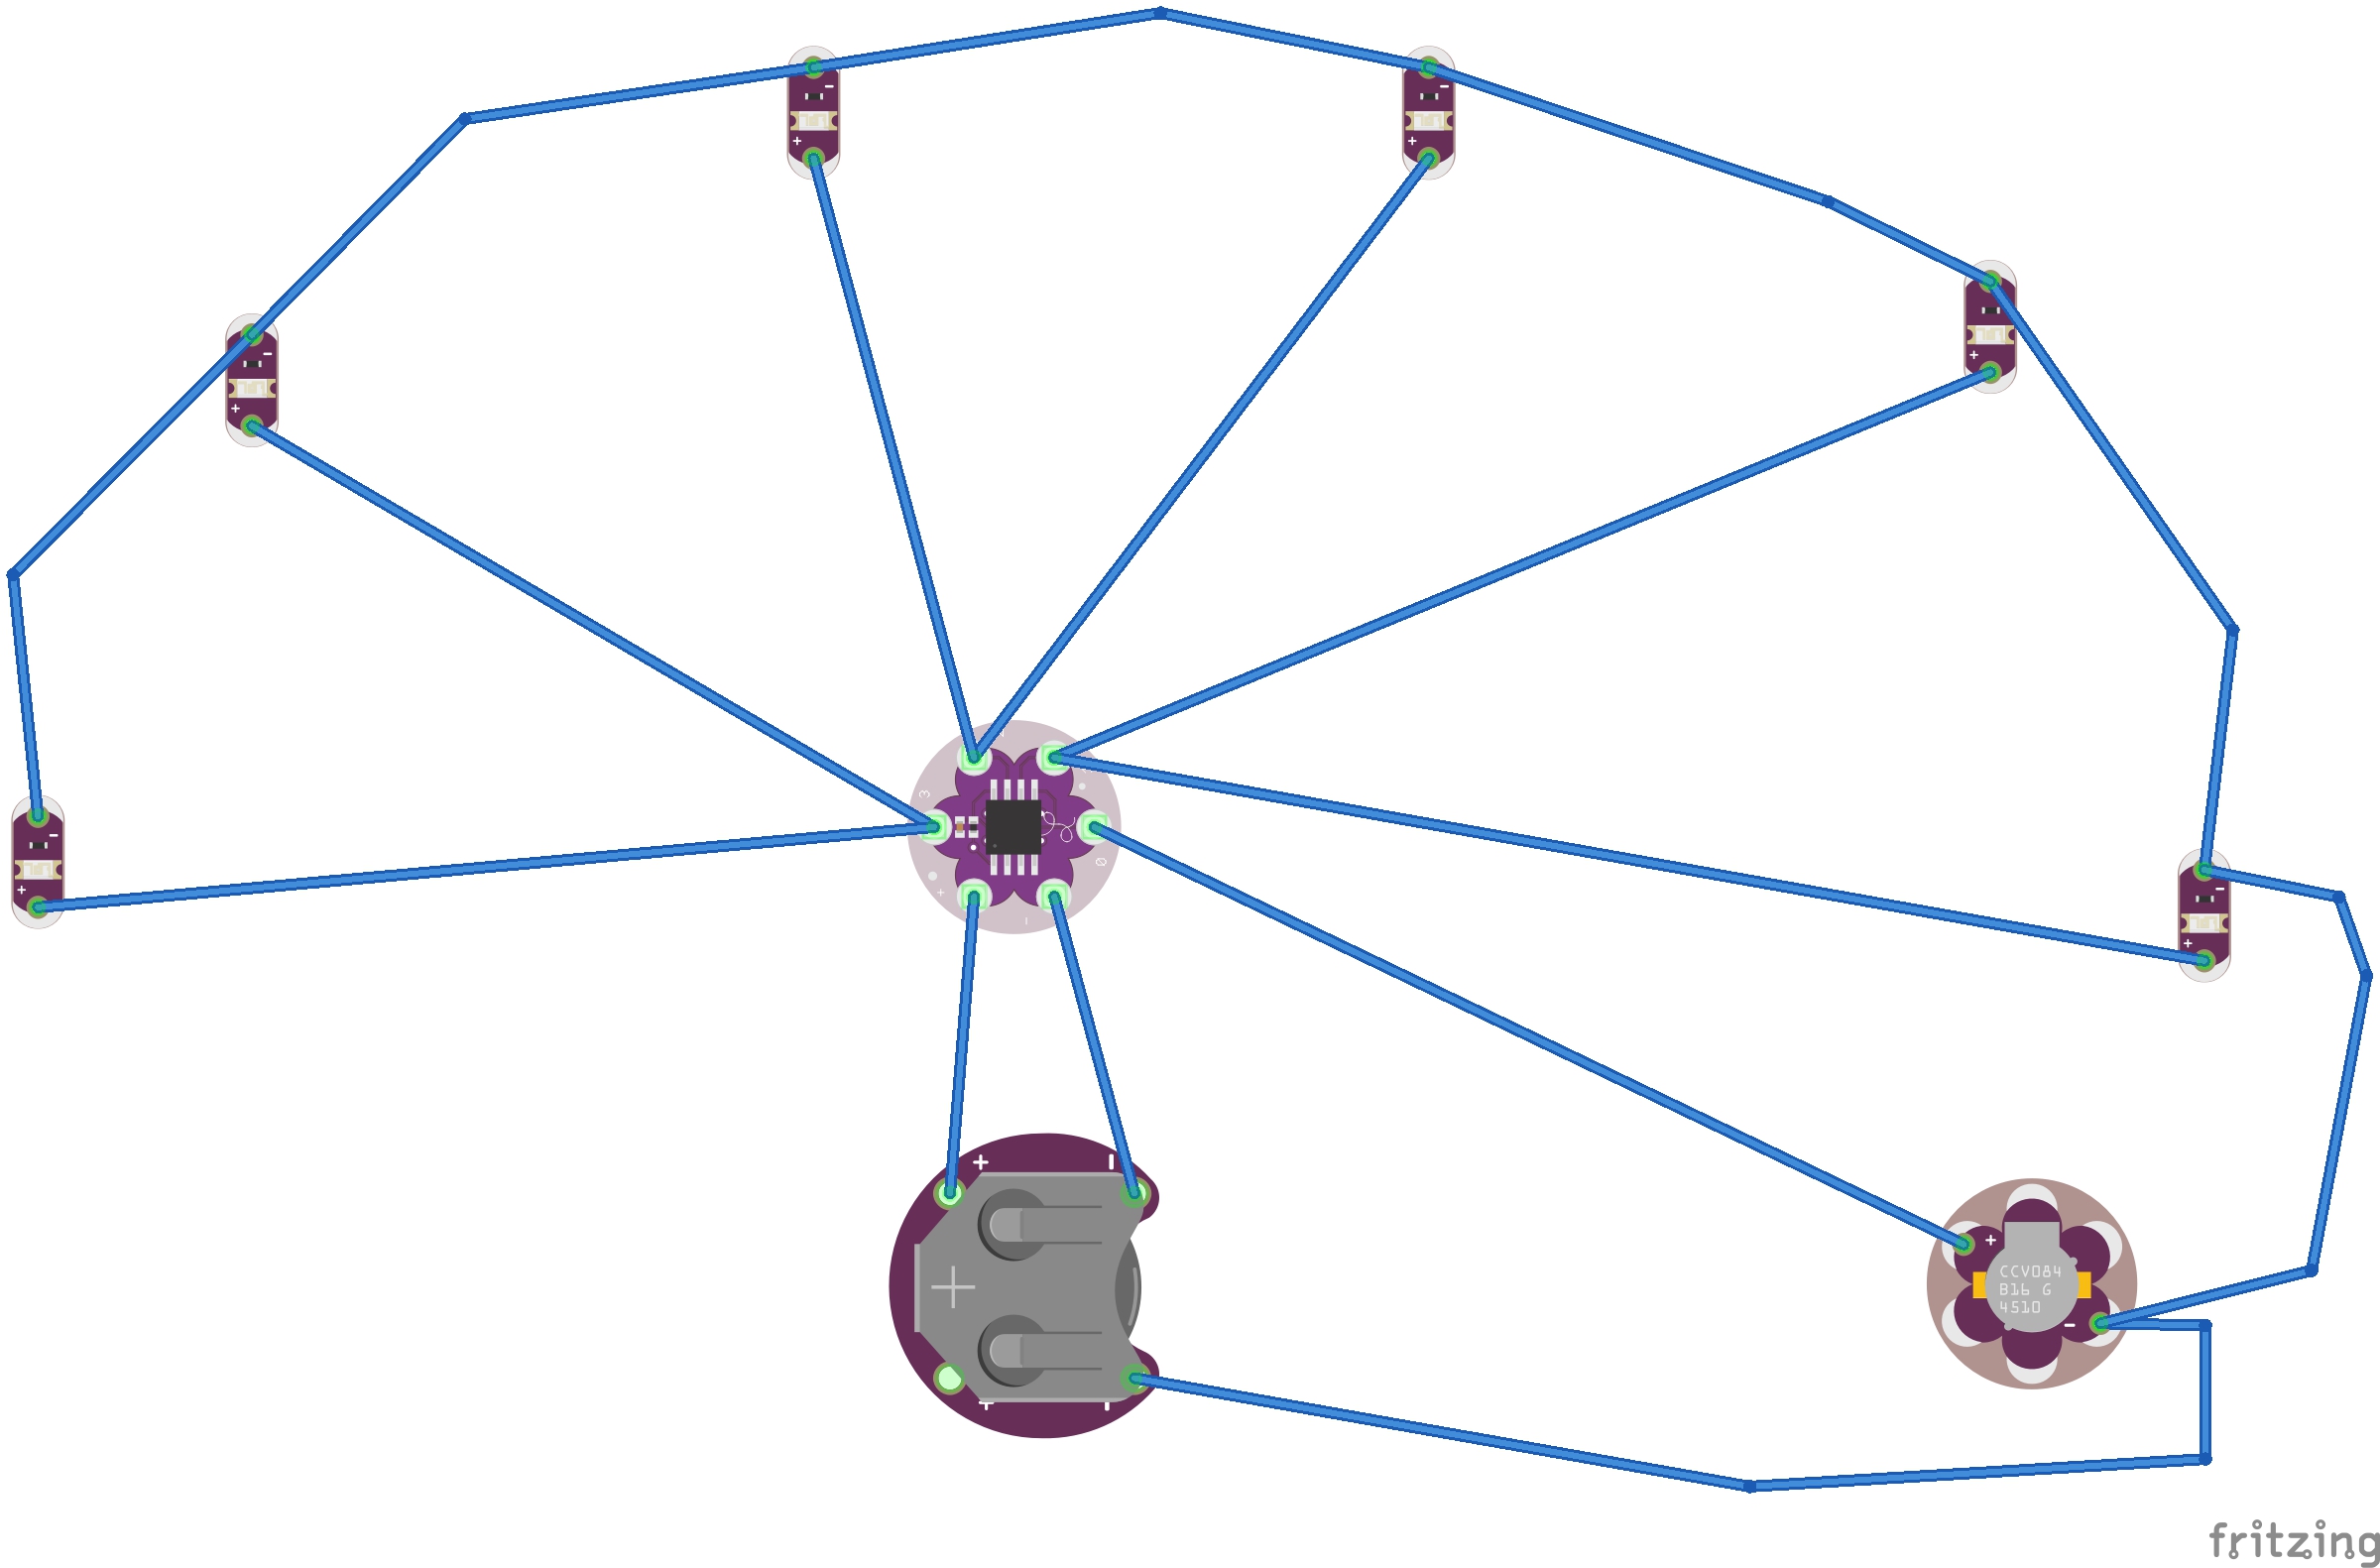
Step 1First, take a look at the schematic together and notice details. The LilyTwinkle is powered by the coin cell battery, so + on the battery must be sewn to + on the LilyTwinkle. - on the battery is sewn to - on the LilyTwinkle. Pin 0 is a PWM (Pulse Width Modulation) pin, and so I chose to connect this to the + side of the buzzer. The buzzer needs a fast-pulsing voltage to produce sound. LED's are polarized, so the + side of the LED must be sewn to each of the numbered pins, 1, 2, and 3. I sewed two LED's to each numbered pin. The - sides of the LED's, as well as the - side of the buzzer and the - terminal of the battery should all be connected together with a long piece of conductive thread. You can change the position of everything, but the general layout should be the same.
Each time you sew, start by tying a starting knot in the conductive thread. Thread the other end through the needle.
Loop the thread through the felt and the conductive pad on your component.
Loop the thread around five or six times, pulling it snug each time.
If you don't want to see the stitches on the front of the design, poke the needle through and stitch on the back. You can stitch just under the bottom layer of fuzz on the felt without poking the needle all the way through.
When you sew onto the connecting pad on the other end, on each pass of the thread, pull it snug as before. Tie a finishing knot and cut off the loose end.
When I sewed all the connections together, it looked like this.
And on the back, it looked like this.
Learners who are new to sewing may want to use some hot-glue to tack down and keep separate any conductive thread that comes too close to touching.
Next comes the programming. Much of my information on how to program the LilyTwinkle comes from this tutorial from SparkFun: https://learn.sparkfun.com/tutorials/re-programming-the-lilytiny--lilytwinkle
Connect the TinyAVR Programmer to your IC Test clip using the jumper wires. Make sure the wires connect corresponding pins to each other going from the clip to the programmer.
You'll need to get a driver for the TinyAVR Programmer. It's available here. https://cdn.sparkfun.com/datasheets/Dev/AVR/usbtinyisp_libusb_1.2.6.0.zip
You'll also need to install the board files into your Arduino Sketchbook folder. The process described on the SparkFun site worked fine, except that I had to rename the "attiny-master" folder to be simply "attiny" and then move it into the hardware folder.
Step 4Next, I also had to edit the Boards Manager in the Arduino IDE according to the instructions here. http://highlowtech.org/?p=1695
Step 5You need to select File --> Preferences in the Arduino IDE and then paste this into Additional Boards Manager URLs: https://raw.githubusercontent.com/damellis/attiny/ide-1.6.x-boards-manager/package_damellis_attiny_index.json
- Then go to Tools -> Boards -> Board Manager and find "attiny" and install it.
- Go to Tools -> Boards again and you should see ATTiny 25/45/85. Choose this one.
I ended up with some additional menu items to set. This is what my Tools menu looked like when it was configured correctly.
Note Board, Processor, Clock, Port and Programmer all had to be set. Port may vary depending on what else you have plugged into your USB ports.
ConclusionsFinally ready to upload the code to the LilyTwinkle. I clipped the test clip to the ATTiny on the LilyTwinkle. Make sure the wires plugged into pins 0 and - on the TinyAVR programmer are the ones that get connected closest to the "L" silkscreened on the LilyTwinkle.
Hearing the music play and watching the light show is very satisfying at this point! It's now very easy to program as many LilyTwinkles as you want. You can take care of a whole class of students in minutes.
Attach the felt patch to your sweater/pillow/misc wearable at this point, add any other bling you want, and you're ready to go!


_3u05Tpwasz.png?auto=compress%2Cformat&w=40&h=40&fit=fillmax&bg=fff&dpr=2)


Comments
Please log in or sign up to comment.