


Hardware components | ||||||
 |
| × | 1 | |||
 |
| × | 1 | |||
Software apps and online services | ||||||
 |
| |||||
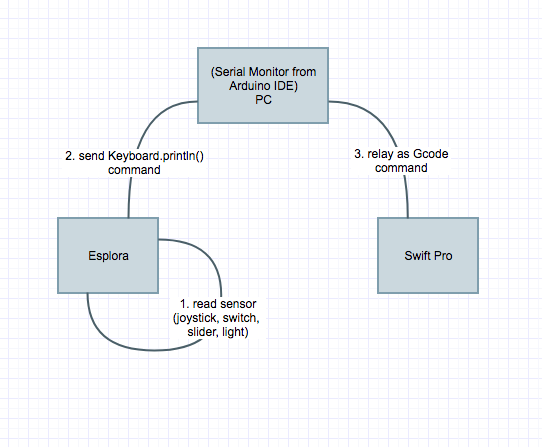
Arduino Esplora sends Gcode commands over serial monitor to manipulate a uArm SwiftPro (4 DOF robot arm) using Esplora joystick & switch buttons, slider and even light sensor.
BackgroundI backed a crowdfunding campaign at Indiegogo which arrived in June 2017. It's a 4-DOF robot arm called uArm Swift Pro and it comes with several end effectors to attach to the arm like laser engraver, 3D printer, gripper, suction cup, etc.
The hardware can be controlled from a PC software called "Studio" via USB or from a smartphone app via Bluetooth - both are manufacturer-provided. It includes a Blockly module to create programs that control the arm, and another controller module which you can remote control the arm from the PC. The smartphone app version does the same, but the problem with the control module, it sometimes make unexpected moves and stops, and I have not been able to control the arm with millimeter-precise movements.
I have an Arduino Esplora with TFT LCD which hasn't seen much use, and the board SwiftPro is running on is also an Arduino Mega 2560, and can be detected and connect to the Arduino IDE and its serial monitor. I thought it would be great to make the two gadgets work together - moving the arm like what the control module does, but with higher accuracy and can display status feedback on the LCD.
I referenced Arduino IDE example sketches for Esplora and TFT, and SwiftPro documentation which has a list of Gcode commands to send to the robot arm from a serial terminal. After working on it for a couple of weeks my Esplora sketch could move all 4 motors in the arm and turn the suction cup on/off with Esplora joystick, switch buttons, slider, and light sensor.
Basically, Esplora emulates a keyboard, and SwiftPro receives commands from the serial monitor. What the sketch does, when Esplora.readbutton() library function detects a sensor has been activated, it triggers a Keyboard.println() string to the serial monitor in Gcode which is sent to the SwiftPro and moves accordingly. The Gcode used here is a variant developed by the manufacturer and specific for the SwiftPro.
What's good about the Esplora + TFT LCD, it has a lot of sensors in a compact form factor, and displays feedback on the LCD. It allows you to prototype without having to use breadboards, wire pins, resistors, etc - it's really plug and play!
For a detailed how-to, I've published a step-by-step procedure on Instructables. And the Arduino sketch is available on GItHub.
Once the technical setup is complete, the (even more) fun part begins and ready to play with! I built a small playground with LEGO pieces with the robot arm moving balls and tiles around, and triggering a projectile launcher. Another use case shown in the video below was stacking and lifting Jenga bricks.
There are many varieties and possibilities with Arduino. Feel free to use the sketch code, improve it and share with the community. Thanks for viewing and enjoy!


Comments
Please log in or sign up to comment.