

Hardware components | ||||||
_zhWsCcSEcl.jpg?auto=compress%2Cformat&w=48&h=48&fit=fill&bg=ffffff) |
| × | 1 | |||
 |
| × | 2 | |||
 |
| × | 1 | |||
 |
| × | 4 | |||
 |
| × | 4 | |||
Software apps and online services | ||||||
| ||||||
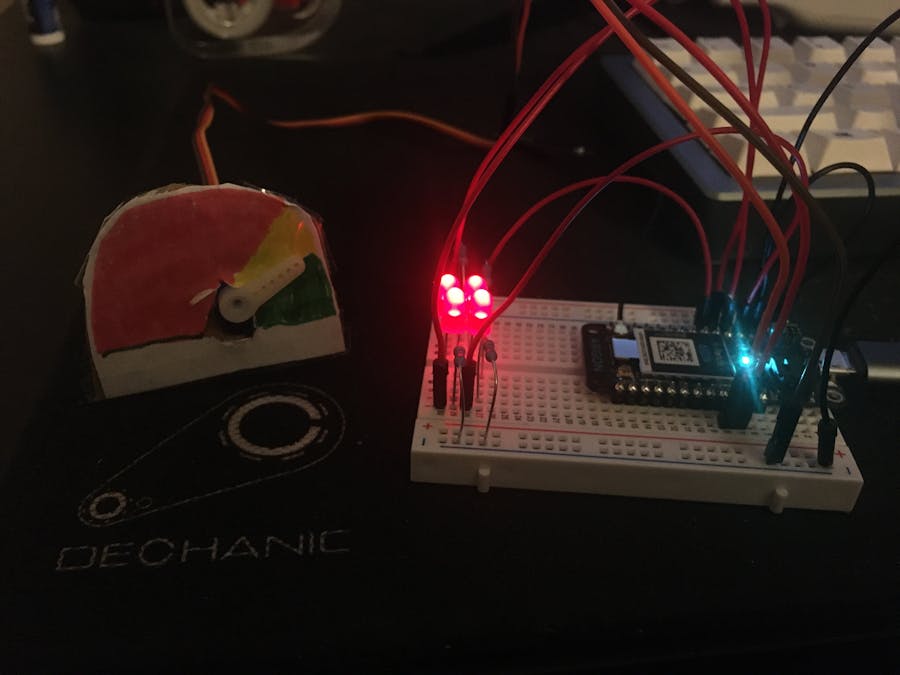
As someone with asthma, it is important for me to know the air quality outside. To make my life easier, I decided to create a prototype that checks it for me. This device will write analog signals to LEDs: the brighter the LEDs, the worse the air quality and the safer it is to stay inside. I later added on a meter for increased visualization precision.
This project was part of Lane Tech HS's Physical Computing Lab course. I created this project as part of the Data Visualization project.
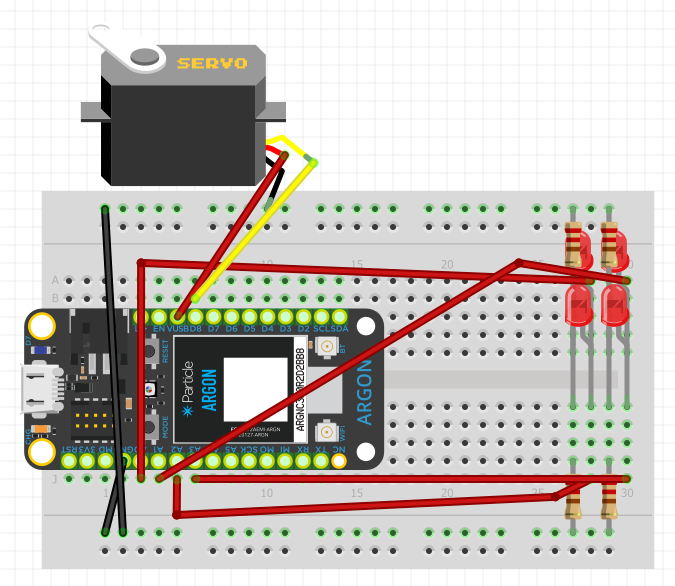
Circuitry/CraftThe circuitry of the setup is relatively simple. The ground rails of the breadboard are connected to the ground pin on the Argon. 220ohm resistors are connected from the ground rails to the negative end of the LEDs. The positive ends of each LED are connected to separate analog pins on the Argon. The servo is connected to digital pin D8. The power is connected to the VUSB pin on the Argon and the ground is connected to the ground rail on the breadboard.
A schematic of the circuitry can be found below.
Alongside the array of LEDs, I wanted to provide a more exact depiction of the data that I had collected. With that in mind, I created a meter from cardboard and paper with the aim of depicting the air quality index's status, whether it was completely healthy, a light health risk, or dangerous for me to go outside. Each category was designated by green, yellow, and red, respectively.
To create the webhook you will be using for API calls, open the Particle console, go to Integrations, create a new integration, and designate it as a WebHook.
From there, you will input these settings:
Note that the URL's ending city name (in my case, Chicago) can be changed to a city of your liking, as long as it is included in the API's database.
Add your API token in the advanced settings:
Create the WebHook, then go to edit it and select Custom Template. Add this line to the template:
"responseTemplate": "{{{data.iaqi.pm25.v}}}"This will allow your API calls to return the air quality index specifically for fine particulate matter.
Once you are finished, your WebHook is ready to be used.
CodeTo start off, click the Libraries button in the Particle IDE and add the ArduinoJSON library to your program.
To start the code, create the JSON document that your API call returns will arrive in, as well as the Servo object that you will be referring to throughout. Set the digital pin you are using for the servo as a constant integer variable. Set the analog pins you are using as constant integer variables as well. Finally, create an integer variable for the analog value that you will be writing to the LEDs and another integer variable for the value you will be writing to your servo.
// setup for API return and servo
StaticJsonDocument<3072> doc;
Servo myServo;

// designate LED analog pins and servo pin
const int led1 = A0;
const int led2 = A1;
const int led3 = A2;
const int led4 = A3;
const int servoPin = D8;

// variable for LED analog and servo write values
int writeValue = 0;
int servoWriteValue = 0;
In your setup function, set the analog pins you are using to output and start your serial monitor. Attach your servo to the integer variable you designated earlier and write a 0 degree angle to the servo. I added a 5 second startup delay to my project, but it is not required.
void setup() {
    // set analog pins to output
    pinMode(led1, OUTPUT);
    pinMode(led2, OUTPUT);
    pinMode(led3, OUTPUT);
    pinMode(led4, OUTPUT);
    // start serial monitor
    Serial.begin(9600);
    // attach servo to D8 pin
    myServo.attach(servoPin);
    // set servo to first angle possible
    myServo.write(0);
    // 5 second startup delay
    delay(5000);
}
In the loop function, publish and subscribe to your WebHook event so that you make calls to the API. Additionally, add a 2 second delay (so that API calls are made every 2 seconds) and write the analog value given from the aqiHandler function to the LEDs. Write the servoWriteValue you receive from the aqiHandler() function to your servo.
void loop() {
    // make API call
    Particle.publish("airQualityCheck");
    // subscribe to API call event
    Particle.subscribe("hook-response/airQualityCheck", aqiHandler);
    // wait 5 seconds, then write values to respective components
    delay(5000);
    analogWrite(led1, writeValue);
    analogWrite(led2, writeValue);
    analogWrite(led3, writeValue);
    analogWrite(led4, writeValue);
    myServo.write(servoWriteValue);
}
In the aqiHandler function itself, print the API return data onto your serial monitor and create the analogWrite value that will be sent to the LEDs by mapping the range of AQI values to the range of analogWrite values. Create the servo write value as well. I printed out the mapped values to my serial monitor, which is optional, but suggested for testing purposes.
void aqiHandler(const char *event, const char *data) {
    // grab API return and print onto serial monitor
    String aqi = data;
    Serial.print("The Fine Particulate matter air quality index is at ");
    Serial.println(aqi);

    // make API return into integer
    int value = atoi(aqi);
    // map AQI value to analogWrite and servo write ranges
    writeValue = map(value, 0, 300, 0, 255);
    servoWriteValue = map(value, 0, 300, 0, 180);
    // print mapped values to serial monitor
    Serial.print("Analog write value: ");
    Serial.println(writeValue);
    Serial.print("Servo write value: ");
    Serial.println(servoWriteValue);
}When you are finished, the LEDs should illuminate to a brightness corresponding to the air quality index received from the API. The servo should also position itself along the meter according to the data gathered.
Your serial monitor should read the following:


Comments
Please log in or sign up to comment.