


Hardware components | ||||||
| × | 2 | ||||
| × | 1 | ||||
Software apps and online services | ||||||
| ||||||
Hand tools and fabrication machines | ||||||
| ||||||
DXF and Vectric software files are provided to make the trap assembly itself form acrylic or wood, with all measurement needed although in metric format. !! If you have the Vectric software, you can convert to imperial format with 1 simple command.
Electronics are easy to build on strip-board, no need to make a PCB... strip-board layout provided.
2019-05-01
The trap is in use continually and no mouse has escaped... Total caught mice count: 55
Why design a mouse trap if you can buy dozens of different model traps?
We have chickens so mice are feasting on the feed and it is hard to avoid having mice rampaging the chicken coop at night.
We decided we want to catch the mice alive... But what traps to use? So I watched a lot of mouse trapping video's from Shawn Woods on his Mousetrap Monday YouTube channel. I then bought a bunch of the best live catch traps available and curious what was happening at night in the chicken coop I installed 2 camera's and a Network Video Recorder. but to my astonishment the mice walked around the traps, day after day...! aaaaaarhg! Apparently Shawn Woods' mice are not as smart as the mice we have here...
From that moment on it was a case of MANKIND against MICE!
I TOOK OUT THE HEAVY GUNS and made a microcontroller powered trap. But this first version of the MouseOleum trap was not good enough because older mice were so incredible fast when the trap doos opened! They could turn and jump out in a matter of 0.1 (!) seconds. I first could not believe my eyes...
Blooper VideoLook at some footage of the first build. The 3rd mouse did escape: click HERE
Still I caught 12 mice with this trap but still, the score was: MANKIND: 0 - MICE: 1
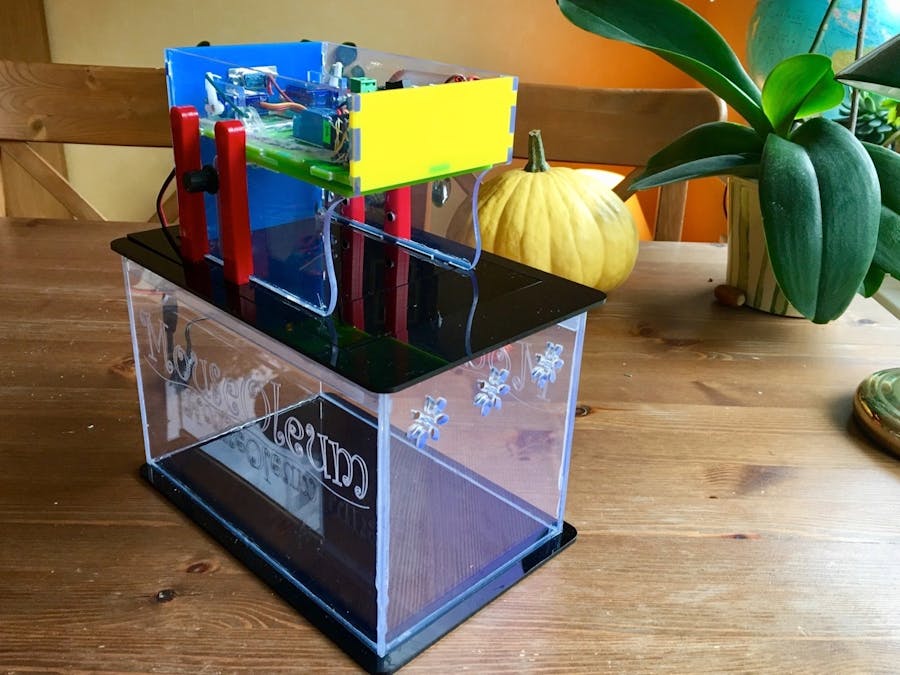
Behold! The MouseOleum v2 trap...
I learned a lot watching mice escape so this trap is after 43 mice 100% reliable. MANKIND: 43 - MICE: 1
Demonstration of the mouse trap, click HERE
The "making of video":click HERE
See the trap in action!click HERE
Lessons learned about mouse behaviourThese are my observation, yours may vary...
When looking at the mouse trap reviews of Shawn Woods, you can see mice enter traps very easily! But when I bought 6 live catch mouse traps, no mice would come in... That's why I build this trap.
I also read many tips and tricks but these things I observed by looking at many video recordings I made:
- mice are very, very cautious, especially the older ones.
- it takes 2-5 days before the smell of peanut butter will convince mice to overcome their fears of the trap. TIP: put peanut butter in the back of the trap, on the back wall, at the same height as the IR led's
- make it easy for the mice to climb onto the trap.
- you do not need to wear gloves when handling the trap.
- the smell of died mice in the trap will not scare new mice away
- already trapped mice will not scare other mice away nor lure them to enter also.
A trapdoor model seemed to me the most simple solution to catch multiple mice. When entering the trap they are 'lowered' into the cage of the MouseOleum and the trap is ready for the next guest. To prevent escape when triggering the trap, a front door is lowered simultaneously with the trap door and opened only if no mice are in the upper part.
IT IS IMPORTANT to leave a 5mm gap when lowering the front trapdoor because else the tail of the mouse will get stuck and they will be hurt.
Ventilation holes provide enough fresh air. Some hay on the bottom provides a soft landing and a way for the mice to hide in. Pieces of apple and bread will keep them alive and well.
Many young mice died because of the exhaustion from trying to escape so take that into account.
TIP: some peanut butter (NOT cheese...) will lure the mice. I used some wire mesh to make it easy to climb onto the trap. Mice have to get used to a trap so I put some peanut butter on the entrance area, midway and all the way in the back of the trap.How does the MouseOleum trap work?
When a mouse enters the trap, it will trigger the first infrared beam. (They cannot see the IR light so they are not scared away.)
- At that same moment, a message is send to the Blynk app, notifying you of the presence of a mouse. The 'mouse present' counter is increased and on the Blynk app message list you can see the exact time the mouse entered.
If you have an IP camera like me, you then can watch what happens and if you want manually trigger the trap at any moment with the press of a button on your phone... ;)
When the mouse, (often reluctantly) moves further to the back, it will at some point trigger the second infrared beam and immediately the front door is lowered and simultaneously the trapdoor is opened.
After 300ms, the trapdoor is raised/closed and then a check is performed if the upThe storyper chamber, where the mouse entered, is empty. If all is OK, the front trapdoor is opened, ready for the next mouse.
But if, while closing the trapdoor, the mouse managed to jump up, it will trigger any of the two IR beams. In that case, the trapdoor will immediately open again. This is repeated maximum 3 times. This should take care of any smart mouse fast enough to jump up... After 3 times we have another problem so a notification is sent, the front trapdoor is opened and the trap will be disables until you fix the problem.
- A message and push notification is sent to your phone. You can see the time it happened and a 'mouse caught; counter is increased.
GOTCHA! We now have caught a very frustrated mouse...
To make it easier to transport the trap when releasing the mice elsewhere, you can slide in a piece of acrylic, wood etc into a slot at the back of the base to close it off. If you've done that, you can slide the trap assembly out and only transport the base assembly without the risk of mice jumping out.
DO NOT FORGET to remove this lid when sliding the trap assembly back onto the base, else the trapdoor cannot open and the servo can be damaged. I speak out of experience...Remote control and notification
With the Blynk phone app, you can:
- see how many times a mouse was present but not caught
- see how many mice are caught
- get notifications: mouse present, mouse caught, IR1 beam error, IR2 beam error, trapdoor error
- status of the trap: System OK, Trap disabled, Error
- detailed messages on a terminal window
- available push buttons: reset the trap, reset the counters, manually open the trapdoor, disable trap (because you are temporarely not able to release caught mice)
The Blynk IoT (Internet of Things) platform is a great way to design very easily your own app to connect with the project you make. You can use the Blynk cloud server but I have a local server with the benefit of the best response time, privacy and best of all: no cost to design the app.
WHY TWO IR BEAMS:
The first IR beam will trigger a 15 second timer. In this time the second IR beam has to be triggered to actually activate the trapdoors. I designed this on purpose because else a moth or other nasty bug can trigger the trap sometimes, activating it continuously!. I observed this on my first design.
As long as a mouse is present in the trap, the timer will reset itself so the 15 second limit is then never exceeded.
SPEED:
The FRONT DOOR is lowered in a 45 degree angle. This way the door closing time can be MUCH faster as when we would use a 90 degree mounted door.
Mice are so incredibly fast so I didn't want to give them a chance... In the first video you can see the third mouse escaping in a split second!
The TRAPDOOR opening time has to be as short as possible. 0.3 seconds open time is more than enough. Any longer and a mouse can maybe jump up.
MechanicsThe servo's
I used two servo's, the Tower pro SG92R. They are cheap, fast enough and small.
Notice on the photo the idle position (trapdoor closed) of the servo arm. In this position alone, the servo does only need very little effort to keep the bottom trapdoor in the closed position.
If you use any other position, the servo will make noise because the trapdoor is relatively heavy and the servo has to maintain its closed position. This humming noise will scare the mice away.
I made this to test the IR LED's. The front trap door is lowered so sticking your hand in the trap will maybe damage the servo's.
To prevent mice moving the lever at the inside of the trap, I made a pocket in the acrylic. By adding a spring between the knob and the side panel, I can now push the lever out and move it.
The IR beam LED'sUse some brass pipe to keep the IR beam focused and this also will help to keep other light away from the IR receiver. Of course if you use a wooden trap this is not necessary.
Some pictures of the trapdoor
I used my CNC machine to make the assembly but there are other ways of course. I provided the DXF files so anyone can use those to make the trap, for example with a scroll-saw.
Note: The servo placement, the position and length etc of the levers in the trapdoors are the result of a lot of measuring etc. Feel free to experiment but if you want a working trap, just use my drawings.
IMPORTANT: I used acrylic with variable thickness and the slots and tabs are of course made to match these different thickness of acrylic. SO please check the drawings and adjust them to your material thickness!
The most important thing to remember is to measure often and make once... The most time is spent on this measuring and double checking. If you follow this advice, you will have a lot less frustration and extra work... ;)
Acrylic is my preferred material because it's cheap and easy to saw etc. I used a very special bonding material. It's not glue! It will 'melt' the acrylic parts together and the result is a very strong bond, as if the two pieces are one. See the photo's above. Acrylic is also moisture and dirt resistant and easy to clean.
TODO: INSERT NAME OF GLUEStrip-board was something I used many decades ago but when things get a bit more complex, I rather design a PCB and let it be produced online.
But I discovered an amazing piece of software, VeeCAD. With this program, I can draw a schematic in KiCad, export the netlist and after import in VeeCAD, place and wire the components using the ratsnest wires as guides. VeeCAD will indicate errors and pins to be connected etc. Very helpful!!!
Without it, I won't have tried making this project on strip-board.
All Strip-Board files available in a ZIP file at the ATTACHMENTS section.
!!!!!!!!!!!!!!!!!!!!!!!!!!!!!!!!!!!!!!!!!!!!!!!!!!!!!!!!!!!!!!!!!!!!!!!!!

!!!! DO NOT USE THE PHOTOS BELOW, these are only examples!

!!!!!!!!!!!!!!!!!!!!!!!!!!!!!!!!!!!!!!!!!!!!!!!!!!!!!!!!!!!!!!!!!!!!!!!!!A good friend from the USA, Henri the Monniers, made a PCB for this project!
It's so great when people jump in and add to a project...
The GERBER files and a BOM file is found in the ATTACHMENTS section.
Use all files provided at your own risk!The software
NOTE: you need 2 sketches, one for the Arduino Uno chip and one for the Adafruit Huzzah 8266 breakout board .
You can find this software here but notice the 2 selection tabs above the software section else you would think the 2nd sketch is missing.

Comments
Please log in or sign up to comment.