Modulo is a modular electronics system that makes it easy to assemble powerful electronic devices. Most electronics systems leave you with a tangle of cables, but Modulo uses a compact base that holds and connects individual components (called Modulos) together, allowing you to quickly and easily build devices that are almost as compact and powerful as a custom-designed circuit board!
To learn more about Modulo in general, check out modulo.co.
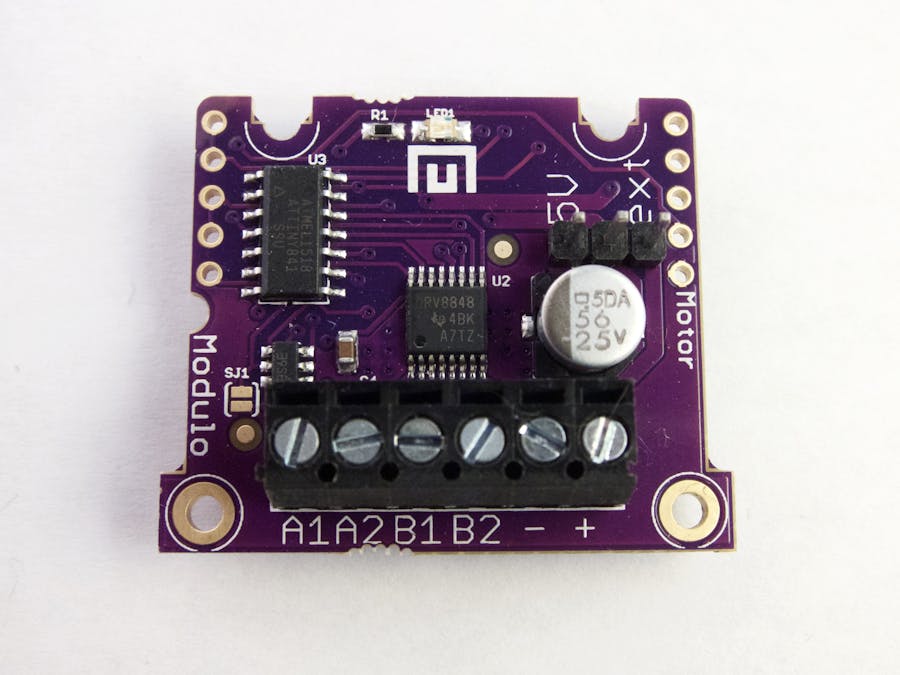
About the Motor Driver ModuloThe Motor Driver Modulo is used to drive DC Motors, Stepper Motors, and other DC loads. Like all Modulos, the Motor Driver Modulo slides into the Modulo Base, connecting it to the rest of the Modulo system. It's controlled over the Modulo protocol (based on I2C) using the convenient Modulo libraries for Arduino, Particle, and Python.
The Motor Driver Modulo has a DRV8848 Dual H-Bridge Motor Driver IC, which can provide up to 2A of of drive current to each of its two channels. It has an operating voltage range of 4V to 18V, and includes protection against over-current and over-temperature fault conditions, so you won't fry it if you drive it too hard or hook something up wrong.
The Motor Driver Modulo also features a current regulation feature, which limits the maximum current through a motor winding. This is especially useful for improving stepper motor torque, but can also be used to limit the stall current of a DC motor. Unlike most motor driver boards which have a small potentiometer for setting the current limit, The Motor Driver Modulo's current limit is set digitally, through its convenient API.
Selecting MotorsWhen selecting a DC motor, choose motors with a free running current of at most 1A total (or 500mA each). Though the Motor Driver can handle up to 2A, it cannot supply that much current continuously without overheating.
If you plan to power your motors without a separate external power supply, look for motors that operate near 5V and have an even lower current draw. A DC gearmotor like this one is a good choice for many applications.
If you are using an external power supply, match the motor voltage and supply voltage. The Motor Driver Modulo can operate at up to 18V.
Motor ConnectionsMotors are connected the the driver using the first four screw terminals, marked A1, A2, B1, and B2. Connect Motor A to the first two positions (A1 and A2) and Motor B to the second two positions (B1 and B2).
When the power supply selection jumper is in the "5V" position, the Motor Driver will draw 5V power from the base, so no external power supply is required.
When powering larger motors, a higher voltage or higher current power supply may be needed. You can use an external power supply by connect the power supply's positive and negative wires to the motor driver's + and - terminals. You will also need to move the power supply jumper to the "Ext" position.
sdf
The Modulo Library makes controlling motors a breeze using Arduino, Particle, or Python. If you haven't worked with Modulo before, follow the getting started instructions first. The examples below using the Arduino/Particle API, but the Python API is very similar.
The use the Motor Driver, first create a MotorDriverModulo object.
MotorDriverModulo motorDriver;
You can set the speed and direction of each motor independently. A value of 1 is 100% forward, and a value of -1 is 100% reverse. For instance, to run motor A in the forward direction at 100% speed, you'd do:
motorDriver.setMotorA(1.0);
And to run motor B in reverse at 50% speed, you'd do:
motorDriver.setMotorB(-.5);
The Motor Driver has support for active current limiting. This limits the current through the motor winding to a specific level, regardless of the supply voltage. Current limiting can be used to driver a lower voltage motor using a higher voltage power supply, to increase stepper motor torque, or to limit the maximum stall current of a DC motor.
The current limit value is the percentage of the driver's maximum 2A current. So to set the current to 500mA, set the value to .25 (.5A/2A = .25)
motorDriver.setCurrentLimit(.5);
The Motor Driver controls motor speed by varying the percentage of time that it is supplying current to the motor, a technique called pulse width modulation (PWM). The speed at which it cycles on and off is called the PWM Frequency, and changing it can affect torque and even audible motor noise. You can change the PWM frequency using the setPWMFrequency method.
motorDriver.setPWMFrequency(500);
The Motor Driver can detect fault conditions and will temporarily stop driving its connected load when a fault occurs. Fault conditions include a short between motor terminals, the power supply voltage dropping too low, maximum current being exceeded, and maximum temperature of the driver IC being exceeded.
You can check to see if the Driver currently has a fault condition using the hasFault() method.sdf
bool fault = motorDriver.hasFault();
You can also register a callback function that will be executed when the fault status changes.
void faultChanged(MotorDriverModulo &d) {
    bool fault = motorDriver.hasFault();
    ....
}
void setup() {
    motorDriver.setFaultChangedCallback(faultChanged);
}
Learn about Modulo in general at modulo.co.
Buy a Modulo Motor Driver from the modulo store.
Check out a complete example program that uses the Motor Driver Modulo in either C++ (Arudino/Particle) or Python.
Read getting started tutorials and complete API docs at docs.modulo.co.
Visit the modulo community to ask questions and discuss your project.
Follow the hackster.io Modulo community hub to keep up to date with Modulo guides and projects.


Comments
Please log in or sign up to comment.