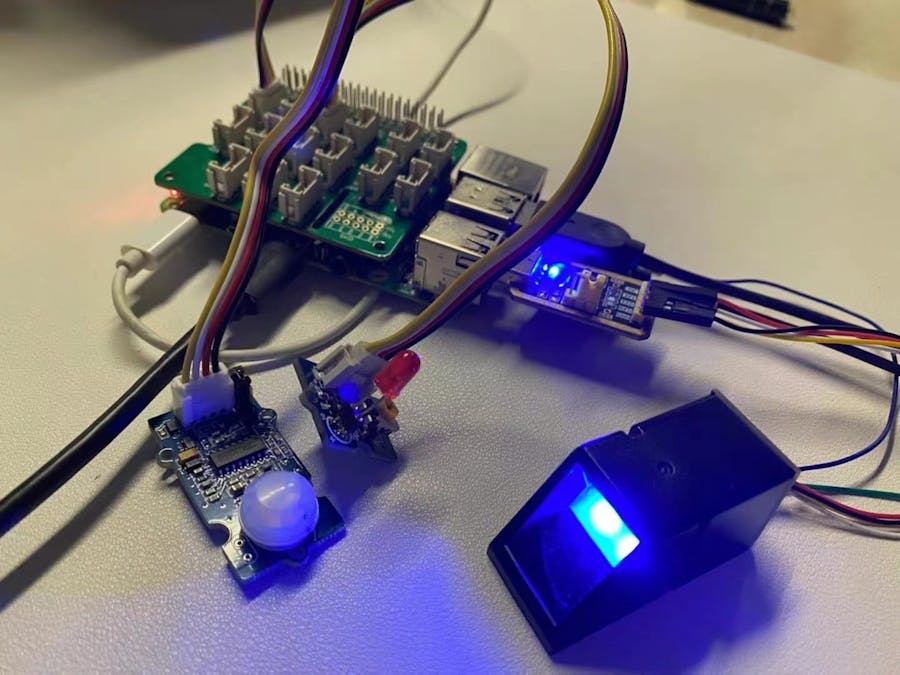
Recognizing fingerprints on Raspberry Pi can be made easy with a few sensors by simply wiring. Raspberry Pi also helps the retailer this way to collect punch-in/punch-out process as a check-in machine.
Fingerprint SensorAS608 Fingerprint Sensor is an optical fingerprint sensor module that makes fingerprint detection and verification simple. AS608 is an integrated optical fingerprint chip with a fingerprint algorithm inside. The AS608 module uses an 8pin control interface. You can enroll up to a hundred new fingerprints and store them in the onboard FLASH memory. A built-in LED in AS608 is used to convey information about the working state of the sensor.
PIR Motion Sensor
PIR refers to a passive infrared sensor that measures infrared light radiating from objects in its field of view. PIR motion sensors are most often used in PIR-based motion detectors such as security alarms and automatic lighting applications.
PIR Sensor is short for passive infrared sensor, which applies to projects that need to detect human or particle movement in a certain range. It is also known as PIR (motion) sensor or IR sensor.
Technically, PIR is made of a pyroelectric sensor, which is able to detect different levels of infrared radiation.
If the PIR sensor notices the infrared energy, the motion detector is triggered and the sensor outputs HIGH on its SIG pin. The detecting range and response speed can be adjusted by 2 potentiometers soldered on its circuit board, The response speed is from 0.3s - 25s, and max 6 meters of detecting range.
Interface the sensor and store the dataAdafruit has written both Arduino library and Python library to help you run the fingerprint detection program in 10 minutes. The library supports both enrollments and searches for fingerprints. Once you enroll fingerprints, there will be an assigning ID # correspond to each print for you to search later. You will actually look for the exact ID that has been photographed and verify if the ID is enrolled.
pandas is a software library written for the Python programming language for data manipulation and analysis. In particular, it offers data structures and operations for manipulating numerical tables and time series. It is free software released under the three-clause BSD license. (Wikipedia)
Implementation
The implementation of the project will consist of the following steps:
- Wiring of the modules
- Installing the software and registering fingerprints
- Combine motion sensor with fingerprint sensor
Wiring modules
There are different models of AS608 sensor that are available on the market and it is important to wire the sensor properly.
RX is the white wire, TX is the green wire then the red power wire. Alternatively, if your sensor has all the same-color wires, The first wire from the left is ground, then the two data pins, then power.
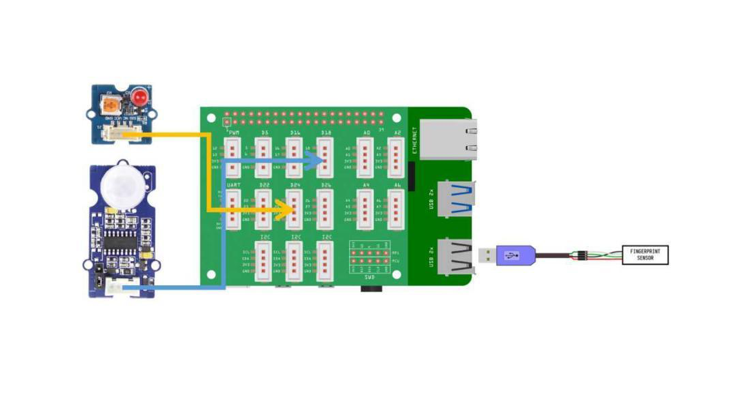
You can use an external USB-to-serial converter or the built-in UART on the Pi's TX/RX pins. Here's an example of wiring up the USB-to-serial converter:
Sensor VCC (red wire) to USB 5V or 3V (red wire on USB console cable)
Sensor GND (black wire) to USB Ground (black wire)
Sensor RX (white wire) to USB TX (green wire)
Sensor TX (green wire) to USB RX (white wire)
To use Raspberry Pi built-in UART to wire, make sure you have disable the serial console and enable the serial port hardware in raspi-config if you choose built-in UART.
Then connect the sensor to Raspberry Pi GPIO header with jumper wires, using the below information as the reference.
Pi Ground wires sensor GND (black)
Pi TX wires sensor RX (white)
Pi RX wires sensor TX (green)
Pi 3.3V wires sensor VCC (red)
You can look up the Raspberry Pi 4 GPIO pinout guid to wire with the sensor.📷
To connect Grove PIR Motion Sensor and Grove LED, we’ll use GrovePi Base Hat, that will allow us to avoid using jumper cables and use more convenient Grove wires instead. Connect PIR Motion Sensor to D18 socket and Grove LED to D24 socket. You are now finished setting up the wiring.
Installing the software and registering fingerprints
From your command line run the following commands to install the Adafruit Fingerprint sensor library:
To test the fingerprint sensor run this command from fingerprint_simpletest_rpi.py:
Note: If you get an error saying “RuntimeError: Failed to read data from sensor”, check your wiring and make sure baud rate is set up to 57600.
If you are directly connecting the sensor to Raspberry Pi 4 UART, comment out line 14 and uncomment line 17 in fingerprint_simpletest_rpi.py.
# SPDX-FileCopyrightText: 2021 ladyada for Adafruit Industries
# SPDX-License-Identifier: MIT

import time
import serial

import adafruit_fingerprint


# import board
# uart = busio.UART(board.TX, board.RX, baudrate=57600)

# If using with a computer such as Linux/RaspberryPi, Mac, Windows with USB/serial converter:
uart = serial.Serial("/dev/ttyUSB0", baudrate=57600, timeout=1)

#If using with Linux/Raspberry Pi and hardware UART:
#uart = serial.Serial("/dev/ttyS0", baudrate=57600, timeout=1)

#If using with Linux/Raspberry Pi 3 with pi3-disable-bt
#uart = serial.Serial("/dev/ttyAMA0", baudrate=57600, timeout=1)

finger = adafruit_fingerprint.Adafruit_Fingerprint(uart)
Start the enrollment process by typing “e” and pressing enter after starting fingerprint_simpletest_rpi.py. Enroll and store your fingerprint image as ID 1. You’ll notice the sensor starts flashing.
After pressing the finger on the fingerprint sensor, if the image has been successfully taken, you will see the following output, which means the fingerprint image has been properly stored as a template model with an ID number.
If the two prints don't match, or the device failed to store the image to generate a template, you will see the following error message
Repeat the procedure until it is successful, make sure you press your finger tight against the sensor and the sensor surface is clean and unobstructed.
When your finger is successfully enrolled, enter “f” in the main menu of fingerprint_simpletest_rpi.py. You’ll notice the sensor starts flashing - press the same finger you used for enrollment against the sensor and the program will print “Searching” while trying to match your fingerprint inside internal storage.
If recognition is successful it will print the ID and confidence of the fingerprint match.
You can also remove the fingerprint model saved to system you by entering d in the main menu of fingerprint_simpletest_rpi.py.
For LED and Motion sensor, we will need to download and run script that will install grove.py Python 3 library on your Raspberry Pi:
curl -sL https://github.com/Seeed-Studio/grove.py/raw/master/install.sh | sudo bash -s -After installing the grove.py library and having an LED and a motion sensor connected we can now test. Run python file of led_motion_sensor
python3 test_led_motion_sensor.py
When motion is detected the program will start blinking an LED.
If you have successfully verified the above steps and found the hardware connected to your Raspberry Pi 4 works, then we can start to make use of the example Python file to design our system architecture!
Combining motion sensorThe sample application can be found in file attendance.py. The program logic of the sample application consists of a few important parts.
First we get the pin numbers as arguments and create Blinker and Motion sensor objects. If there is a person approaching the fingerprint machine, the PIR motion sensor will detect the motion and main application logic will start running.
def main():
while True:
while not motion_sensor.is_activated():
time.sleep(0.05)
print('Motion detected.')
The system will try collecting the fingerprint for a total of 5 tries - if no fingerprint detected it goes back to waiting mode.
If a finger is successfully detected, the program gets system time and appends the ID of the recognized finger and the time stamp to attendance.csv file.
Grove Led - Red module is used to indicate thecurrent status of the device. It is inactive when no motion is detected. If the system was activated, but no fingerprint was found (Error state), the LED will blink very fast (10 Hz frequency) for 3 seconds.
If thefingerprint matching function returned True(Success state), which means the device has recognized the fingerprint, and fingerprint ID number and punch in/out date time were saved to csv. file, the LED will blink slowly(1 Hz frequency) for 3 seconds.
In order to run working example, execute the following steps:
- Connect all the sensors, connect the power to Raspberry Pi 4.
- Start the application with python3 attendance.py
1. When there is a human approaching the device, the PIR motion sensor will pick up the motion and the fingerprint sensor internal LED will start blinking.
2.Place your finger (already enrolled in the previous step with fingerprint_simpletest_rpi.py) on the fingerprint sensor.
3. If the finger matches one of the templates stored in the sensor, its ID and current date/time will be appended to the attendance.csv file. If the fingerprint does not match any of the templates stored in the sensor, the system will go to waiting mode.


Comments
Please log in or sign up to comment.