Most Arduino remote controlled car building tutorials on the internet use Bluetooth and an Android app. However, Bluetooth is not very efficient at real-time remote control:
1. It has a noticeable delay
2. The range is 6 meters at best
3. You need an Android Phone to connect to the HC-05 Module (connecting from an Apple Phone is not possible).
Now, for an easy toy project like a car with 4 DC motors instead of a proper steering servo, this is not an issue. Slapping an expensive RC controller and receiver on this cheap bluetooth car kit from Amazon would be a complete overkill and the fun would subside after a mere 2 minutes of driving just because of the cheap hardware of the actual car.
Unfortunately, I didn't realize until I finished building it. So in the hopes that I have not completely wasted my time on this, I am sharing it on here as an example of what not to do. Hope you enjoy!
The FLYSKY FS-I6X Controller and Receiver are really expensive and not worth it for this cheap car at all. It's only really worth your money for airplanes, for which it was originally designed. Nevertheless we are using it in this project.
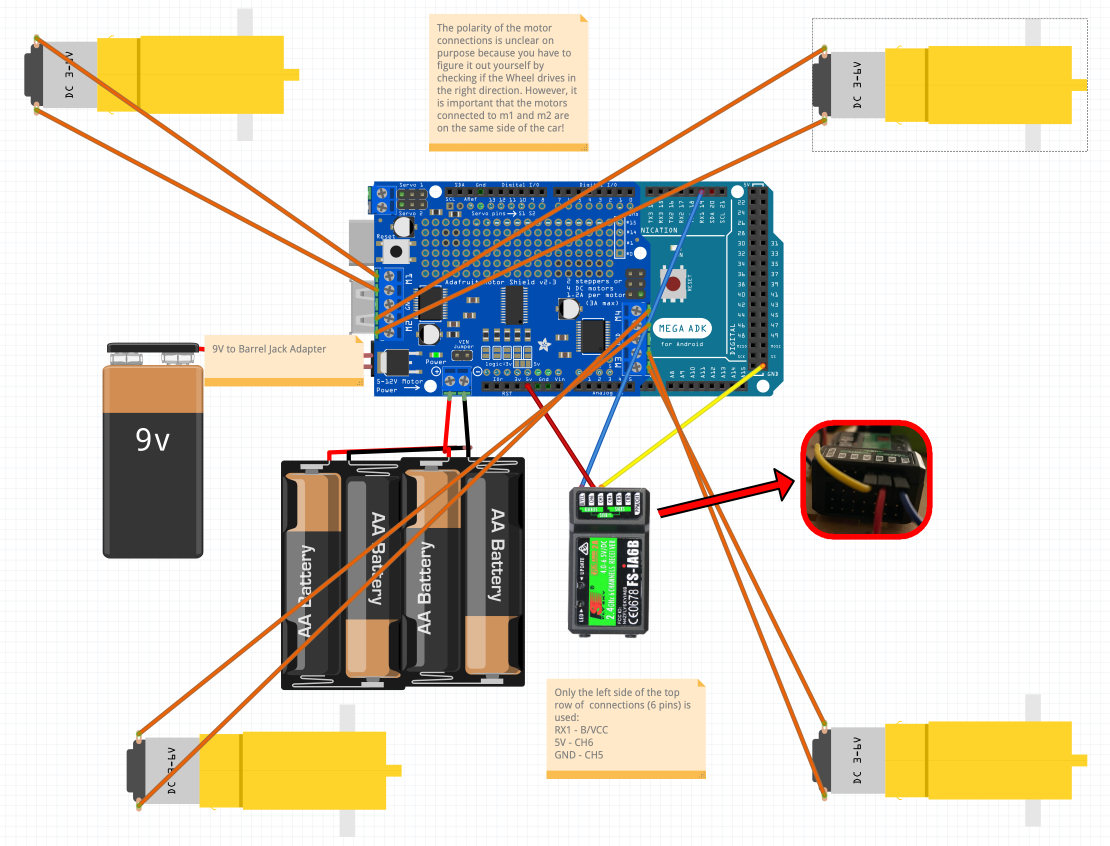
For the actual backbone and motors of the car, I have used this robot car kit from amazon. The battery holder and cables are included. I followed this tutorial to build it, but the instructions for the electronics seem to be wrong so just follow the soldering and building of the motors into the two platforms and refer to my circuit instead. You can use the holes in the platforms for clever cable management, so get creative!
I have used an Arduino Mega (Rev 3) in this, but I don't think there should be any reason why you couldn't just use an UNO on this because you could access the Pin 0 (RX) and 5V and ground through the Motor Shield pins. Then again, please don't just take my word for it.
The Arduino is powered by a 9V battery through the DC barrel jack with an adapter, which is about the most inefficient method available. In my opinion you should always use the 5V USB input with a power bank as it requires less voltage. However, some intelligent power banks require a minimum current pull higher than that of Arduino, so I prefer a regular dumb one.
The motors are driven by the Adafruit Motor Shield v2, a great shield which combined with the code library makes driving motors a lot easier. You can use a regular motor driver but you have to tinker with the code (check out the last section of this video if you plan on doing that). 4 AA batteries are used for power.
I mounted all the parts onto the platform using double sided duct tape. I keep the two antennas of the Receiver flat with zip-ties so that they are parallel to the Controller antenna and the physics work out for optimal range.
Controlling the CarThe Code was by far the hardest part. Don't just copy/paste it, try to understand every step of the algorithm and how the data is processed and changed from the moment it arrives through the receiver to the voltage that the motors receive.
Bonus challenge: Try to understand how the car can turn without a steering servo through offset.
Use the left Joystick to control the speed of the car. Turn it up all the way and the car will drive at maximum speed. However, this will cause turns to be very slow. If you want to make fast turns on the spot quickly turn the motor speed down and the right Joystick into one of the four corners. You can accelerate again once the turn is completed.
Push the right Joystick up and down to control forward / backward movement. The further you turn it up / down, the faster the car will be.. Tilting the Joystick to the left / right will turn the car. The turns will be most effective if you push the Joystick all the way to one of the four corners depending on how you want to turn.
You might be thinking to yourself: "why are the controls so complicated for a simple car?". The truth is I don't know either. But it feels pretty intuitive once you get the hang of it!


_wzec989qrF.jpg?auto=compress%2Cformat&w=48&h=48&fit=fill&bg=ffffff)


Comments
Please log in or sign up to comment.