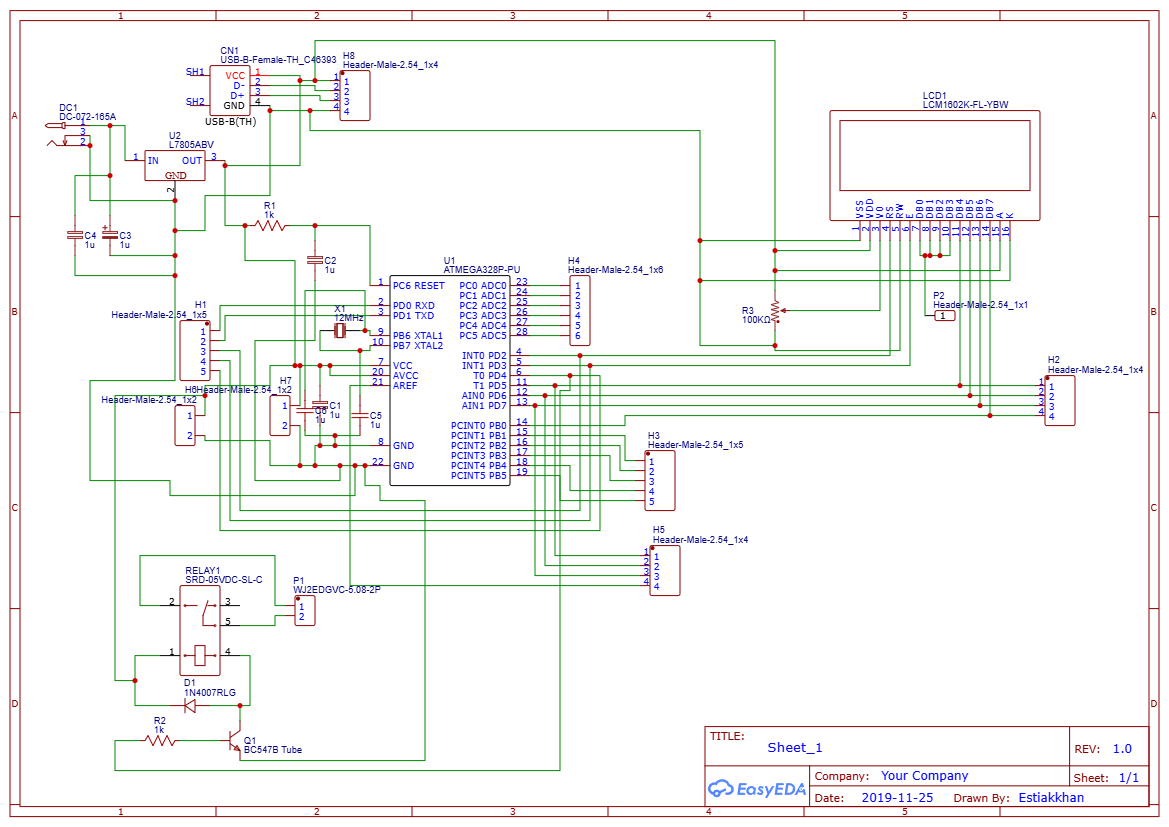
In this post, we’ll design and build a 12V Battery Autocut Charge Controller using the ATmega328P microcontroller. The system integrates components like an LCD, a relay, and basic electronic components to effectively monitor and control battery charging. Let’s dive into the circuit design, components required, and the Arduino code for programming.
Overview of the ProjectThis 12V Battery Autocut Charge Controller automatically cuts off the charging when the battery reaches its full charge level. It protects the battery from overcharging, ensuring safety and efficiency. The ATmega328P serves as the brain of the circuit, controlling the relay and displaying real-time battery status on the 16x2 LCD.
Get JLCPCB 6-layer PCBs for just $5! Register to get $60 Coupons: https://jlcpcb.com/?from=EST
Required Components- ATmega328P Microcontroller (28-pin IC Base)
- 16MHz Crystal Oscillator
- 10K Resistor (Pull-up for RESET)
- 103 Variable Resistor (For LCD contrast adjustment)
- Capacitors (1uF, 10uF, etc.)
- L7805 Voltage Regulator (For 5V supply)
- BC547 Transistor
- 1K Resistor
- 1N4007 Diode (Flyback protection for the relay)
- Relay (5V)
- 1602 LCD Display
- 2-pin AC Terminal Block (Input)
- LED (Indicator)
- Header Pins
- 12V Battery
- PCB manufacturing (from JLCPCB )
Refer to the circuit diagram above for visual guidance. The major steps are explained as follows:
Power Supply Section
- A 12V DC power source is connected to the circuit via a 2-pin AC terminal block.
- The voltage regulator L7805 steps the input down to 5V for powering the ATmega328P and other components.
- Capacitors (C1 and C2) stabilize the supply voltage.
- Power Supply SectionA 12V DC power source is connected to the circuit via a 2-pin AC terminal block.The voltage regulator L7805 steps the input down to 5V for powering the ATmega328P and other components.Capacitors (C1 and C2) stabilize the supply voltage.
ATmega328P Microcontroller
- The ATmega328P is configured with a 16MHz crystal oscillator for precise timing.
- Pin PC0 (A0) reads the battery voltage through a voltage divider.
- Digital pins control the relay and send data to the LCD.
- ATmega328P MicrocontrollerThe ATmega328P is configured with a 16MHz crystal oscillator for precise timing.Pin PC0 (A0) reads the battery voltage through a voltage divider.Digital pins control the relay and send data to the LCD.
Relay Control
- The BC547 transistor drives the relay, with the 1N4007 diode providing flyback protection.
- The relay toggles the charging circuit, cutting off power when the battery voltage reaches a threshold.
- Relay ControlThe BC547 transistor drives the relay, with the 1N4007 diode providing flyback protection.The relay toggles the charging circuit, cutting off power when the battery voltage reaches a threshold.
LCD Display
- The 1602 LCD shows the real-time voltage and the charging status. A 103 variable resistor adjusts the contrast.
- LCD DisplayThe 1602 LCD shows the real-time voltage and the charging status. A 103 variable resistor adjusts the contrast.
Battery Voltage Monitoring
- The battery voltage is scaled using a resistor divider circuit and read by the ATmega328P ADC pin (PC0).
- Battery Voltage MonitoringThe battery voltage is scaled using a resistor divider circuit and read by the ATmega328P ADC pin (PC0).
For assembling the project, use JLCPCB for custom PCB manufacturing. Upload your schematic and layout files (generated using EasyEDA) to ensure high-quality and cost-effective boards.
Arduino Code for ATmega328PHere’s the Arduino code to program the ATmega328P. It monitors the battery voltage and toggles the relay accordingly.
cpp

Copy code
#include <LiquidCrystal.h>

// LCD Pin Configuration
LiquidCrystal lcd(7, 8, 9, 10, 11, 12);

// Pin Definitions
const int relayPin = 3;
const int batteryPin = A0; // Analog pin for battery voltage
float batteryVoltage = 0.0;

void setup() {
  pinMode(relayPin, OUTPUT);
  digitalWrite(relayPin, LOW); // Turn off relay initially
  lcd.begin(16, 2);            // Initialize LCD
  lcd.print("Battery Monitor");
  delay(2000);
  lcd.clear();
}

void loop() {
  // Read battery voltage (scaled by voltage divider)
  int sensorValue = analogRead(batteryPin);
  batteryVoltage = (sensorValue * 5.0 / 1023) * (12.0 / 5.0); // Adjust for divider

  // Display voltage on LCD
  lcd.setCursor(0, 0);
  lcd.print("Voltage: ");
  lcd.print(batteryVoltage);
  lcd.print("V");

  // Check voltage and control relay
  if (batteryVoltage >= 13.8) { // Fully charged
    digitalWrite(relayPin, LOW); // Turn off relay
    lcd.setCursor(0, 1);
    lcd.print("Status: Full    ");
  } else if (batteryVoltage <= 12.0) { // Below threshold
    digitalWrite(relayPin, HIGH); // Turn on relay
    lcd.setCursor(0, 1);
    lcd.print("Status: Charging");
  }

  delay(1000); // Update every second
}
- The circuit monitors the battery voltage using the ATmega328P's ADC pin.
- When the voltage exceeds the set threshold (e.g., 13.8V), the relay turns off, stopping the charging process.
- If the voltage drops below a minimum threshold (e.g., 12.0V), the relay turns on to resume charging.
- The 16x2 LCD displays the current voltage and the charging status, providing a user-friendly interface.
- Solder the components onto a PCB, following the circuit diagram.
- Connect the ATmega328P to your computer via an Arduino Uno board to upload the code.
- Mount the PCB in an enclosure with appropriate terminals for the battery and the power source.
JLCPCB offers reliable and affordable PCB manufacturing services. With high-quality standards and fast delivery, it’s perfect for DIY and professional projects. Their $2 for 5 PCBs offer is an excellent choice for prototyping.
Get JLCPCB 6-layer PCBs for just $5! Register to get $60 Coupons: https://jlcpcb.com/?from=EST
Video Reference:
ConclusionThis 12V Battery Autocut Charge Controller is an efficient way to protect your batteries from overcharging. By leveraging the ATmega328P, the system is simple yet robust, providing precise voltage monitoring and control. Using JLCPCB, you can build a durable PCB for this project.
Feel free to experiment with the voltage thresholds in the code to suit your specific battery type!
Happy building!


_ztBMuBhMHo.jpg?auto=compress%2Cformat&w=48&h=48&fit=fill&bg=ffffff)


Comments
Please log in or sign up to comment.