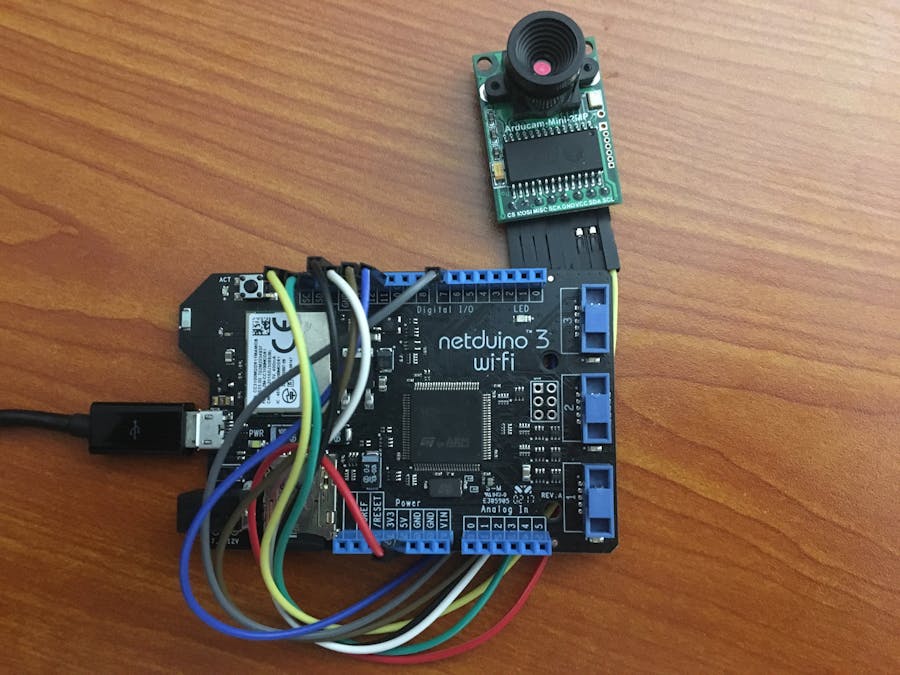
This writeup will show you how to tackle porting the ArduCam to be used on the Netduino board and use that camera to do tasks such as object detection using neural nets!
ArchitectureThe ArduCam and Netduino will serve frames to our remote web server which will be the middleware for sending the frame to a processing server. Depending on the outcome of the detection, we can send out alerts through email or text message to the user.
Hardware1. Netduino + ArduCam Pins
This is actually pretty straightforward, the ArduCam will use the same pins as a regular Arduino board. Make sure that the CS pin is correct. This project will use the D7 pin as the CS pin. Here's how to connect the camera:
2. Netduino Wi-Fi Setup
Hold the RESET button while plugging in the Netduino to a PC or mac. Download the appropriate bootloader tool: http://developer.wildernesslabs.co/Netduino/About/Updating_Firmware/
Input the SSID and password like so and hit Apply.
1. Porting Arduino/ArduCam to the.NET MicroFramework (C#)
Majority of my work has been porting the Arduino ArduCam code onto the Netduino. The main components required are I2C and SPI. The datasheet for the ArduCam OV2640 is available here.
To start off, clone the repository and open the Visual Studio solution (ArduCamSingleShot.sln):
$ git clone https://github.com/exp0nge/netduino-arducam.git
Here's the code that actually tests I2C:
arduCAM.writeRegister(0x07, 0x80);
Thread.Sleep(100);
arduCAM.writeRegister(0x07, 0x80);
Thread.Sleep(100);
Thread.Sleep(10);
arduCAM.writeRegister(ARDUCHIP_TEST1, 0x55);
byte testByte = arduCAM.readRegister(ARDUCHIP_TEST1);
You should get the following output:
Similarly, the SPI test code looks like this:
arduCAM.writeI2CRegister(0xFF, 0x01);
byte[] writeReadback = arduCAM.readI2CRegister(0xFF);
Here's the expected output:
The above should print before you proceed any further. If you can't get the camera to proceed after taking one image, make sure you include
arduCAM.ClearBit(ARDUCHIP_GPIO, GPIO_PWDN_MASK);
before communicating with SPI.
Here's what the final output should look like:
Ensure that capture.jpg has the appropriate JPEG headers:
ÿØÿà..JFIF..
2. SoftwareTesting
We're going to test with a local server that saves the received bytes as a JPEG. Run the following command to start the simple Flask app:
$ pip install flask
$ cd ArduCamSingleShot
$ python app.py
At this point you should have the Flask app running. You will need the address of the device that is hosting this app. One way to do this is to run ifconfig (mac/Linux) or ipconfig to figure out your local address. It should be something like 192.168.X.1XX. You'll need to change App.cs in the solution to use this route like so:
WebRequest request = WebRequest.Create("http://192.168.0.102:5000/upload/");
3. Bridge with Smart Camera
The rest of this guide will walk you through how to setup using Smart Doorman which is the processing and middleware server. The setup will involve the easiest methods but feel free to follow the original guide for more advanced setups.
3.1 gstreamer
Windows / macOS / Linux
Install gstreamer from the official site: https://gstreamer.freedesktop.org/download/
To test your installation, run these commands:
$ python3
>>> import gi
>>> gi.require_version('Gst', '1.0')
>>> gi.require_version('GstRtspServer', '1.0')
3.2 Installing YOLOv2 Object Detection API (on compute device)
IMPORTANT: You will need to download the model files before doing anything. Download them here and place the model directory in the project folder once you done. Install Docker prior to running the following commands:
$ git clone https://github.com/alexa-doorman/yolo-detection-api
$ sudo docker run --name redis-yolo -d redis~
$ sudo docker run --link redis-yolo:redis -e REDIS_URL=redis://redis:6379/0 --volume "/home/pi/yolo-detection-api:/src/app" -p 5001:5001 -d doorman/yoloapi:rpi
That's it! Check http://<ip-of-device>:5001 or try to post to http://<ip-of-device>:5001/detect
Here's an example of the output:
{
  "results": [
      {
          "bottomright": {
              "x": 588,
              "y": 539
          },
          "confidence": 0.5031049251556396,
          "label": "person",
          "topleft": {
              "x": 136,
              "y": 35
          }
      }
  ],
  "status": "success"
}
At this point we are ready to setup our middleware to send to /detect.
Here's the code that actually sends to our route for processing:
@app.route('/upload/process/', methods=['POST'])
def upload():
    with open('capture.jpg', 'wb') as f:
        f.write(request.data)
    process_request = request('http://<ip-of-device>:5001/detect', files={'image': open('capture.jpg', 'rb') })
    process_request.raise_for_status()
    return 'OK, saved file'
Once you've setup the regular upload and verified the image is saved properly, you can start pointing
WebRequest request = WebRequest.Create("http://192.168.0.102:5000/upload/");
to
WebRequest request = WebRequest.Create("http://192.168.0.102:5000/upload/process/");
The detection looks like this:
3.3 Sending Text Message
One scenario we can envision is that we would like to recieve a text message when a person or another object is detected. We can actually use a SMS gateway to text message by sending a email to that phone number. Here's the table of the routes:
Here's an example from the Python docs adapted to our use case:
# Import smtplib for the actual sending function
import smtplib
# Here are the email package modules we'll need
from email.mime.image import MIMEImage
from email.mime.multipart import MIMEMultipartCOMMASPACE = ', '
msg['From'] = 'your-email@email.com'
msg['To'] = COMMASPACE.join('recip-email@tmomail.net')
msg.preamble = 'A person has been detected'
with open('capture.jpg', 'rb') as fp:
    img = MIMEImage(fp.read())
    msg.attach(img)
s = smtplib.SMTP('localhost')
s.send_message(msg)
s.quit()


Comments
Please log in or sign up to comment.