

Hardware components | ||||||
 |
| × | 1 | |||
Software apps and online services | ||||||
| ||||||
| ||||||
 |
| |||||
This project is intended to be the logical continue of:
- Google-Cloud-based-IoT-System Tutorial. ( 1 )
- Google Cloud based IoT System - RIOT, MQTTSN, MQTT. ( 2 )
- Google Cloud based IoT System - LoRaWAN, TTN, MQTT. ( 3 )
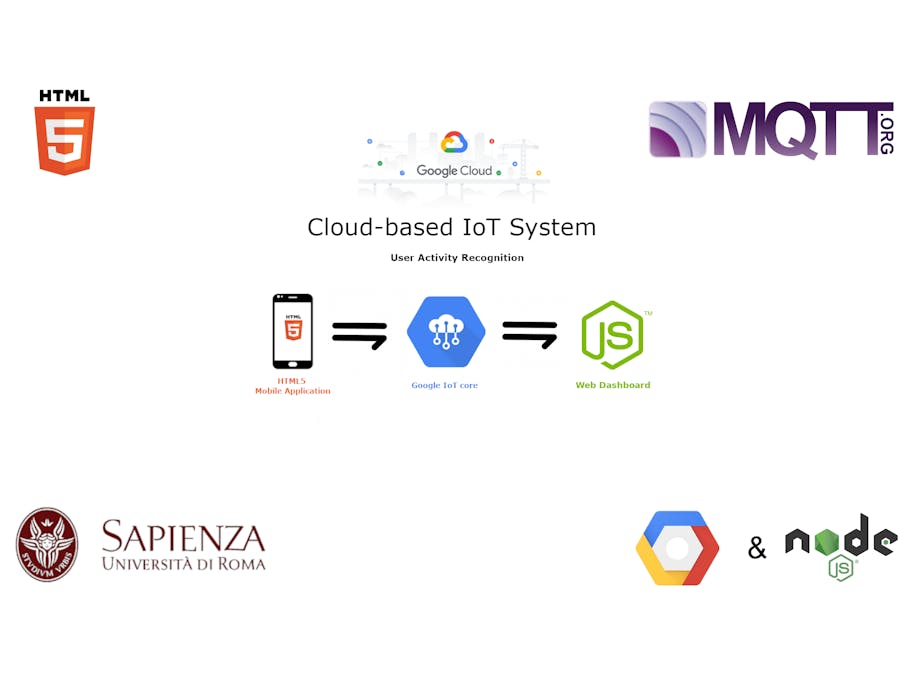
As study project of IoT course at Sapienza - University of Rome.In this section we will build on-top of the cloud based system developed in the previously parts. Essentially we will build an HTML5 mobile application using the Generic Sensor API to collects data form the acceleration sensor of the mobile phone. That data will be computed through a simple activity recognition model that detects if the user is standing still or walking and finally sent to our cloud system (the model will be deployed both in edge and cloud way).
DEPENDENCIESIn this project there are few dependencies needed, this can be easly obtained following the official guide linked here:
IMPLEMENTATIONMobile HTML5 applications
A very simple HTML5 based mobile application hosted by a node server, its job is retrieve data from the integrated accelerometer through the Generic Sensor Api and eventually send it to the Cloud. This page will locally compute and display the result of the recognition model.
Generic SensorAPI - Linear Accellerometer
Set the accelerometer in order to achieve our desired result is very simple, this through the use of Geneirc Sensor Api, a framework that expose sensor data to the Open Web Platform in a consistent and accessible way. First of all you need to define a linear acceleration sensor, a basic form of the accelerometer that dosn't include the acceleration due to the gravity, for this example let's set the frequency to 1Hz.
accelerometer = new LinearAccelerationSensor({ referenceFrame: 'device', frequency: 1 });Then, after set up the error listener, start the accelerometer
accelerometer.start();
accelerometer.onreading = () => {
    //APPLY RECOGNITION MODEL TO THE INPUT DATA
    rModel(accelerometer.x, accelerometer.y, accelerometer.z)
    //PUSH DATA
}
The input data on the accelerometer will be computed with the model or just raw pushed to the cloud.
User Activity Recognition Model
I developed a really simple activity recognition model, with a nice accuracy and without a training dataset (this will cause a reasonable number of false positive).
The classic acceleration measured from Generic Sensor Api takes into consideration the gravity force applied to the smartphone over the three axes X, Y, Z. This effect could be easily avoided through a simple math operation but we can simply use the Linear Acceleration Sensor that doesn't take into account the gravity force.
The model itself relies its funtionability on the concept of the "normal" of a vector, indeed we have a vector of three element v( x, y, z ) and we can compute the length of that vector through this matematical concept expressed on the belowing equation:
||v|| = sqrt(x^2 + y^2 + z^2)This length is compared on a threshold empirically studied.
In our case if the length is major than 0.7 the user is supposed to be moving otherwise it's resting.
Deploying the model - EdgeBased
As mentioned before, we are testing two kind of deployment of our model. Let's see how we deploy the model locally on the front end of the application.
delta = Math.sqrt(accelerometer.x * accelerometer.x + accelerometer.y * accelerometer.y + accelerometer.z * accelerometer.z);
delta > 0.7 ? (moving = true, status.innerHTML = "Walking") : (moving = false, status.innerHTML = "Resting");
console.log("send data: " + accelerometer);
socket.emit('data',
{
    x: accelerometer.x,
    y: accelerometer.y,
    z: accelerometer.z,
    status: moving
});
The data collected by the Linear Accelerometer Sensor is locally computed on the html and sent to google cloud through a publishAsync function on the server that host the page (we retreive the value through the use of soket.io as seen in the previously tutorial).
const publishAsync = (
mqttTopic,
client,
data,
) => {
    console.log("Edge computing");
    // Function that push the sensor status on Google Cloud
    var status = JSON.stringify(data.status);
    var x = JSON.stringify(data.x);
    var y = JSON.stringify(data.y);
    var z = JSON.stringify(data.z);
    console.log("x: " + x + " y: " + y + " z:" + z + " ======> " + status);
    const payload = deviceId + ":" + status + ":" + "crowd_sensing";
    // Publish "payload" to the MQTT topic. qos=1 means at least once delivery. (There             is also qos=0)
    console.log('Publishing message:', payload);
    client.publish(mqttTopic, payload, { qos: 1 });
};
Notice that you need some of your personal google cloud project data (mqtt topic, client and deviceId) as described on our first tutorial.
Deploying the model - CloudBased
Other face of the same coin, now let's deploy the model on the cloud.The html is the same but now we will not use the value computed locally indeed the data ( x, y, z ) are:
1) Pushed to the cloud
const publishCloud = (
    mqttTopicCloud,
    clientCloud,
    data,
) => {
    // Function that push the sensor value on Google Cloud
    var x = JSON.stringify(data.x);
    var y = JSON.stringify(data.y);
    var z = JSON.stringify(data.z);
    console.log("Cloud computing");
    console.log("x: " + x + " y: " + y + " z:" + z);
    const payload = deviceIdCloud + ":" + x + ":" + y + ":" + z + ":" + "crowd_sensing";
    // Publish "payload" to the MQTT topic. qos=1 means at least once delivery. (There is also qos=0)
    console.log('Publishing message:', payload);
    clientCloud.publish(mqttTopicCloud, payload, { qos: 1 });
};
2) Computed through the model on cloud side and then pushed on the dashboard through soket.io.
else if (device == "accelerometer") {
    //Computed at edge, receive and push the value without computing at cloud
    log[5].lastValue = value;
    log[5].values.push(value);
    socket.emit('accelerometer', log[5].lastValue);
    socket.emit('accelerometer', log[5].values);
}
else if (device == "accelerometer_cloud") {
    //Compute at cloud, if delta > 0.7 then user is moving
    var delta = Math.sqrt(x * x + y * y + z * z);
    log[6].lastValue = delta > 0.7
    socket.emit('accelerometer_cloud', log[6].lastValue);
    socket.emit('accelerometer_cloud', log[6].values);
}
As you can see we are using two device for the push to achieve our goal of double deploy study case.
3) Saved on the database
// References an existing subscription
const subscription = pubSubClient.subscription(subscriptionName);
// Create an event handler to handle messages
let messageCount = 0;
const messageHandler = message => {
    console.log(`Received message ${message.id}:`);
    console.log(`\tData: ${message.data}`);
    var data = `${message.data}`.split(":");
    if (data != null) {
    var device = data[0].toString();
    var x, y, z;
    var value = data[0] != "accelerometer_cloud" ? data[1].toString() : (x = data[1], y = data[2], z = data[3]);

    [//Device Switch as seen in 2)]

    new Data
    ({
        device: device,
        value: value,
        data: Date.now() / 1000
    }).save();
Extra - Cloud Function as background function
The same goal could be reached through the use of cloud functions. An example can be found on my personal repository under "./crowd_sensing_client/background_function".I think that this is a well balanced method to achieve this goal, the flow is pretty simple, essentially the data passed on a specific topic will be analyzed by the background function defined and then pushed on another topic (or the same one as you prefer). Let's see how it works:
1) On google cloud IoT core click on cloud functions and then create a new function.
Insert a name for the function, select the allocated memory (256MiB will be enough), select Cloud Pub/Sub as trigger method and then an associated topic (or create a new one no matter).
2) Code your function.
N.B. In this part it's crucial set correctly the package.json because the version of pubsub are very different eachother (in this case i've used the 0.21.1). Remember to change the name of the executed function.
3) Simply push the valute to the specific topic and you are done.
I really like this implementation but the used one is more linear and coerent to all the other tutorial. I hope that you liked this tutorial, you can test the overall application running the server (node./app.js) and using the mobile application deployed on heroku.


Comments
Please log in or sign up to comment.