


Hardware components | ||||||
 |
| × | 1 | |||
| × | 1 | ||||
 |
| × | 1 | |||
 |
| × | 4 | |||
 |
| × | 1 | |||
Software apps and online services | ||||||
 |
| |||||
Hand tools and fabrication machines | ||||||
 |
| |||||
 |
| |||||
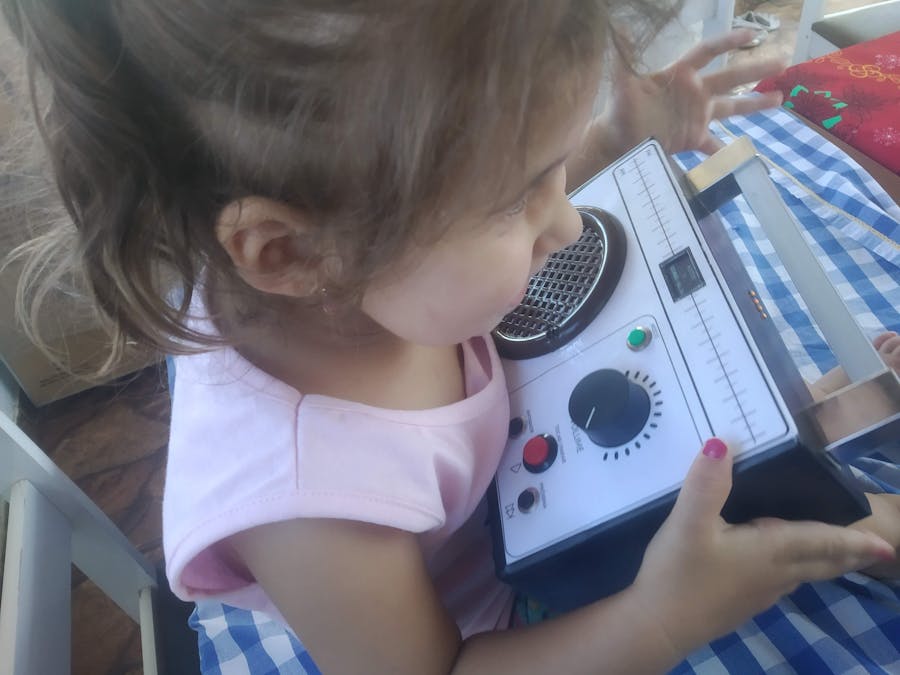
My niece loves music. She is two years old and the way she listens to music is through a smartphone. To try to get her a little off the smartphone and keep the songs that she likes, I made an educational radio for her as a gift for this Christmas.
Sure, I could buy a Chinese MP3 device, but as a good maker, this was the opportunity to develop not just a little generic radio but an educational toy so she can listen to her favorite songs, children's tales, and even a little game to guess sounds and a lullaby function and yet develop motor coordination.
With these requirements, I went in search of the solution (And have fun).
The most affordable solution with customization options was the use of DFPlayer Mini in conjunction with an Arduino.
I did some validation testing with the FranzBoy board that helped me define the desired buttons, use of the OLED display and operating modes for DFPlayer Mini:
So I designed the schematic of my project:
I bought the knobs and potentiometer for easy use by a child.
Then the challenge was to make the box. At first, I thought about using laser cut MDF, but I didn't have easy access to a laser at the moment. Looking at my trinkets I found an old smartphone box that would be perfect for the project.
Based on this box I made a design of the front of the radio.
With the design done, the next step was to drill the box to fit the speaker, knobs, potentiometer, and OLED.
The control board and DFPlayer Mini were mounted on a standard board.
I used hot glue to fix the speaker, control board and wiring.
For external finishing, I used the contact paper. As a handle, I used a drawer pull.
The result was excellent!
The source code was written based on the Arduino framework in PlatformIO. All code is available on my GitHub.
Here is my encouragement for parents, uncles, and friends to make toys for children.
Livia loved her new toy and takes him everywhere.


_3u05Tpwasz.png?auto=compress%2Cformat&w=40&h=40&fit=fillmax&bg=fff&dpr=2)
Comments
Please log in or sign up to comment.