


Hardware components | ||||||
 |
| × | 1 | |||
 |
| × | 1 | |||
| × | 1 | ||||
 |
| × | 1 | |||
Software apps and online services | ||||||
 |
| |||||
 |
| |||||
 |
| |||||
In this article, we are going to cover how to setup your own custom GATT service on the Arduino platform and then interact with it using an application running on Windows IoT Core. The project we will create is a BTLE bracelet that has an LED light (NeoPixel) that changes colors based on the communications received over the custom GATT service.
What is a GATT Service?
GATT stands for Generic ATTribute Profile. Essentially, it is what defines the services and their associated characteristics that are available on a particular BTLE (Bluetooth Low Energy) device (it is also available on regular Bluetooth devices, but we are concentrating on BTLE in this use case). A service can be thought of a behavior, and the characteristics can be thought of as the data that describes or enables the behavior.
GATT Service Conceptual Diagram
Hardware used in this article
- Adafruit Flora v.2 (it has an on-board NeoPixel)
- Adafruit Flora Bluefruit LE module
- Conductive Thread or Alligator Clips
- Orico Bluetooth Dongle (recommended by Microsoft)
- (+ your existing Raspberry Pi 2 with Windows IoT Core setup)
Setting up the Hardware
Setting up the hardware for the Raspberry Pi is simple. Just plug the Orico Bluetooth dongle into an available USB port on the Raspberry Pi 2 and boot it up.
Orico Bluetooth 4.0 Dongle
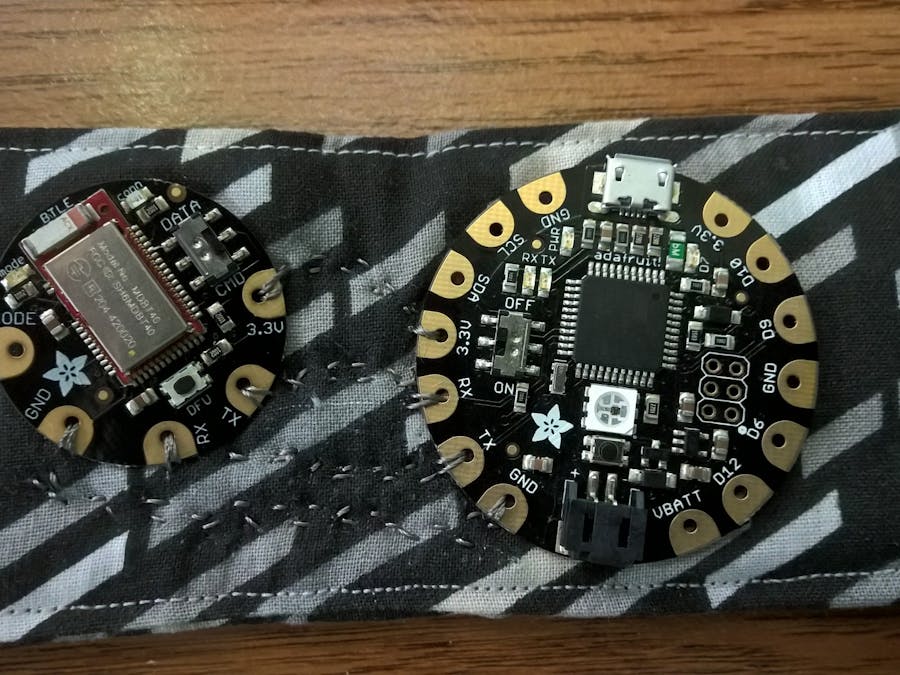
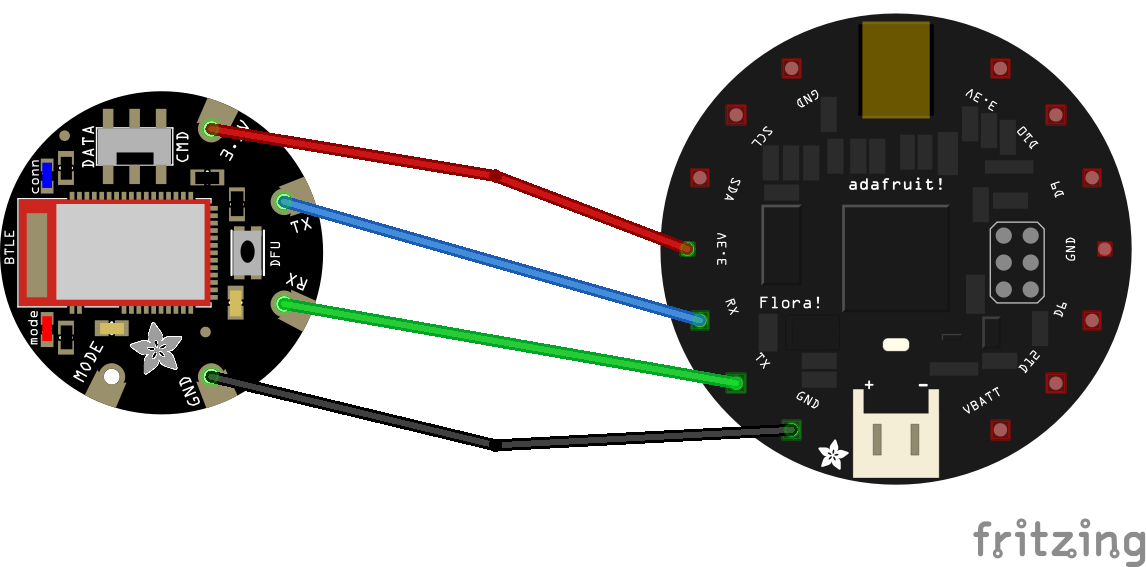
To setup the hardware for the Flora, follow the following diagram, and either sew the circuit using conductive thread on some fabric, or alternatively, you can use alligator clips (it is always recommended to start with alligator clips to ensure your hardware is in proper working order before you sew it):
Wiring overview:
- Flora 3.3v to Bluefruit LE 3.3v
- Flora RX to Bluefruit LE TX
- Flora TX to Bluefruit LE RX
- Flora GND to Bluefruit LE GND
- Switch the Bluefruit LE to CMD mode (on-board switch)
Flora Bracelet
(Please note that I am not the best hand sewer in the world)
Flora Bluefruit LE Configuration
This article expects that you have already setup your Arduino IDE to support the Flora. You will also need the Adafruit BluefruitLE nRF51 library, add this library through the Sketch->Include Library->Manage Libraries.
Arduino Bluefruit LE Library
The BluefruitLE has been implemented to accept a series of AT commands. Many that are explained in the Command Mode documentation on the Adafruit website. To configure our custom GATT service on the Bluefruit LE, we will be using a series of GATT commands and a GAP (Generic Access Profile) command (to add our service to the BLE device advertisement). You can configure the Bluefruit LE module directly from a serial window (there is an example that ships with the library that lets you run AT commands from the serial window available in File->Examples->Adafruit BluefruitLE nRF51->atcommand **please note that you’ll have to make several changes in order to run this example on the Flora, it is all documented step-by-step on the Adafruit website).
In our case we want to implement a service that changes the color of the on-board NeoPixel on the Flora 2 board. Here is a conceptual view of our service:
Custom GATT Service Conceptual Diagram
We will first need to define the service. We will also define a Readable/Notifiable characteristic, which will essentially trigger an event on an external device that is subscribed to it. This characteristic will be changed to the current color of the NeoPixel every time that the color has changed. We will define a Writeable characteristic, where an external device can write a hex color code. The Arduino sketch that we will be writing later on will poll for changes to that value, and if changed will assign that color value to the NeoPixel. We will also define a Readable characteristic where an external device can request the current color of the NeoPixel. This article will serve as a great reference as we are covering notifications, reading and writing to a custom GATT service.
Create a new Arduino sketch, I’ve named mine “customGATTService.ino”. Add the documented code (from the customGATTSerice.ino code section below) to configure your Bluefruit LE module with a custom service, remember that the sketch will not proceed until you open the Arduino IDE Serial Monitor.
Once the Bluefruit configuration sketch has been executed, you can close out of this Sketch, the Bluefruit LE module is now configured. To check the GATT information that we added to our device, we can run the ATCommand example (** Be sure to set FACTORYRESET_ENABLE to 0 or else the custom service will be wiped out!**) and issue the AT+GATTLIST command to see a listing of custom services available on the Bluefruit LE module. Open the Serial monitor and type AT+GATTLIST and click the send button. You should see output similar to the following:
AT+GATTLIST Command Output
AT > AT+GATTLIST

<- ID=01,UUID=0x1312,UUID128=00-77-13-12-11-00-00-00-00-00-AB-BA-0F-A1-AF-E1
ID=01,UUID=0x4201,UUID128=00-68-42-01-14-88-59-77-42-42-AB-BA-0F-A1-AF-E1,PROPERTIES=0x12,MIN_LEN=1,MAX_LEN=3,VALUE=00-FF-00
ID=02,UUID=0x4203,UUID128=00-69-42-03-00-77-12-10-13-42-AB-BA-0F-A1-AF-E1,PROPERTIES=0x08,MIN_LEN=1,MAX_LEN=3,VALUE=00-FF-00
ID=03,UUID=0x4204,UUID128=00-70-42-04-00-77-12-10-13-42-AB-BA-0F-A1-AF-E1,PROPERTIES=0x02,MIN_LEN=1,MAX_LEN=3,VALUE=00-FF-00
Keep a reference specifically to the ID’s of the services and each characteristic. These will be needed when we are interacting with them in our next sketch.
Flora BLE LED Sketch
Create a new sketch, I’ve named mine “Flora_BLE_LED.ino”. You will also need to add the Adafruit NeoPixel library to your Arduino IDE. You’ll do this much in the same way as adding the Bluefruit LE library by accessing Sketch->Include Library->Manage Libraries and performing a search for NeoPixel.
Arduino NeoPixel Library
Add the Flora BTLE NeoPixel Sketch from the Flora_BLE_LED.ino listing in the Code Section below.
You can see from the source code that the Write characteristic is consistently polled every second. If the value stored in this characteristic changes, it will change the color of the on-board NeoPixel, issue the Notification by changing the value in the Notification characteristic, as well as update the value that is stored in the Read characteristic which holds the current color value of the NeoPixel. Go ahead and upload this sketch to the Flora, and open the Serial Monitor. You should see consistent polling happening on the monitor.
Flora Polling GATT Characteristic
Pairing the Flora Bluefruit LE Module to Windows IoT Core
Currently in Windows IoT Core, interaction with GATT services over BTLE is only supported with paired devices. So we will need to pair our Bluefruit LE module with the Raspberry Pi. An easy way to do this is to access the Webb interface of Windows IoT Core. Access it via http://<IP_or_piname>:8080. In my case, I’ve named my Raspberry Pi raspii_2, so I access http://raspii_2:8080 . You will be asked to authenticate using the Administrator username and password that you set when initially setting up your Raspberry Pi with Windows IoT Core. Once the Webb interface has loaded, click on the Bluetooth menu option. You may need to hit the refresh buttons in order to see the Bluefruit module. Click the Pair link next to the Adafruit Bluefruit LE item. Give it a couple seconds, and then refresh the paired devices (if it doesn’t appear automatically), it should then show up in your paired devices.
Windows IoT Core available devices
Windows IoT Core Paired Devices
The next thing we are going to do is see how Windows IoT Core interprets our service and characteristics. To do this we will need to install on our development machine (not the Pi) the Windows Driver Kit. In this installation is a very valuable tool that we will FTP to our Raspberry Pi called bthgattdump.exe. Upon installation of the Windows Driver Kit, this file is located at the following path: C:\Program Files (x86)\Windows Kits\10\Tools\arm\Bluetooth\BthGATTDump\bthgattdump.exe. FTP this file to the root folder of your Raspberry Pi 2 using file explorer (ftp://<IP_or_piname>). Now we can use Putty or similar tool to run the executable we just uploaded. I have extracted the portion of the GATT dump tool output that represents our service.
Microsoft bthgattdump.exe output
[Service] Handle=0x003a Type=00771312-1100-0000-0000-abba0fa1afe1
[Characteristic] Handle=0x003b ValueHandle=0x003c Type=00684201-1488-5977-4242-abba0fa1afe1 Properties=(Read/Notify)
[Value] [00FF00]
[Descriptor] Handle=0x003d Type=0x2902(Client Configuration)
[Value] No subscription
[Characteristic] Handle=0x003e ValueHandle=0x003f Type=00694203-0077-1210-1342-abba0fa1afe1 Properties=(Write)
[Characteristic] Handle=0x0040 ValueHandle=0x0041 Type=00704204-0077-1210-1342-abba0fa1afe1 Properties=(Read)
[Value] [00FF00]
Here we can see that our service is identified with the handle 0x003a, our notification characteristic by 0x003b, our write characteristic is identified by 0x003e, and finally our read characteristic is identified by 0x0040. We will need these values when we implement our Windows IoT Core application.
Windows IoT Core Application
The last part of the equation is to implement a Windows IoT Core application to consume the custom GATT service that we created and exposed. Open Visual Studio 2015 and create a new blank Universal Application, I’ve named mine “HelloBLE”. Once the project has been loaded, add a reference to the extension Windows IoT Extensions for the UWP.
Next we will need to declare the GATT capability in our Package.appxmanifest file, in solution explorer, right-click this file and select View Code. Go to the capabilities section of this file, and add the GATT device capability from the Code section below.
Next we will define our UI.
Windows IoT Core Application Interface
Upon first running the application, all buttons are disabled. The Adafruit Bluefruit Connection Status will indicate if a connection has been made to the Bluefruit module. Once a connection has been made, the service and associated characteristics are retrieved. Once all has been initialized, the Adafruit Bluefruit Connection status will display Initialized in green, and the buttons will enable on the screen. The user can select from multiple pre-defined colors by pressing them. When a color change notification is issued from the service (after the Flora sets the color of the physical NeoPixel), an event will trigger and the Last Notification indicated Flora LED Hex Color As color will update with the value that was received in the notification. The user also has the ability to obtain the current color of the NeoPixel by querying the value stored in the Read characteristic of the service. This action is initiated by pressing the Read Current Color button near the bottom of the screen.
Obtain the XAML markup and associated code implementation from the MainPage.xaml, and MainPage.xaml.cs listings in the Code section below.
Now you can run the application and change the color of the LED over our custom BTLE GATT service.
Conclusion
In this article we learned how to configure and expose a custom BTLE GATT Service on the Adafruit Flora Bluefruit LE module. We also learned how to poll and manipulate the characteristic values of our service in our Flora sketch. On the Windows IoT Core side of the house, we learned how to pair a BTLE device, get service info using bthgattdump.exe, as well as learned how to connect and retrieve service and characteristic information. We also learned how to subscribe to a notification characteristic, write to a characteristic, and read from a characteristic.
Source Files (note: Arduino Source Files are located in a folder in the Visual Studio Project)
Tags:


Comments
Please log in or sign up to comment.