

_KkjhYf3rIH.jpg?auto=compress%2Cformat&w=900&h=675&fit=min)
Hardware components | ||||||
 |
| × | 1 | |||
 |
| × | 1 | |||
| × | 1 | ||||
| × | 1 | ||||
| × | 1 | ||||
| × | 2 | ||||
 |
| × | 1 | |||
| × | 1 | ||||
| × | 1 | ||||
| × | 1 | ||||
| × | 1 | ||||
| × | 1 | ||||
| × | 1 | ||||
 |
| × | 1 | |||
 |
| × | 1 | |||
| × | 1 | ||||
Software apps and online services | ||||||
 |
| |||||
Hand tools and fabrication machines | ||||||
 |
| |||||
Like any self-respecting, techie homeowner with a busy, on the go lifestyle, I depend on a programmable thermostat at my home that allows me to control heating/cooling remotely via my android phone. I also happen to have large wrap around glass windows.
They trap the heat inside the condominium on sunny days even when it is cold outside. To make it a little comfortable, I would crack open a window to let some air in. Problem was that, I would forget to shut it before leaving the house. Later at night, I would get back home, only to find out that the heating has been running full force (it was programmed to come on in the evening) while the windows is open all the way. This would happen during summer time also when air conditioning would come on while nobody was home and a window was left open.
GoalThe goal of this project was to remedy this situation. I needed a way for my home to send me an alert if a window is open and the heating/cooling comes on so I could turn it off remotely using the thermostat app on my phone. And thus the idea for the "Project Elara" was born.
For this project, firstly I needed a way to detect if a window is open. That is pretty easy to achieve using a commercially available magnetic sensor switch or what is technically called a 'Reed switch'. Secondly, I needed a way to detect when there is air flowing through the HVAC ducts (hot or cold didn't matter), and that turned out to be more of a challenge. After several hours of research on the internet, it became clear that the best way to achieve this would be by the way of a 'sail' attached to a 'trigger switch'. Lastly, I need something that would sense these two pieces of input together and raise an alarm if the windows is open and an air flow is detected. For that I decided to go with an arduino based "Sparkfun ESP8266Thing" board. The main reason for that was the board comes with an on-board wifi and was cheap (I picked on up for $10.00 on black Friday deal). It also has more than enough GPIO pins for my needs.
Elara Airflow DetectionBefore this project, I knew nothing about the dynamics of airflow and more specifically how it flows out of the vents of a typical HVAC system at home. So this ended up being a 'learning experience'. I unscrewed a vent that was situated on the top of my kitchen window and went about attaching a sail to it that would trigger a micro switch when the air was flowing. It took several trials and errors and weeks of testing different ideas. I even created a test circuit on a breadboard to see if the airflow was detected reliably. I ended up using a small parachute that I picked up at the model rocketry section of my local hobby store and attaching to the micro switch hidden inside the vent. The trick was to find a balance such that the switch is not triggered merely by the weight of the sail (parachute in the case) but only when the air pushes against the sail. Also, parachutes are not designed to work upside down (like shown in the picture) so I had to make some modifications. I had to insert a piece of paper plate inside this parachute to keep it open and catch some air. It also adds some weight and prevents it from flopping around uncontrollably when the air is flowing. The long lever attached to the micro switch (I used a food picker stick from my kitchen) gives me a little more control over the trigger pressure when the parachute is hanging from it. Finally, keep in mind that when air is flowing, the micro switch does stay closed and flickers quite a bit due to the tug and pull from the parachute. We correct for this in the code by using a technique called 'debouncing'. More on this later. Anyhow, how not saying that this is the best way to do it but after several weeks of testing it worked to my satisfaction and I was ready to move on the the next step.
Micro Switch Assembly
Attaching micro switch assembly to the vent:
Completed micro switch assembly:
Vent with micro switch assembly wired in and parachute attached.
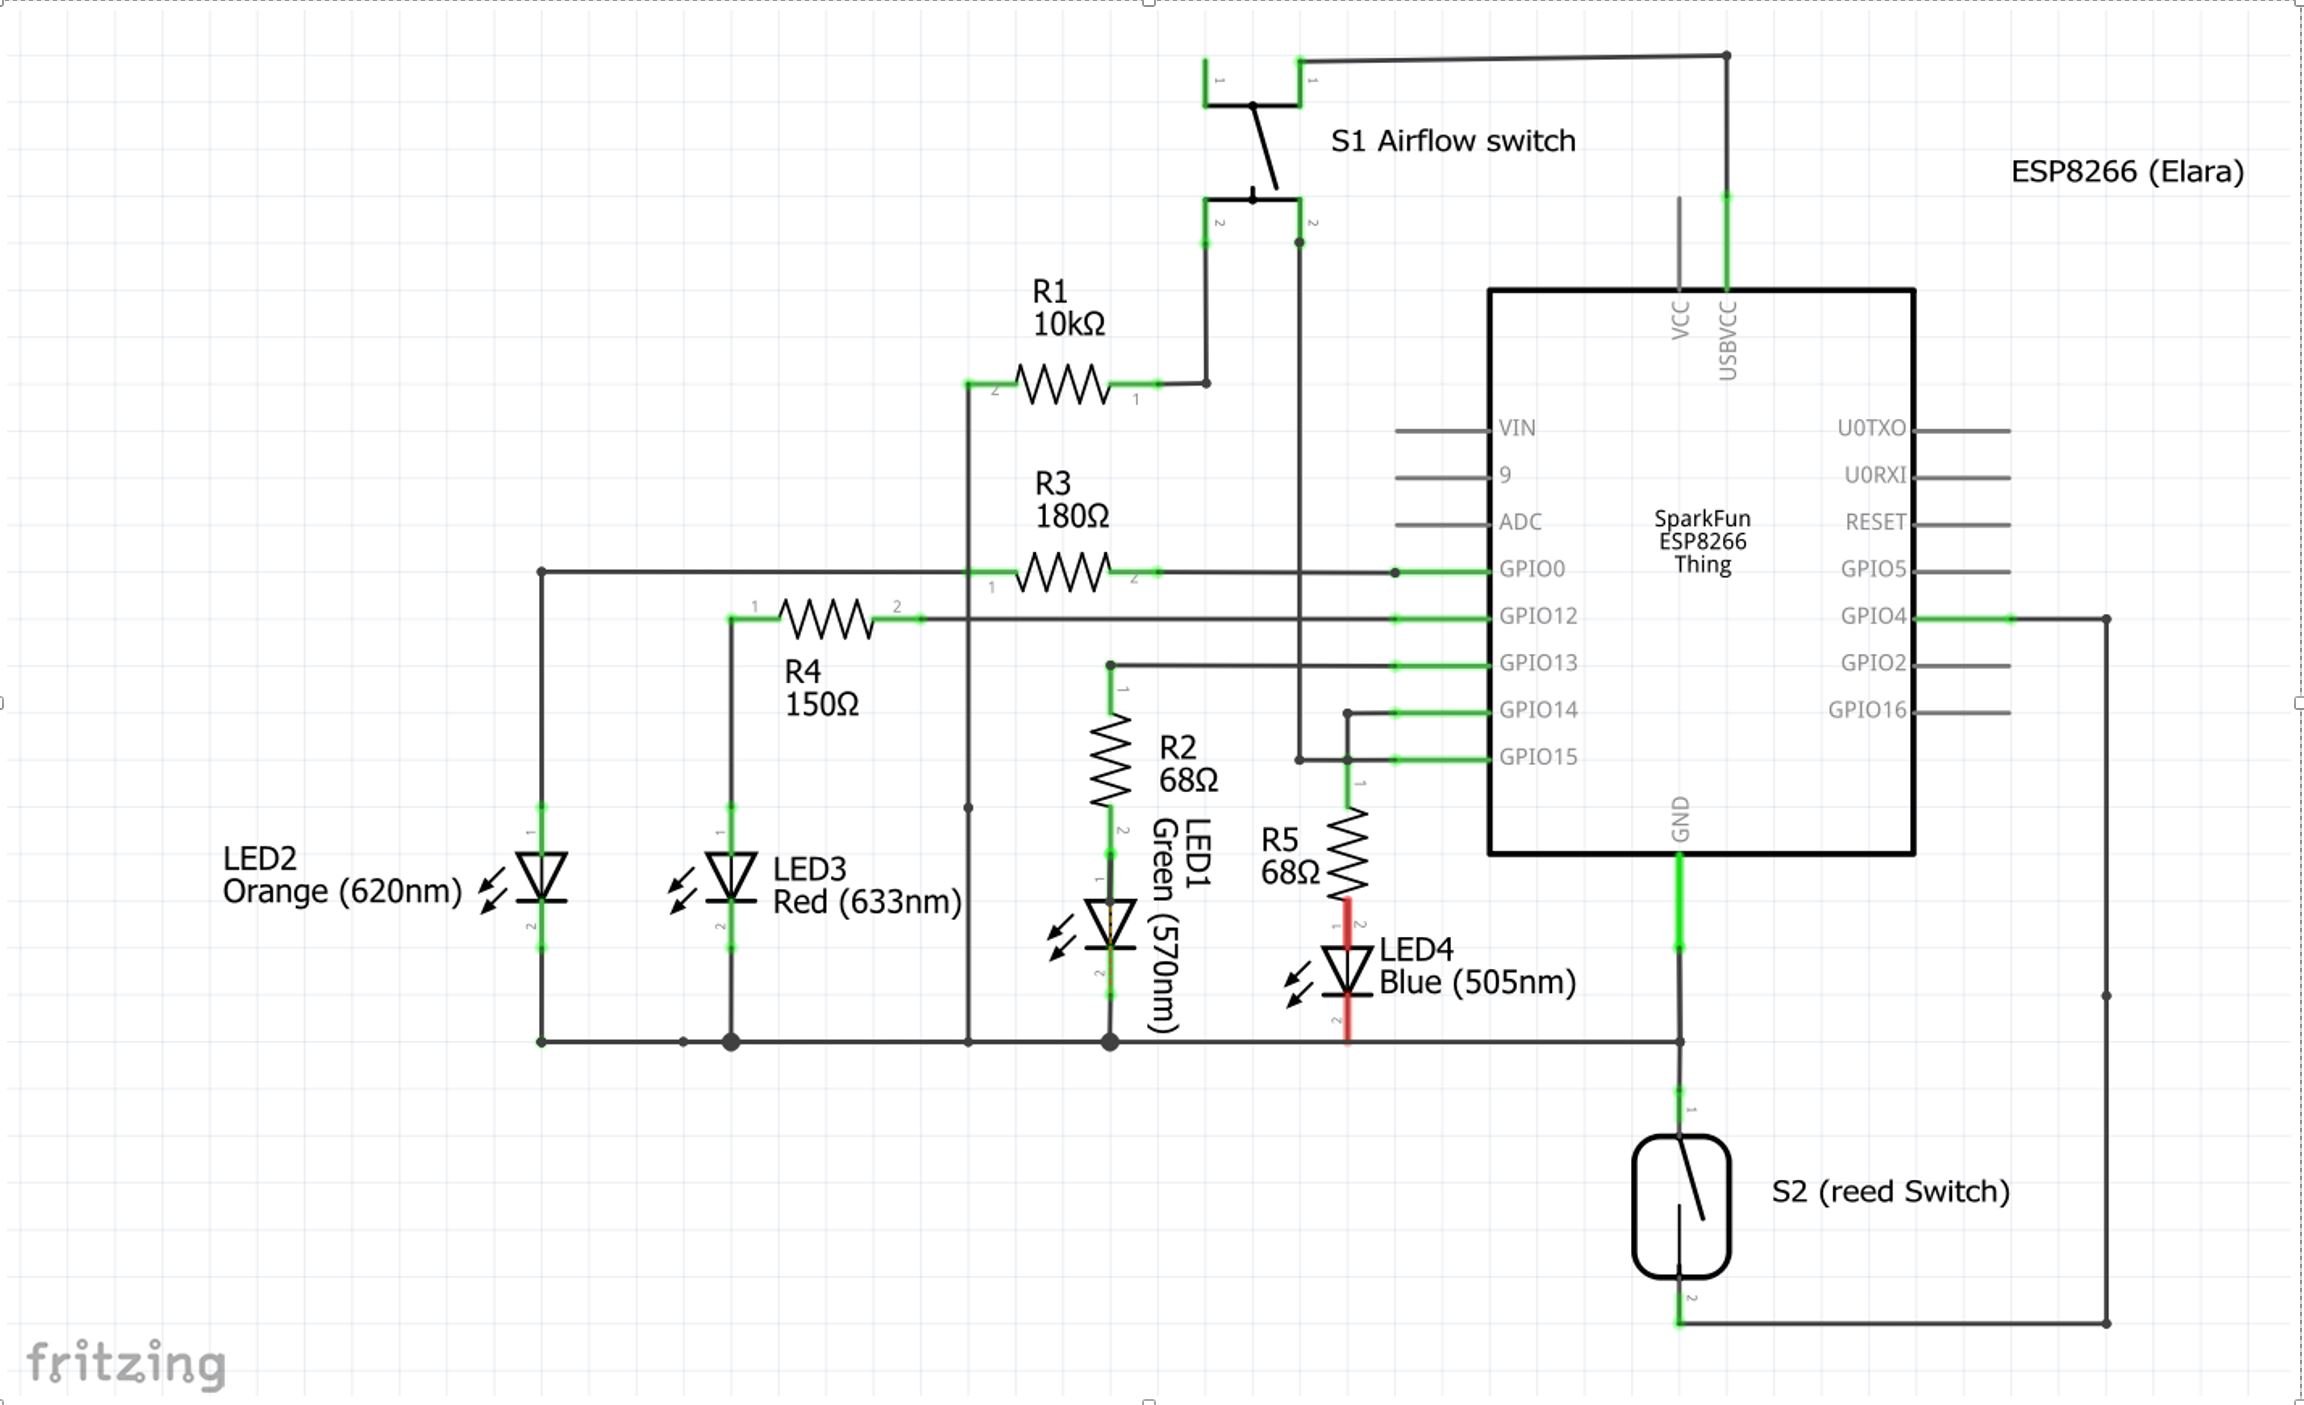
Elara Circuit Assembly:Once the airflow detection was working reliably, it was time to design the circuit for the project. Center piece of the design was the Sparkfun ESP8266 Thing board. The board senses input from the two switches:
- S1 - The airflow detector switch described in the section above.
- S2 - The reed switch to detect the window open/close status.
The design also includes four, 5 mm indicator LED's in different colors (as well as their corresponding current limiting resistors):
- LED1: Green - Indicates Airflow status
- LED2: Orange - Indicates Window Open/Close status
- LED3: Red - Indicates alarm condition status
- LED4: Blue - Indicates a ping command arrival from a client (described below)
When the the circuit detects airflow in the vent, the green LED comes on. Orange LED comes on when the window is open. And when both these conditions are true at the same time, the red LED starts flashing. Once the status of either one of the switches changes (airflow stops or windows is closed) the red LED stops flashing.
Finally, I packaged the entire assembly after the wiring and soldering into a nice looking $3.00 enclosure that I picked up at the local Ax-man Surplus store near my home.
Parts used for circuit assembly (Switches S1 and S2 not shown):
Final Assembly:
Another view of the final assembly:
Breadboard testing:
Enclosure with final circuit assembly and the LED's installed
The Elara API:Besides sensing the input from the two switches and controlling the LED's, the Sparkfun ESP8266 Thing board also launches a little web service when it boots up. This service hosts a Rest API. This allows a client program (like a browser) to query the board, over your home wifi network, for the current status of the airflow, window and alarm as detected by the circuit. The API also includes a 'Ping' command. When the board receives a Ping command, it flashes the blue LED and responds with a 'ACK' status, letting us know that it is still talking to us. Here is the list of all available Elara API commands:
http://[board IP address]/Ping
http://[board IP address]/AirflowDetected
http://[board IP address]/WindowOpen
http://[board IP address]/AlarmStatus
Where board IP address is assigned by your home router so an example ping command might look like this: http://192.168.0.102/Ping.
We will go into the details of the code i.e arduino sketch that serves this API in the next section.
The Elara Code:Before we delve into our code, we will need to set up the Sparkfun 8266 Thing board as a web server. Please click here for a detailed tutorial that includes everything from full hardware set up to configuring the board as a web server.
The following snippet of arduino sketch shows how the Elara API is implemented in the code. We are basically formatting and returning a HTTP string in response to a incoming request. Full code listing can be downloaded as an .ino file from the code section in the attachments of this post.
void loop()
{
	// We start with setting up the Airflow and windows status:
	DetectAirflow();
	DetectProximity();
	if (AirflowDetected && WindowOpen)
		blinkAlarmLED();
	else
		digitalWrite(alarmLEDPin, LOW);
	// Here we respond to incoming requests:
	// Check if a client has connected
	WiFiClient client = server.available();
	if (!client)
	{
		return;
	}
	// Prepare the response
	String s = "HTTP/1.1 200 OK\r\n";
	s += "Content-Type: text/html\r\n\r\n";
	s += "<!DOCTYPE HTML>\r\n<html>\r\n";
	// Read the first line of the request
	String request = client.readStringUntil('\r');
	Serial.println(request);
	client.flush();
	if (request.indexOf("/WindowOpen") != -1)
	{
		// client is looking for the Window Status:
		s += "Window Open: ";
		s += (WindowOpen) ? "TRUE" : "FALSE";
	}
	else if (request.indexOf("/AirflowDetected") != -1)
	{
		// client is looking for Airflow status
		s += "Airflow Detected: ";
		s += (AirflowDetected) ? "TRUE" : "FALSE";
	}
	else if (request.indexOf("/AlarmStatus") != -1)
	{
		// client is looking for Alarm status
		s += "Alarm Status: ";
		s += (AirflowDetected && WindowOpen) ? "ON" : "OFF";
	}
	else if (request.indexOf("/Ping") != -1)
	{
		// client is looking for Ping confirmation
		s += "Ping: ";
		s += "ACK";
	}
	else
	{
		// request is invalid
		s += "Invalid Request.<br> Try /WindowOpen, or /AirflowDetected or/Ala                      rmStatus or /Ping";
	}
	s += "</html>\n";
	// Send the response to the client
	client.print(s);
	delay(1);
	Serial.println("Client disonnected");
}
Following snippets show how the input is detected and processed from switch S1 (airflow) including the 'debouncing' that I mentioned earlier:
// Following control the debouncing of the air flow switch
unsigned long previousmillis = 0;    // the last time the output pin was toggled
long debounce = 3000;                // the debounce time, increase if the output                                          // flickers
// Detects the current state of airflow and sets the state
// of the airflow LED accordingly.
void DetectAirflow()
{
	reading = digitalRead(airflowInputPin);
	if (reading == LOW)
	{
		if (millis() - previousmillis > debounce)
		{
			// we can change the airflow state because we are passed the                          //  debounce period
			AirflowDetected = false;
			airflowLEDState = LOW;
		}
	}
	else
	{
		AirflowDetected = true;
		airflowLEDState = HIGH;
		// reset the previous millis:
		previousmillis = millis();
	}
	digitalWrite(airflowLEDPin, airflowLEDState);
}
Finally, this is a simple code snippet that detects the status of the window sensor switch S2 (proximity sensor) and controls the corresponding LED.
boolean WindowOpen = false;         // initial state of the window
void DetectProximity()
{
 int proximity = digitalRead(reedInputPin);
 if(proximity == LOW)
 {
   digitalWrite(reedLEDPin, LOW);
   WindowOpen = false;
 }
 else
 {
   digitalWrite(reedLEDPin, HIGH);
   WindowOpen = true;
 }
}
With this project, we created a gadget that monitors air flow in your HVAC duct. It also detects if a window is currently open or closed. It gives a visual indication of the current state of these things via LED's. Moreover, it hosts a web based API that can be queried for the same information over a Wifi network. We can now write a REST client application on any platform (mobile, desktop) in a language of our choice that can query this API for current state of things and take appropriate action (for instance send out a text alert) as necessary. I will be adding a code listing for a sample client application with this post some time in the future.
If you have any comments or questions about this project, please let me know.

_3u05Tpwasz.png?auto=compress%2Cformat&w=40&h=40&fit=fillmax&bg=fff&dpr=2)
Comments