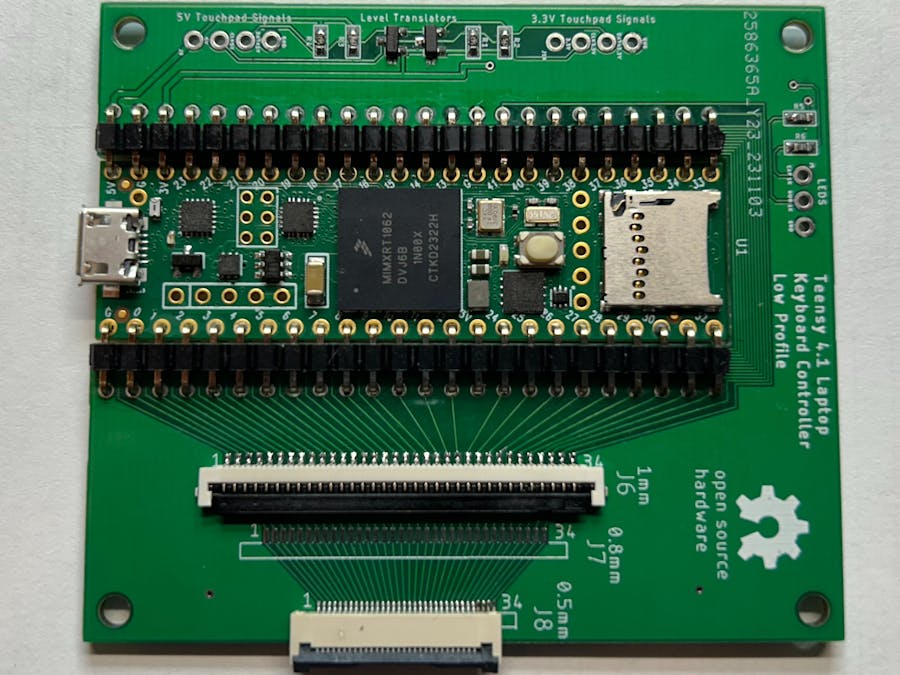
I did this project because I've seen many forum posts from people asking how to use the keyboard from their old broken laptop. Unfortunately the answers given are "it can't be done," "it's too hard," or "rip apart another USB keyboard and steal the controller circuit." I believe I have a better answer by using a "nearly universal" keyboard controller. My original project description was based on a Teensy LC or 3.2 (see video above) but those are now obsolete. I've updated my circuit board to use the Teensy 4.1. This board accepts keyboard cables with up to 34 pins on a 1 mm, 0.8 mm, or 0.5mm pitch. The board shown below won't work on every keyboard but it will work on most. The Teensy 4.1 sits in the cutout so it is a very low profile assembly. "U" shaped header pins connect the Teensy signals to the board. The Teensy 4.1 doesn't need any backside jumper wires (like the Teensy 4.0). Because the Teensy 4.1 is not 5 volt tolerant, I added pads for N-Channel FETs and pull up resistors to make level translators. Add these parts if you want to control a PS/2 touchpad powered by 5 volts. A 3.3 volt touchpad doesn't need any level translators. There are also pads for current limit resistors if you want to drive CAPS and NUM lock LEDs.
First you load a text file on your PC with a list of your keyboard's keys, leaving your cursor next to the first key. Then the Teensy 4.1 is loaded with an automated continuity test routine which sends the pin numbers (over USB) that are connected when a key is pressed. It then sends a down arrow so the cursor is positioned at the next key. Once all the keys have been pressed, you have a list of all the pin connections for your keyboard. This is a much better method to decode the key matrix than using an ohm meter. A table like the one shown below can be made from the continuity test results.
With the key matrix mapped out, the Teensy can be reprogrammed with a USB keyboard controller routine. The TMK software will give you all the features you could ever want but it is pretty complicated to set up. As an alternative, I wrote a simple Arduino routine using the Teensyduino “Micro-Manager” functions. This code has been tested on a few dozen different laptop keyboards. All files for the Teensy 4.1 USB controller are located at my GitHub repository.
The software and circuit board files can be downloaded from my GitHub repository by clicking the green "Code" download button on the right. Choose the Download ZIP option from the Code pull-down menu. The ZIP file will contain the entire repository content.
My “Instructable” gives a step by step description to assemble the board and decode the keyboard matrix. It also shows other circuit boards for the Teensy 4.0 and Teensy 2.0++ where the Teensy sits on top with regular header pins. There's even a board that uses an FPC connector with thru-hole pins so it's much easier to solder than a surface mount connector. This board will only work for FPC cables with a 1mm or 1.25mm pitch.
If you don't know how to solder but still want to make a USB keyboard, download the "no_solder_method" pdf file from my repo. It will explain how to use a 0.5mm FPC or 1mm FPC adapter board from Ali Express along with a Teensy 4.1 with header pins. The adapter board and Teensy will be connected together with Dupont jumper wires as shown below.
Check out my other Hackster project that details how to convert laptop PS/2 touchpads to USB. Once the keyboard and touchpad are converted, all you need to make a Raspberry Pi laptop is a HDMI to LVDS video card from EBay.
I hope you find these projects useful.
Cheers
Frank Adams


Comments
Please log in or sign up to comment.