


Hardware components | ||||||
 |
| × | 1 | |||
_ztBMuBhMHo.jpg?auto=compress%2Cformat&w=48&h=48&fit=fill&bg=ffffff) |
| × | 1 | |||
 |
| × | 1 | |||
 |
| × | 1 | |||
Software apps and online services | ||||||
 |
| |||||
_4YUDWziWQ8.png?auto=compress%2Cformat&w=48&h=48&fit=fill&bg=ffffff) |
| |||||
LCD1602 is a commonly used component to display information from Arduino boards. When connecting the LCD1602 screen to your MCUs, have you ever been tired of the messy connections? As a lazy man, I have! Although there are several LCD shields available for Arduino UNO board, none of them is suitable for Arduino MKR board. So if you have a MKR board, you still have to wire the LCD screen yourself. Today, I am going to show you my customized LCD 1602 shield that can work for either an Arduino UNO board or an Arduino MKR board.
Yes! A shield working for two kinds of Arduino boards! And it takes cares of all the annoying connections!
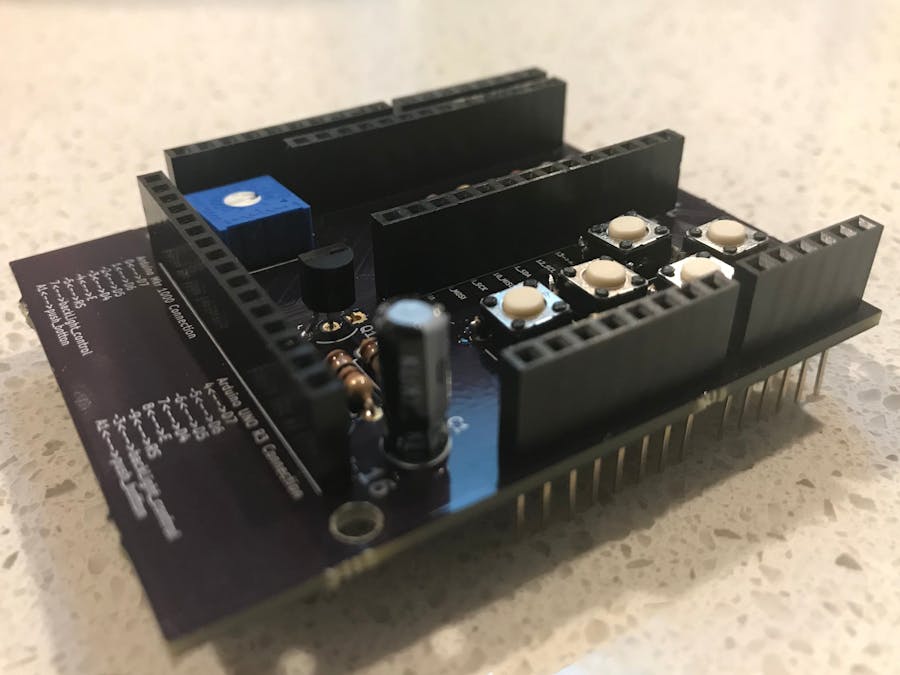
DesignThe shield is of the same size of an UNO board. It has three groups of connectors. The most outside connectors are for the Arduino UNO board. The inner connectors are for the Arduino MKR board. The bottom connectors are for the LCD1602 screen.
There are five push buttons that can be configured as UP, LEFT, RIGHT, DOWN, SELECT keys. A potentiometer is used to adjust the screen contrast. The shield uses a RC filter to smooth the PWM modulation to control the screen brightness.
The circuit works as a socket for Arduino MKR board as the MKR board sits at the top. The pin occupations are listed below: (Arduino MKR pin left, LCD right)
Pin 0 <---> D7
Pin 1 <---> D6
Pin 2 <---> D5
Pin 3 <---> D4
Pin 4 <---> E
Pin 5 <---> RS
Pin 7 PWM for backlight control
A1 analog input for push button sensing
The rest of the Arduino MKR pins are unused, so you can utilize them in your project.
For Arduino UNO, the shield sits on top of the UNO, and the pin configurations are as follows: (Arduino UNO pin left, LCD right)
Pin 4 <---> D7
Pin 5 <---> D6
Pin 6 <---> D5
Pin 7 <---> D4
Pin 8 <---> E
Pin 9 <---> RS
Pin 3 PWM for backlight control
A1 analog input for push button sensing
The rest of the Arduino UNO pins are unused, so that you can use them in your project.
To program your Arduino boards with the shield, simply set the right pins in your code.
For Arduino MKR board, the declaration of the variables are:
#include <LiquidCrystal.h>
const int rs = 5, en = 4, d4 = 3, d5 = 2, d6 = 1, d7 = 0;
const int litPin = 7;
LiquidCrystal lcd(rs, en, d4, d5, d6, d7);
For Arduino UNO board, the declaration of the variables are:
#include <LiquidCrystal.h>
const int rs = 9, en = 8, d4 = 7, d5 = 6, d6 = 5, d7 = 4;
const int litPin = 3;
LiquidCrystal lcd(rs, en, d4, d5, d6, d7);
I have included the example scripts in the attachment. Feel free to download them.
DemonstrationNoticeDon't connect UNO and MKR board together with the shield, as the UNO and MKR I/O voltages are different, so this may damage the MKR board.
Check out this link if you want to have one.


_Ujn5WoVOOu.png?auto=compress%2Cformat&w=40&h=40&fit=fillmax&bg=fff&dpr=2)

Comments
Please log in or sign up to comment.