


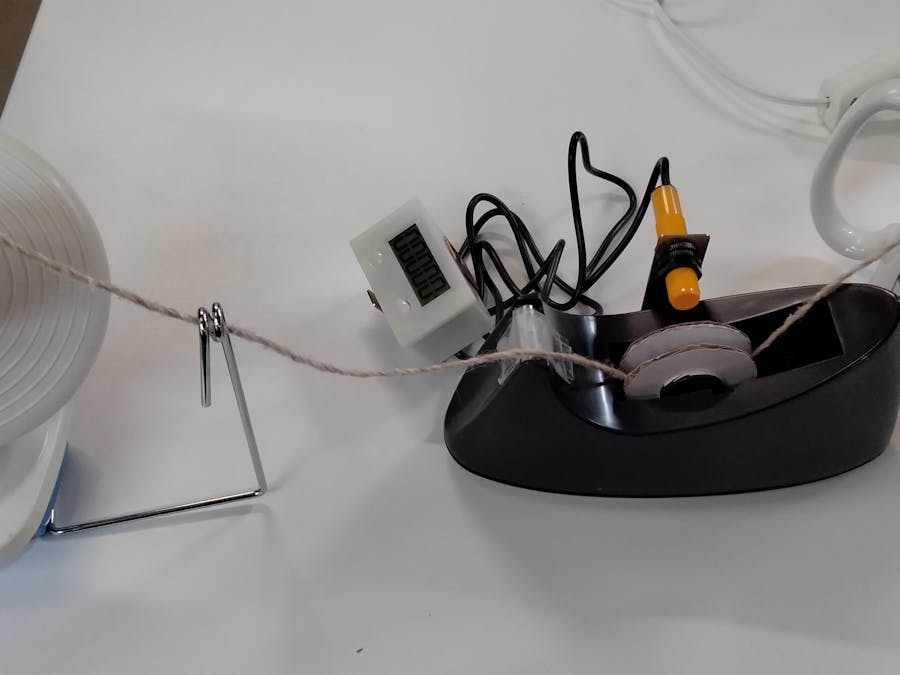
This device was made for an article written the for PLY Magazine blog - if you're interested in all things hand-spinning, check them out! https://plymagazine.comFull article including a discussion of yarn measurement techniques:We take a weighted tape dispenser, instrument it with an off-the-shelf digital magnetic counter, and use it to measure the length of yarn left in a ball. Note that we re-wind the ball in the process, so it can't still be attached to a project!Thanks to PLY for encouraging this project and having us on their blog!
BUILD INSTRUCTIONS1. Gather your tools and supplies
You’ll need:
- A weighted tape dispenser with 1” core, similar to this one.
- A full roll of tape
- A digital magnetic counter kit
- Cardboard
- A pen or pencil
- Scissors or an exacto knife
- Phillips/Plus-tip screwdriver
- Pliers
- Hot glue gun and glue
- A hand crank ball winder, like this one.
- Aball of yarn !!!
- A smooth container or yarn bowl for containing yarn as it unwinds
2. Cut your yarn guides
Take the roll of tape and trace the inside and outside of the roll. Make two donuts. Cut them out with scissors or an exacto knife.
3. Attach the yarn guides and magnet
Take your yarn guides and push them onto either end of the core of your tape dispenser. They may stay put as-is, but ours loosened and flopped after winding a few balls, so we recommend hot-gluing them in place. Also hot-glue the magnet to the outside of one of the yarn guides.
Note: we have an older-style tape dispenser with a round core. If yours has a triangular core, that’s OK too, proceed!
4. Prepare the rotation counter
Unscrew one of the nuts on the rotation counter, push the rotation counter through the large oblong hole on the mounting bracket that comes with the kit. Adjust both nuts so that there’s about ¾ inch (19 mm) from the end of the tip of the counter to the mounting bracket. Using pliers, bend the other end of the bracket into an “L”, about mid-way through the bottom hole on the bracket. (Note: read through the next step as well, the amount of L or where you bend the bracket may need to be different for your particular tape dispenser.) The tip of the L should be on the same side as the tip of the rotation counter.
5. Assemble the rotation counter and magnet
Place the tape dispenser core with yarn guides back into the tape dispenser. Rotate the core so that the magnet is at the top, you’ll need to hold it there with one hand. With your other hand, hold up the rotation counter bracket on the side of your tape dispenser. The magnet and the rotation counter tip should be directly opposite each other, with approximately a 1/8” (3 mm) gap between them. If the gap is different, adjust the nuts on the rotation counter. If the rotation counter is more than 1/8” above or below the magnet, adjust the place where you’ve bent the bracket.
6. Tape the bracket to the dispenser
Use a few pieces of tape to attach the bracket to the dispenser. The bracket should be as close to vertical as possible. Our tape dispenser had slanted sides, so we folded up a piece of tape and stuck it between the bracket and tape dispenser to hold it in a vertical position. This helps with consistent spacing between the magnet and counter, which helps with consistent counting! At this time, also use a few pieces of tape to tape over the serrated edge of your tape dispenser. We don’t want it roughing up your yarn!
7. Attach the rotation counter to the display
The rotation counter should already have stripped wires, meaning some copper strands are exposed from the insulation, but the strands might be a little frayed. Using your fingers, twist each of the wire ends together, so they’re nice and tidy. The LCD should by default have a battery installed, and be displaying all zeros in black. If the display is completely blank, unscrew the bracket and back compartment, insert a new battery, and screw it back together. With the phillips screwdriver, unscrew each “COUNTER” terminal on the LCD display a few rotations so they’re loose, but still screwed in a little. The word “COUNTER” is embossed in the white plastic and may be difficult to see, we’ve used a marker to make it black in the photo. Insert the wires between the two plates in each terminal. It doesn’t matter which wire is on the left or right. Make sure the wire insulation ends before the wire enters the plates, this will ensure you get good electrical contact. Screw the terminals back down tightly, so that the wires are firmly sandwiched between the plates. Set the LCD next to the tape dispenser.
8. Test your counter
Manually rotate the tape dispenser core around a few times, passing the magnetic by the tip of the rotation counter. With each pass, the display on the LCD should count up! Note that there’s no way for it to tell direction – it will count up by one no matter which way you turn the core. Press the Reset button to zero the count. We don’t use the pause button, note that if you press it, the counter will no longer count up.
9. Set up your yarn
Yay, you’re ready to test it out with some yarn! Clamp your ball winder to a surface, like you would for winding any ball of yarn. Set the tape dispenser in front of the yarn guide, so that the taped-over serrated edge is opposite your yarn guide. Place the LCD someplace you can see it while winding. Place the yarn container (or yarn bowl) in back of the tape dispenser, so that all 3 parts are in a line. Take the core out of your tape dispenser. Take an end of your yarn from the ball (if you have an inside vs outside choice, we tend to prefer inside. If the inside is trapped, outside is totally fine), and loop it around the core once, leaving about a 1 foot (30 cm) tail. Direction of the loop doesn’t matter. Place the core back inside the tape dispenser, making sure the yarn is within the two yarn guides. Run the end of the yarn through your ball winder’s yarn guide, and attach it to your winder core.
10. Wind and count!
Make sure your yarn is between the yarn guides in the tape dispenser. Zero the count on the LCD display. You will need to guide the yarn properly with your non-winding hand, so that the core doesn’t jump out of the tape dispenser. Take a loop of yarn from the ball-side, and bring it toward you and above the ball winder. Between this and the pull from the ball winder, you should be able to keep a little bit of tension on the tape dispenser core, pulling it toward you, which keeps it seated. We found that pulling the yarn all the way to you and holding it directly above the ball winder was comfortable and worked well. Start winding away! You’ll get approx. 8 rotation counts per crank of the ball winder. Keep winding slow and steady, so that the core doesn’t jump and so that you don’t get going so fast that you miss counts. This didn’t happen to us, but could theoretically happen. Keep cranking at about 1 to 1.5 cranks per second. When your run out of yarn, since the core is weighted, it will stop. It won’t freespin and add extraneous counts. Check out our video of this step:
11. Do the Math!
Now on your LCD, you have a display of number of tape core rotations underwent while winding this ball of yarn. Now let’s turn that into a measurement of length! Tape cores are generally a standard 1” (25.4 mm) in diameter in the US. We need the circumference, to figure out how much yarn goes around with each rotation. Easy-peasy – circumference is just diameter x Pi. So 1 inch x 3.14 = 3.14 inches (7.98 cm) of yarn per rotation. There are 36 inches per yard (or 100 cm per meter). So, multiply your number of rotations by 3.14 then divide by 36 to get yards. Or multiple rotations by 7.98 then divide by 100 to get meters.
But wait! What if your tape dispenser is a newfangled one with a triangular core? No problem! You can take a piece of yarn, wrap it around the core, mark the beginning and end of the wrap, then unwrap it and measure the distance between beginning and end. This is your equivalent circumference. Multiply it by the number of rotations to get total length. If you measured in inches, then divide by 36 to get yards, or if you measured in cm, divide by 100 to get meters. Our triangular core’s equivalent circumference was about 3 inches.

Comments
Please log in or sign up to comment.