Hello,
libgpiod will make your "on-the-fly" utility work! Enjoy this tutorial and what I am trying to convey, please.
Okay, so.
We have our tools and hardware:
- BBBW (BeagleBone Black Wireless)
- Resistor (1k ohm or something comparable)
- Hook-up Wires (2)
- LED(s)
We have our software:
- Debian
- libgpiod
Now...we need to stick these things together and make magic happen, i.e. or at least make some type of LED usage to transpire.
So:
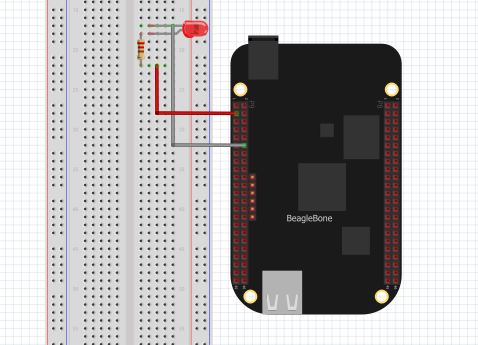
- 3.3v --> 1K ohm resistor --> to anode of the LED --> cathode to GPIO
...
LEDs:
- Cathode --> shorter side (Negative)
- Anode --> longer side (Positive)
The Fritzing Diagram above will show you how to connect the LED, wires, and Headers on the BBBW. Be careful on your "generic" LEDs.
If you have a label and manual for your LED, that is preferable. Going blind, literally, by way of LED is not ideal.
LEDs can explode and even worse, blind you. Be careful!
Besides injuring yourself and your LED, the BBBW or Beagleboard.org family of boards can become damaged due to the inverted signal into the P9_12 GPIO we are using in this example.
...
Oh and one small note to make, if you are using the libgpiod library from Github.com or https://git.kernel.org/pub/scm/libs/libgpiod/libgpiod.git/, make sure you have these two libraries to work w/ for libgpiod:
- libkmod-dev
- libudev-dev
So, just use sudo apt install libkmod-dev libudev-dev and that will do it. You should now have some necessary libraries for compiling the libgpiod library.
...
Listen to the instructions on Github or at git.kernal.org for setting up your library on your BBB. Once cloned into the directory of your choice, use these commands once you are in the libgpiod directory, e.g. cd libgpiod.
./autogen.sh --enable-tools=yes

make

make install
...
Once this bunch of commands work, use the listed set up from Fritzing on your BBB or BBBW from earlier in the tutorial and run:
gpioset --mode=wait gpiochip1 28=0
gpioset: In this library, it allows for turning the LED on and off.
--mode=wait: It waits for user interaction to turn off whatever you turned on or vice versa. It can turn off what was never turned on, too.
gpiochip1: This "1" after gpiochip is the chip w/ the sequence of the pin that we should have found w/ this command:
- gpioinfo
While looking at the printout of gpioinfo, we find that P9_12, our GPIO pin header and pin number, is located at gpiochip1 and at line 28. With this info, we can safely say that the LED we plan on using will light up when given either a =0 or =1 after our line number 28 from gpiochip1.
There should be, on our BBBs, four chips of the GPIO instance.
0 through 3, respectively, are our gpiochip numbers. If you get bored and want to look for them on beagleboard.org Debian Distros and specific kernels, good. Venturing forth with learning the different kernel changes is healthy in Linux.
Things will not always be the same. Although this idea is far from instantiated in every day life of everyone, since sysfs still exists, character device ideas are starting to pop up more and more in my life.
Seth
P.S. If for some reason this tutorial does not do justice to making LEDs light up, please contact me. I would like to know what happened, if I can help, and any ideas for character device would be appreciated from you.


Comments
Please log in or sign up to comment.