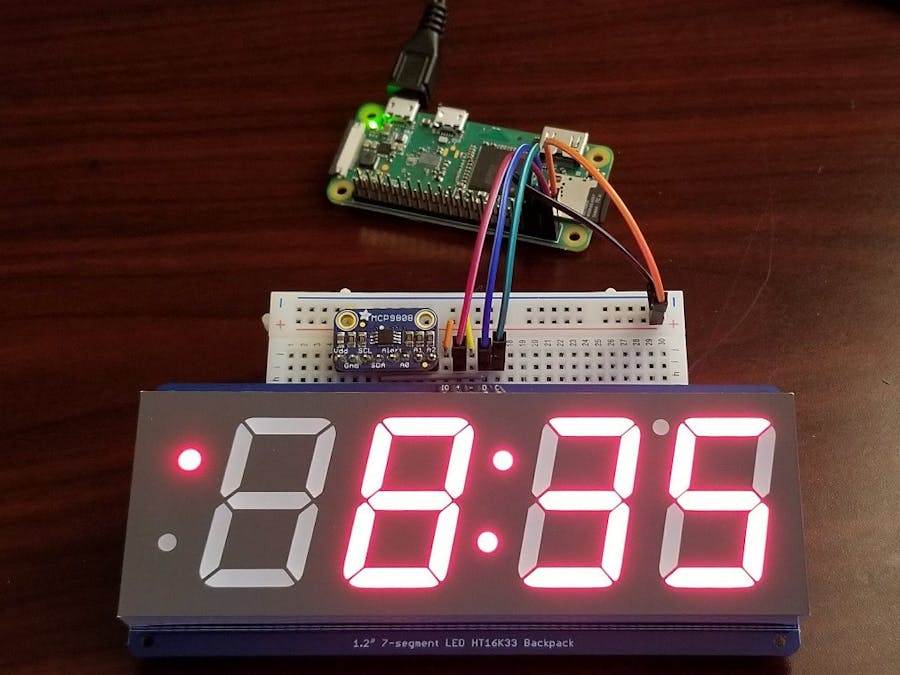
This project is for a building a digital clock that includes temperature display. It uses OpenWeatherMap to retrieve outside temperature information and a MCP9808 sensor for inside temperature. The assembly is fairly simple and requires the following components:
SoftwareThis guide assumes the Raspberry Pi is already setup with a working internet connection. First, make sure all the common dependencies have been installed:
$ sudo apt update
$ sudo apt install -y git build-essential python-dev python-smbus python-imaging python-pip python-pil
For the clock to be accurate the local time of the Raspberry Pi will need to be correct. First make sure the time zone is set correctly:
$ sudo dpkg-reconfigure tzdata
Then make sure the time is being updated correctly by installing ntpd:
$ sudo apt update && sudo apt install -y ntp
The default NTP configuration should be good enough, but can be modified to specify the time server by editing /etc/ntp.conf.
OpenWeatherMap
PyOWMClock uses OpenWeatherMap to retrieve temperature data for our clock. An OWM API key will be required, but the free tier is sufficient.
The pyowmclock.py script uses the excellent OWM wrapper library, PyOWM and can be installed using pip.
$ pip install pyowm
PyOWMClock
If you haven't already, clone the pyowmclock project:
$ git clone https://github.com/fraugware/pyowmclock
The pyowmclock.py script takes several command-line arguments, use -h to show the usage:
$ python pyowmclock.py -h
usage: pyowmclock.py [-h] --api_key API_KEY --zip_code ZIP_CODE
                    [--use_f [USE_F]] [--display [DISPLAY]]
                    [--weather [WEATHER]]
optional arguments:
 -h, --help           show this help message and exit
 --api_key API_KEY    OpenWeatherMap API Key
 --zip_code ZIP_CODE  ZIP Code for weather lookup
 --use_f [USE_F]      Use Fahrenheit instead of Celsius for temperature
                      display
 --display [DISPLAY]  Interval in seconds between display changes
 --weather [WEATHER]  Interval in seconds between weather updates
The --api_key and --zip-code arguments are required, but the others are optional. By default the script will display temperature in Celsius, so use --use_f 1 for Fahrenheit. The --display option is the time in seconds between flipping between time and temperature display; the default is 5 seconds. The --weather option is the time between temperature updates from both OWM and the temperature sensor; the default is 300 seconds (5 minutes).
Example:Using the default display and weather intervals but Fahrenheit display for us here in the US:
$ python pyowmclock.py --api_key b73bacafe2494a70434ddd57a73a3d80 --zip_code 12345 --use_f 1
Running the script manually each time isn't too much fun so I've included a service file that can be used to have it start up automatically on boot. The service file assumes the pyowmclock.py script is in /home/pi/pyowmclock/, so if this is not the case you will need to adjust the paths in the service file.
The service file uses an environment file to pass in command-line options to the script; this allows changing the options without having to modify and reinstall the service. An example environment file is included, so you can just copy and modify to meet your needs:
$ cp pyowmclock.env.example pyowmclock.env
$ nano pyowmclock.env
You can use the following steps to install the service:
$ sudo cp pyowmclock.service /lib/systemd/system/
$ sudo systemctl enable pyowmclock.service
Created symlink /etc/systemd/system/multi-user.target.wants/pyowmclock.service → /lib/systemd/system/pyowmclock.service.
$ sudo systemctl start pyowmclock.service
You can then verify that it has started correctly using journalctl:
$ sudo journalctl -u pyowmclock.service
-- Logs begin at Sat 2018-01-13 21:17:01 PST, end at Sun 2018-01-14 20:43:29 PST. --
Jan 14 20:42:31 pyowmclock systemd[1]: Started Pi OpenWeatherMap Clock.
Jan 14 20:42:31 pyowmclock python[4244]: Initializing display ...
Jan 14 20:42:32 pyowmclock python[4244]: Initializing temperature sensor ...
Jan 14 20:42:32 pyowmclock python[4244]: Initializing OWM API, this may take a few seconds ...
Hardware configuration is pretty simple. Both the MCP9808 and the LED Backpack use I2C, so make sure it has been enabled using raspi-config if it hasn't been already.
The larger 1.2" LED Backpack requires 5 V, so the 5 V pin on the Pi needs to be wired to the + pin ont he LED Backpack. Since the Pi GPIO voltage is 3.3 V, a 3.3 V pin needs to be wired to the IO pin on the LED Backpack.


Comments
Please log in or sign up to comment.