The Nest thermostat was a leap in automated climate control.
However, did you ever wonder why do you need to heat or cool unoccupied rooms, like the office or kitchen during the night?
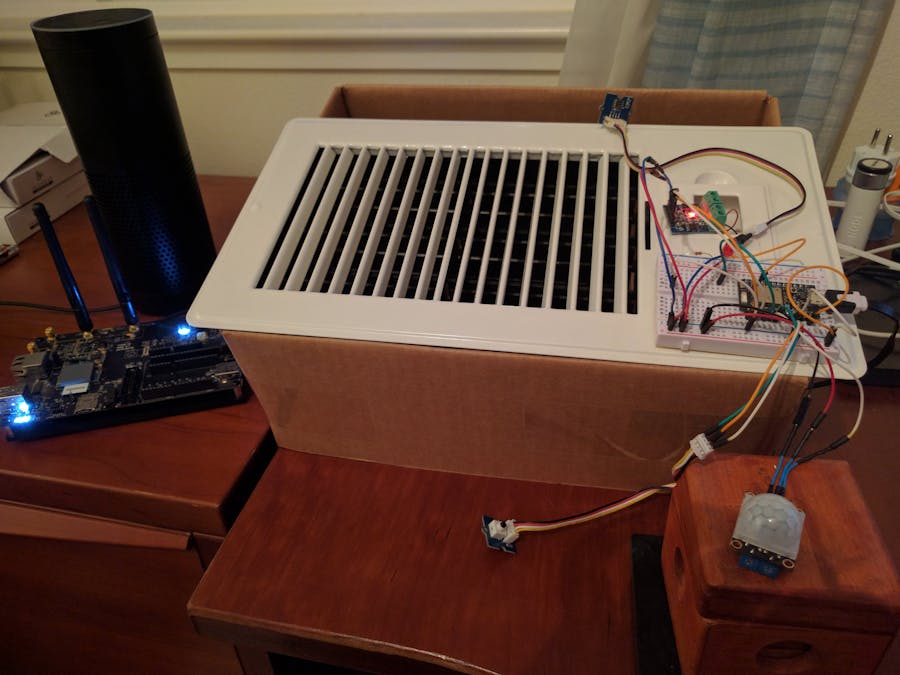
Smart Vent is an IoT enhanced vent that senses when there is people occupying a room, its temperature, and sends this information to Artik Cloud to optimize home or office climate control and save energy.
Our comprehensive solution provides 4 different ways for controlling individual vents:
- Manual Control: Each vent can be easily opened or closed (toggle) by just the press of a button.
- Voice: Use Amazon Alexa to request opening or closing a particular vent using voice commands.
- Mobile: We developed an Android App to control our vents.
- Rules: Use Artik Cloud's powerful rules to automate all vent states and avoid unsafe states like having all vents closed at once.
Customize Artik Cloud rules to:
- Close vents during the night in unoccupied rooms like office or kitchen.
- Open vents for occupied rooms relying on the Smart Vent motion sensors.
- Open or Close vents according to local temperature.
The android app is open source and can be found in github. The app sends Artik Cloud commands to individual vents to open or close them.
We used Artik 10 as the main IoT Hub of the home and office. The Artik 10 runs a local MQTT broker, connects to all the vent's controllers and interacts with Artik Cloud.
Not having each vent connect directly to Artik Cloud but instead to the Artik 10 local hub has the advantages of efficiency, security and cost. Our prototype uses a Particle Photon for the vent controller but our final product will use an Artik 1 which is better suited and cheaper.
Artik Cloud get all sensors messages which are displayed in the charts section. These messages, like temperature and motion, are used by rules to automate the smart vents.
Go to http://developer.artik.cloud and open an account.
Creating a Device TypeOn the dashboard, press on the "New Device Type" button.
Create a new device type for Smart Vent
Press "New Manifest" to create the manifest for the Smart Vent.
Create a "state" field:
then a "temp" field
last a "motion" field:
Press on "NEXT: ACTIONS" to configure the actions. Let's start with the "open" action.
then the "close" action.
Select "Activate Manifest".
Navigate to the Artik Cloud Portal for Users at https://artik.cloud and login.
Select "+ Connect another device". There search for the smart vent device type and name your device.
After creating the device, select the gear in order to get the device info.
Press "Generate Token" to create the device secret token.
Copy your DEVICE ID and the DEVICE TOKEN. These values will be used to authenticate the device to send (or receive) date to Artik Cloud.
Creating Automation RulesRules will allow to automate actions according to sensor information.
Let's create 4 rules:
First rule will open the office vent in the morning at 8:00am
Second rule will close the vent at 11:00pm to avoid heating/cooling the office at night when it is unoccupied.
Third rule will close the vent when the office is unoccupied for a while.
Forth rule will open the vent when it detects motion and the office is above certain temperature.
Go to your developer dashboard and select "New Application"
Name your app to "Smart Vent System", select "client Credentials auth code implicit" and provide an auth url which should match the one used in the app. Select save application.
Set the smart permissions to read and write for the smart vent and read for the profile. Select save.
You app is set. Click in "Show client ID & secret" to get your keys. These keys are needed to configure your app.
In order to be able to control the Smart Vent using voice then you need to configure Amazon Alexa by following these steps:
Login to Amazon Alexa portal at http://alexa.amazon.com, select "skills" and search for "Artik Cloud".
Press the "Enable" button to activate the skill.
When requested login to Artik Cloud account and authorize access to your account devices. You will get a message confirming that your skill was successfully linked.
- Get all your components. If the motorized vent includes a controller you can remove it since we are going to connect our IoT project directly to the motor.
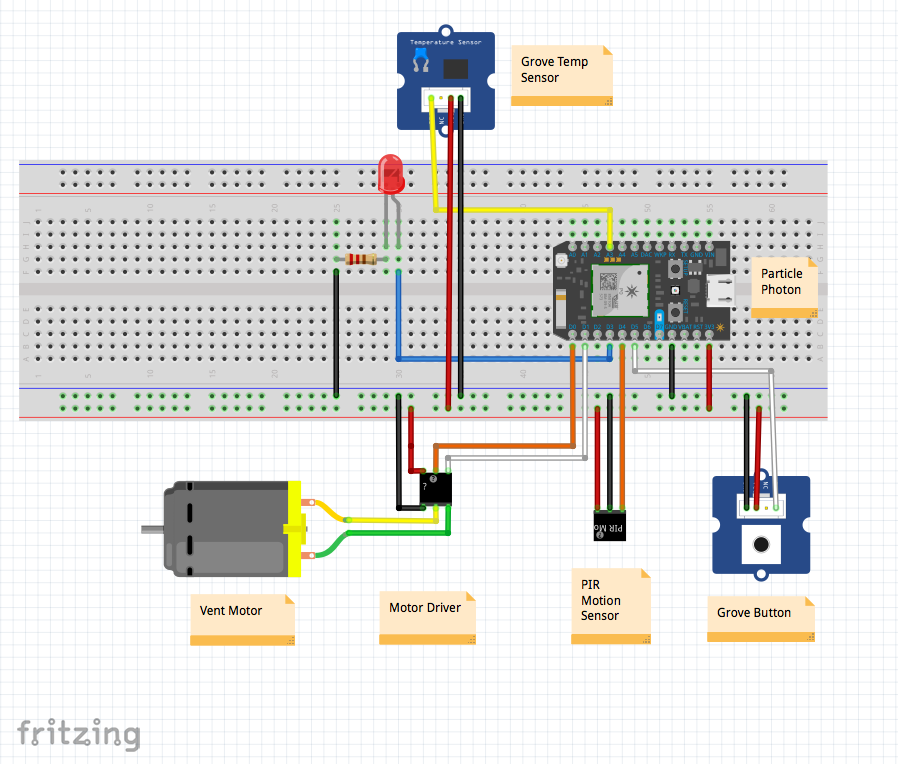
- Connect your circuit according to the provided diagram.
- Flash your Photon with the provided sketch from particle's ide https://build.particle.io . You need to update the ip address of your Artik 10 IoT hub in the sketch.
- Follow the instructions from Artik Tutorials to get mqtt broker and node-red installed.
- Launch the mqtt broker by running $ mosquitto &
- Configure your node-red program as described below.
Node-Red is a tool for wiring together hardware devices, APIs and online services using a drag and drop flow editor.
Configure your Node-Red flow by following this diagram.
Set the format temp event function as follows:
msg.topic = "/v1.1/messages/"+global.get("deviceId")
msg.payload = {
   "temp": parseFloat(msg.payload)
}
return msg;
Set the format motion event function as follows:
msg.topic = "/v1.1/messages/"+global.get("deviceId")
msg.payload = {
   "motion": (msg.payload == "true")
}
return msg;
Set the format action function as follows:
var json = JSON.parse(msg.payload)
var action = json["actions"][0]["name"];
msg.topic = "office-vent"
msg.payload = action;
return msg;
The deviceId global variable above is defined in the .node-red/settings.json file:
  // Anything in this hash is globally available to all functions.
   // It is accessed as context.global.
   // eg:
   //    functionGlobalContext: { os:require('os') }
   // can be accessed in a function block as:
   //    context.global.os
   functionGlobalContext: {
       // os:require('os'),
       // octalbonescript:require('octalbonescript'),
       // jfive:require("johnny-five"),
       // j5board:require("johnny-five").Board({repl:false})
       deviceId:"<<your device id>>"
   },
...
Configure your local MQTT to your local broker:
And the external MQTT to point to Artik Cloud. You also need to set the user/password to your device_id/token values.


Comments
Please log in or sign up to comment.