

Hardware components | ||||||
 |
| × | 1 | |||
 |
| × | 3 | |||
 |
| × | 6 | |||
 |
| × | 1 | |||
 |
| × | 7 | |||
| × | 1 | ||||
 |
| × | 1 | |||
Software apps and online services | ||||||
 |
| |||||
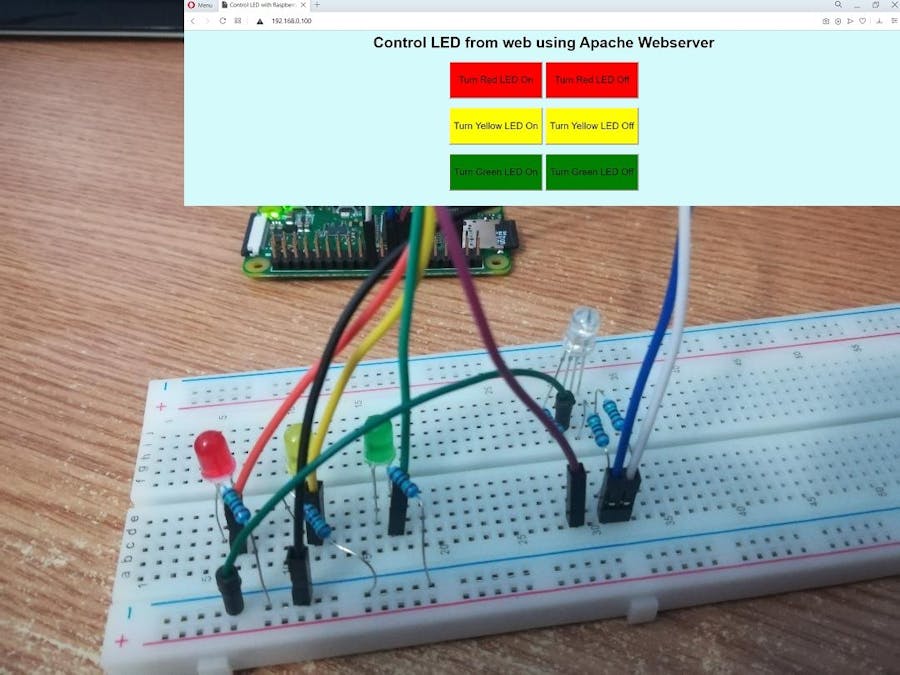
Hi, this is my first project with Raspberry Pi and I thought to do something pretty simple, but using some tools very important in many applications.Because I am at the begininng, I chose to work with LEDs, because I think this is one of the best ways to start learning to do lots of great projects, and because they are also used in many applications.
First of all, I will make a summary of an LED.
An Light Emitting Diode is a component used to provide visual feedback, as they use very little electricity and they can last forever (unless you burn them). One of the most common type of LED is the 5 mm red LED, the one that I use.An LED is always used with a resistor in series in order to limit the amount of current flowing through it, as otherwise it will burn out and you can't repair it.
Important
When you power an LED, the polarity matters. It means you have to correctly identify the anode (positive lead of the LED) and the cathode (negative lead of the LED)
In this project I decided to work with 3 such LEDs, and to make it more interesting, I chose to use also an RGB LED to control it from the web page.
RGB LED
RGB LEDs are pretty similar to the normal LEDs but they light multiple colours, rather than one. Basically, an RGB LED consist of 3 LEDs.They moslty come in 2 versions: common anode or common cathode. The common pin is usually the longest one.The common anode means that one positive line (usually 3.3 V or 5 V) is used by all LEDs. On the other hand, the common cathode means that the one ground line is shared by all LEDs.They have either a common anode or a common cathode in order to reduce the pins used, from 6 pins to just 4 pins.In this case my RGB LED has a common cathode.
Step 1: Connections
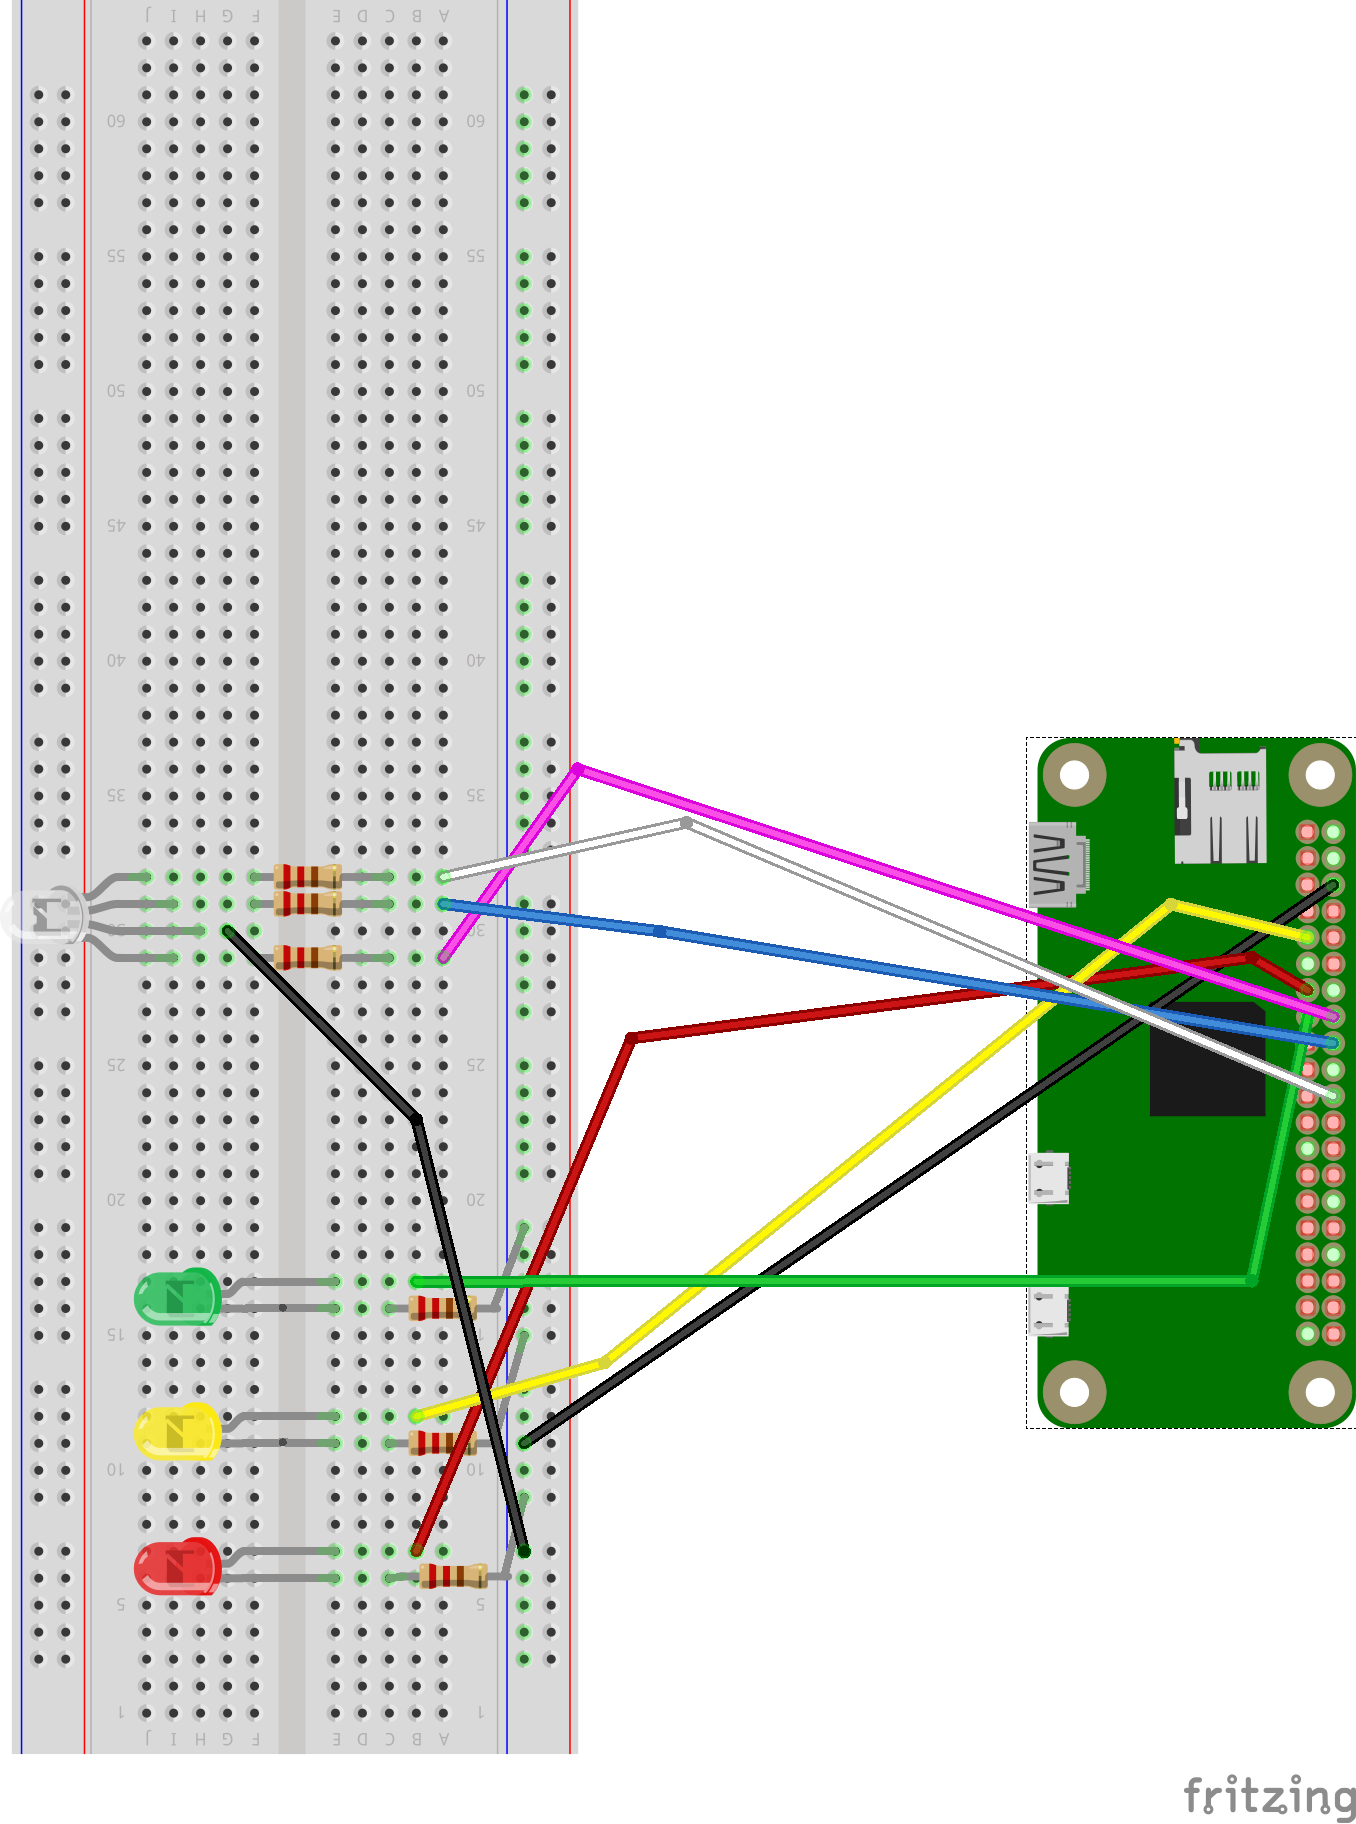
Firstly I will show you the connection of one LED as for the others is the same.You will see the rest in the final diagram.
- Start with connecting one LED in the breadboard.
- Once the LED is placed, insert the resistor into the board with one end in the same horizontal row as the LED’s cathode (short) leg and the other a few rows down. The resistor is not polarized so it does not matter which direction you insert it.
- Connect jump wire from pin 6 (Ground) of the Raspberry Pi in same column with the other end of the resistor
- Now connect the pin 11 (GPIO 17) in the same horizontal row as the LED's anode.
For the the other LEDs and RGB one, we follow the same steps.The difference for the latter is that instead of 3 LEDs producing 3 different colors, we have only one, with a common cathode.
Step 2: WiringPi Library
WiringPi is a PIN based GPIO access library written in C for the BCM2835, BCM2836 and BCM2837 SoC devices used in all Raspberry Pi versions. It’s released under the GNU LGPLv3 license and is usable from C, C++ and RTB (BASIC) as well as many other languages with suitable wrappers.
WiringPi is now pre-installed with standard Raspbian systems.To check your version, type in your terminal:
gpio -vStep 3: Installing Apache Web Server
As I told you before, I am using some essential tools in many projects and IoT applications.One of these is Apache web server.
Apache is the most widely used web server software, designed to create web servers that have the ability to host one or more HTTP-based websites. Apache Web Server can be enhanced by manipulating the code base or adding multiple extensions/add-ons. In our project we are using an HTTP server and its PHP extension.
For this application I chose not to make a global server on my Raspberry Pi.On the one hand, my internet connection is not so great, and accessing my Raspberry Pi from any network perhaps wouldn't work every time or very fast.On the other hand, making my network accessible from everywhere in the Internet would mean that I will make it public in Internet, so anyone could access it.It's not like I am going to be hacked, but I preferred not to do it.If you want to, I strongly recommend to secure your Raspberry Pi.Also I don't have a camera to attache on this project, to see if LEDs are working on my commands from the page, so it wouldn't make much sense to have a global server.
Now to install Apache web server we will use following commands:
First, update the available packages:
sudo apt-get updateThen, install the apache2 package with this command:
sudo apt-get install apache2 -yTo test the web server whether it is working or not, go to your browser and type the Pi’s IP address in the tab. To find the Pi's IP address, type ifconfig at the command line.In my case, it is 192.168.0.100.
By default, Apache puts a test HTML file in the web folder. This default web page is served when you browse to http://192.168.0.100 (use your own raspberry pi's address) on the Pi itself, or from another computer on the network.
If you browse to the default web page either on the Pi or from another computer on the network and you should see this:
This means your Apache server is working.
Changing the default web pageThis default web page is just an HTML file on the file system. It is located at var/www/html/index.html.
Navigate to this directory in a terminal window and have a look at what's inside:
cd /var/www/html
ls -al
This command will show you the following result:
total 12
drwxr-xr-x  2 root root 4096 Apr  24 16:15 .
drwxr-xr-x 12 root root 4096 Apr  24 16:15 ..
-rw-r--r--  1 root root  177 Apr  24 16:15 index.html
This shows that by default there is one file in /var/www/html/ called index.html and it is owned by the root user.To edit the file, you need to change its ownership to your username. Change the owner of the file using the following command: (pi is default, use your username):
Sudo chown pi: index.htmlYou can now try editing this file and then refresh the browser to see the web page change.
PHP Installation in Raspberry Pi
Now to use PHP code along with HTML we have toinstall the PHP extension in Raspberry Pi. Using PHP code we can create shell commands to control the LED from PHP script.
To allow Apache server to edit PHP files, we will install the latest version of PHP and the PHP module for Apache. Use the following command in terminal to install these:
sudo apt-get install php libapache2-mod-php -yNow you can remove your default index.html file
sudo rm index.htmlAnd create your own index.php file:
sudo nano index.phpNow to see if it works, you can put some content like:
<?php phpinfo(); ?>If you refresh the page in your browser you will see a long page with lots of information about PHP. This means that the PHP extension has been successfully installed.If it doesn't work, you can try reinstalling Apache server and its PHP extension.
Step 5: Start Coding for controlling GPIO pin using this Raspberry Pi Web server
Now delete the previous code in index.php file and insert the PHP code to control GPIO pins inside body of HTML code.
Firstly we create a <form> element.
<form method="get" action="index.php">And then create buttons to turn on and off the LED
<input class ="red" type="submit"  value="Turn Red LED On" name="ron">
<input class=" red" type="submit"  value="Turn Red LED Off" name="roff">
So when you click on the submit button, the form data is sent for processing to PHP code.
We will create other buttons for each LED we want to control.
In the PHP code, firstly we use shell_exec() command.This command is used to run the shell command from the PHP script.
For each LED, we will set the proper output via this command.The red one is connected to GPIO 17, so we will write:
shell_exec("gpio -g mode 17 out");After that, using the PHP superglobal $_GET, which is used to collect form-data, we check if the name value of the pressed button is displayed in the URL.
If it is, we set the GPIO pin to 0 for turning the led off or 1 for turning it on.
if(isset($_GET['roff']))
{
	shell_exec("gpio -g write 17 0");
}
else if(isset($_GET['ron']))
{
        shell_exec("gpio -g write 17 1");
}
Practically the whole PHP code consists of several if statements, corresponding to each LED.
You can also add some CSS code to your page to make it looking good!


Comments
Please log in or sign up to comment.