


Hardware components | ||||||
 |
| × | 1 | |||
 |
| × | 1 | |||
 |
| × | 1 | |||
Software apps and online services | ||||||
 |
| |||||
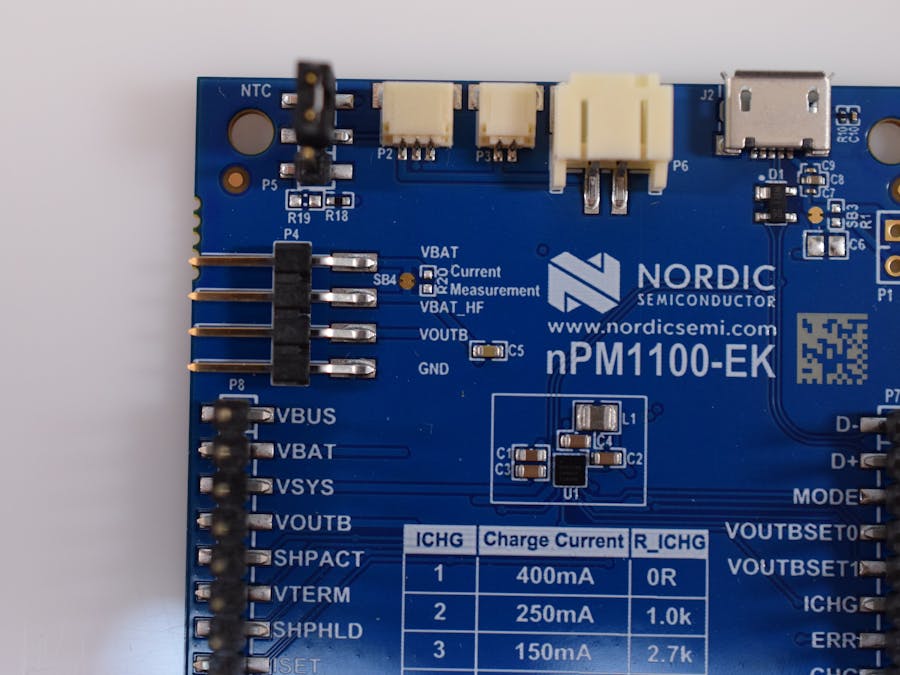
All too often, the circuitry required for both charging a device's battery and efficiently regulating it down takes up much of a PCB's limited real-estate, so finding ways to combine these functions in a tiny footprint is vital. This is where the nPM1100 from Nordic Semiconductor can help, as it's a single 2x2mm integrated circuit that holds advanced functionality for charging LiPo batteries at charging currents between 20 through 400mA and stepping down their voltage from 3.7v to either 1.8, 2.1, 2.7, or 3v at up to 92% efficiency. The IC is also intelligent since it can automatically switch the charging mode.
In order to easily program the nRF52840 and view the power draw with the PPK II, Nordic Semiconductor's nRF Connect and the nRF Command Line Tools must first be installed. To do so, simply find the platform and version you need for your development machine from this page and click the installer to download it. If your machine is Linux or macOS based, you'll have to install the SEGGER J-Link Software separately. Make sure to also install all of the drivers so your board can communicate with your machine. The CLI tools can be found here. Once nRF Connect for Desktop is finished installing, go down the list of software packages an click "Install" for the following:
- Bluetooth Low Energy
- Getting Started Assistant (if you're new to the platform)
- Power Profiler
- Programmer
- Toolchain Manager
This last one is a bit more involved. Upon opening it, click on the "Install" button next to "nRF Connect SDK v2.1.2" under the "SDK Environments" tab, then click on "Open VS Code" to start the environment. If the required extensions aren't already present, they can be installed by clicking the "Install missing extensions" button.
Opening a short example project was quite simple. I started by creating a new application in the nRF Connect extension tab wherein I chose the newly installed SDK/toolchain version and the nrf/bluetooth/peripheral_lbs example. The peripheral_lbs sample project sets up the nRF52840 DK's four LEDs and two buttons to interact with a user via Bluetooth Low Energy. In addition to creating a new project, I also added a new build configuration for the project under the "Applications" tab.
My first modification to the sample project involved turning off the advertising services of the BLE radio when a user connects since this device will have just one at most. Second, the device will go into the PM_STATE_SOFT_OFF state when button 3 is pressed to demonstrate potential power savings of different sleep modes.
This project utilizes the nPM1100 Evaluation Kit (EK) in order to easily expose its pins. Additionally, it uses the Power Profiler Kit II (PPK II) and nRF52840 Development Kit (DK) from Nordic Semiconductor. To begin, connect the VOUT pin on the PPK II to the nPM1100 EK's VBUS pin, as well as attaching both of their GND pins together. Next, attach a jumper wire from the nPM1100 EK's VOUTB pin to the nRF52840 DK's VIN pin on the External supply header. And again, connect the GND pins of both boards together.
With the hardware all connected, I connected the PPK II to my PC via USB and selected it from the "Select Device" menu within the Power Profiler app.
I set the output voltage to around 4.5V and made sure to enable the power output on the PPK II.
Then I sampled the current consumption for 121 seconds at 100, 000 samples per second, thus generating this nice chart:
The first section is simply the nRF52840 sending BLE advertising packets whilst blinking LED1, and that continues nearly the entire time, hence the 1-second large "bumps" in the graph. The second portion is when the client device has connected and is actively sending data to the DK and receiving acknowledgement packets back. The highest level of current consumption came from turning on the third LED with the client device. As mentioned before, the third button causes the DK to enter into the PM_STATE_SOFT_OFF power state which causes many of the peripherals to shut off and therefore giving the lowest power consumption. Assuming there were a device with a 1200mAh battery, it could last for around 5 days without needing to be charged, but because of the great features in the nPM1100 EK, the battery can be trickle charged when not in use or provide constant voltage when it is.
Whether it's the desire to add efficient voltage boosting or a charge controller with a tiny footprint to a small, portable device, the nPM1100 EK is a great choice for building one. And when combined with the ability to charge at up to 400mA with automatic USB port detection, the 2x2mm IC looks even better. For more information about the nPM1100 PMIC or its evaluation kit, you can view it on Nordic Semiconductor's site here.


Comments
Please log in or sign up to comment.