Evan Rust
Published © GPL3+

How to Make a NeoPixel Matrix

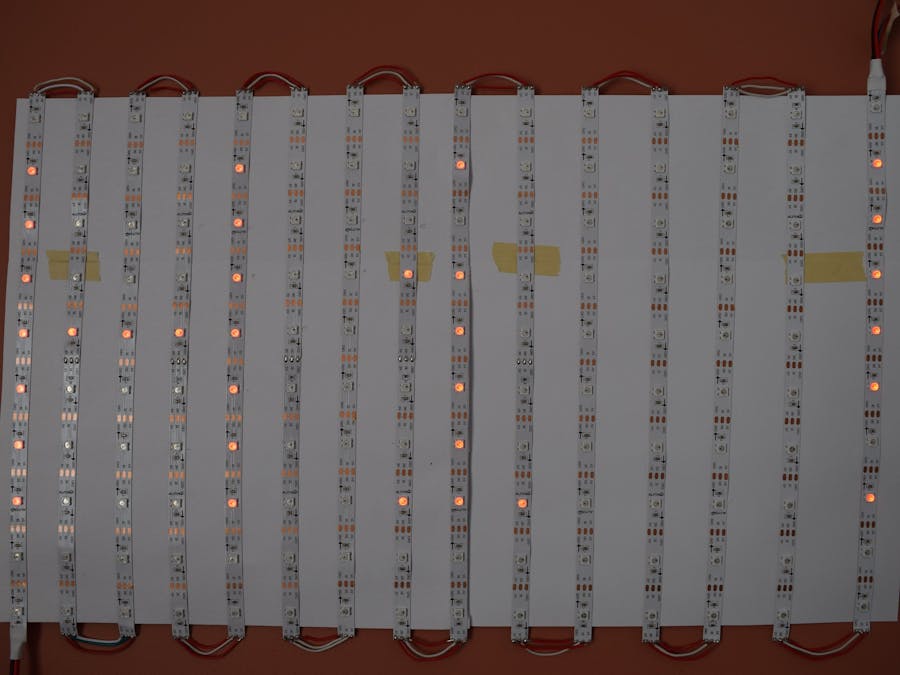
Build a simple NeoPixel matrix with these simple steps!

IntermediateFull instructions provided3 hours21,303
How to Make a NeoPixel Matrix

Things used in this project

Hardware components

Arduino Nano R3
Arduino Nano R3
×1
NeoPixel strip
NeoPixel strip
5m at 30 led/m for 150 total
×1
Jumper wires (generic)
×1

Software apps and online services

Arduino IDE
Arduino IDE

Hand tools and fabrication machines

Soldering iron (generic)

Story

Read more

Schematics

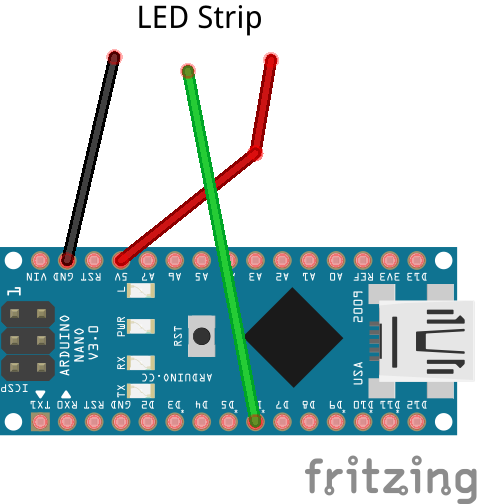
Schematic

Code

Arduino Code

C/C++
Copy and paste
// Adafruit_NeoMatrix example for single NeoPixel Shield.
// Scrolls 'Howdy' across the matrix in a portrait (vertical) orientation.

#include <Adafruit_GFX.h>
#include <Adafruit_NeoMatrix.h>
#include <Adafruit_NeoPixel.h>
#ifndef PSTR
 #define PSTR // Make Arduino Due happy
#endif

#define PIN 6

// MATRIX DECLARATION:
// Parameter 1 = width of NeoPixel matrix
// Parameter 2 = height of matrix
// Parameter 3 = pin number (most are valid)
// Parameter 4 = matrix layout flags, add together as needed:
//   NEO_MATRIX_TOP, NEO_MATRIX_BOTTOM, NEO_MATRIX_LEFT, NEO_MATRIX_RIGHT:
//     Position of the FIRST LED in the matrix; pick two, e.g.
//     NEO_MATRIX_TOP + NEO_MATRIX_LEFT for the top-left corner.
//   NEO_MATRIX_ROWS, NEO_MATRIX_COLUMNS: LEDs are arranged in horizontal
//     rows or in vertical columns, respectively; pick one or the other.
//   NEO_MATRIX_PROGRESSIVE, NEO_MATRIX_ZIGZAG: all rows/columns proceed
//     in the same order, or alternate lines reverse direction; pick one.
//   See example below for these values in action.
// Parameter 5 = pixel type flags, add together as needed:
//   NEO_KHZ800  800 KHz bitstream (most NeoPixel products w/WS2812 LEDs)
//   NEO_KHZ400  400 KHz (classic 'v1' (not v2) FLORA pixels, WS2811 drivers)
//   NEO_GRB     Pixels are wired for GRB bitstream (most NeoPixel products)
//   NEO_RGB     Pixels are wired for RGB bitstream (v1 FLORA pixels, not v2)


// Example for NeoPixel Shield.  In this application we'd like to use it
// as a 5x8 tall matrix, with the USB port positioned at the top of the
// Arduino.  When held that way, the first pixel is at the top right, and
// lines are arranged in columns, progressive order.  The shield uses
// 800 KHz (v2) pixels that expect GRB color data.
Adafruit_NeoMatrix matrix = Adafruit_NeoMatrix(5, 8, PIN,
  NEO_MATRIX_BOTTOM     + NEO_MATRIX_LEFT +
  NEO_MATRIX_COLUMNS + NEO_MATRIX_ZIGZAG,
  NEO_GRB            + NEO_KHZ800);

const uint16_t colors[] = {
  matrix.Color(255, 0, 0), matrix.Color(0, 255, 0), matrix.Color(0, 0, 255) };

void setup() {
  matrix.begin();
  matrix.setTextWrap(false);
  matrix.setBrightness(40);
  matrix.setTextColor(colors[0]);
}

int x    = matrix.width();
int pass = 0;

void loop() {
  matrix.fillScreen(0);
  matrix.setCursor(x, 0);
  matrix.print(F("Howdy"));
  if(--x < -36) {
    x = matrix.width();
    if(++pass >= 3) pass = 0;
    matrix.setTextColor(colors[pass]);
  }
  matrix.show();
  delay(100);
}

Credits

Evan Rust

Evan Rust

122 projects • 1087 followers
IoT, web, and embedded systems enthusiast. Contact me for product reviews or custom project requests.

Comments