


Software apps and online services | ||||||
| ||||||
| ||||||
| ||||||
| ||||||
| ||||||
Imagine a makerspace with thousands of components and hundreds of members, each taking an item or two a day and possibly not returning it.
This problem can lead to inventory shrinkage, where people can intentionally or accidentally keep parts without ever putting them back. That's where version 4 of my inventory tracking system can help. Users register for an account and are able to view all of the parts in the makerspace, along with each bin, container, and category, and check them back in once done, akin to a library.
The primary purpose of this system is to be used in a makerspace, so its interface is built around that goal. Each user has the ability to check out parts and keep track of what they have out, as well as check it back in. Since every part, container, and bin has a dedicated QR code, people can scan it with their phone or a dedicated scanner to find out where it is.
Finally, admins can add new items and keep track of how many are present with ease.
Room for ExpansionThe underlying API is meant to be built upon and improved over time. This could include adding the ability to search for parts, adding a member's RFID tag, or even an interface for an automated system. Simply put, all one has to do is add a new API path and implement it.
The data for the system is stored in a MySQL database and consists of several tables. After installing the DB on a development machine, I created tables that consist of user, part, bin, container, category, and cart-related columns. As an example, the Part table stores the primary data for parts, the DiscretePart table stores data for parts that are discrete, and the PartImage table stores which images go to each part. For access from the webserver, I created another account with limited privileges to protect DB integrity.
Just having a database does nothing when making a web-based system, so a backend with an easy-to-use API was a necessity. Its main purpose is to process, store, and retrieve data to/from the database, with an occasional image thrown in as well. Nearly every entity in the inventory system has these routes: create, modify, delete, and get/get all. Since it's built on Node.js with the Express framework, adding or modifying API paths is extremely easy. The create nodes take in either a JSON or multipart form POST request and then add that data to the MySQL database. In addition, image processing and QR code creation is handled at this stage as well.
Image uploading is needed for several components of the system. First, users can upload their own profile pictures and display them as an avatar. Next, categories are assigned a single image to display what kinds of items are associated with it. And finally, each part has a thumbnail and up to 10 other images to showcase its features.
To accomplish this, the webserver supports uploading multipart form requests through the formidable library. Images are resized using the Sharp library and then their paths are inserted into DB rows.
React FrontendReact.js was my preferred choice for creating the frontend, as it allows for complex web apps to be constructed from distinct modules and combined with CSS.
React components are simply classes or functions that inherit from the Component parent and return a JSX object when its render method is called.
By using React components with props and changing states, anything from a login button to a complex form can be created with relative ease. At a basic level, components that need data from the backend API use the axios library to send GET requests, and components that need to add or change data, such as creating a new part, send POST requests to given end-points.
Navigation and URL SchemeNavigating the inventory management system is quite simple. If a user wishes to explore the available containers, bins, categories, or parts, they can click on the "Explore" button and select what they want from a drop down menu.
The URL follows this scheme:
http://<frontend_IP:port>/explore/<part|bin|container|category>/<ID|part_category>[/part_id]
For viewing cart information, they just have to go to the /cart path. Likewise, heading to /checkin brings up a list of parts that need to be checked back in. Certain pages are only accessible to users who are logged in, so any attempt to reach them without the proper authorization simply returns the visitor to a login page.
To add, modify, or remove items, there is an admin page where approved users can make changes to the underlying data. To add/remove a user as an admin, there is an included CLI for the webserver app.js file. For example, running node app.js --add-admin test adds the user 'test' as an admin. The list of added users is stored in the UserAdmin table in the MySQL database. From there, going to /admin will open up a menu where various items to change can be selected. Bins, categories, parts, and containers will show up as rows inside of tables, with each having a corresponding edit/delete feature. There is also a Floating Action Button (FAB) that opens up a corresponding modal dialog in which new items can be added.
To use the part tracking system, first create a new account and add it as an admin if you wish to add new items with it.
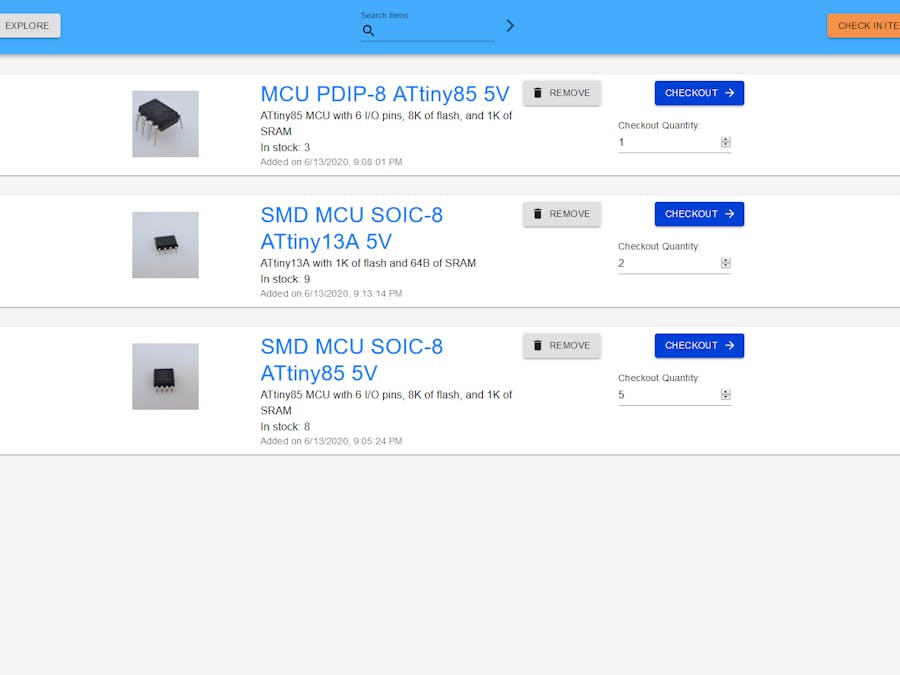
After creating categories, bins, containers, and finally parts, you will be able to search for and add them easily with their dedicated add to cart buttons. From there, navigate to the cart and checkout. Parts can be returned by clicking on the checkin button and then choosing which ones to put back.
Future PlansCurrently, there are still missing features, including modification, deletion, and searching, so I plan to add those over time. I would also like to add the ability for users to check out a part and then have it get picked out and delivered autonomously.


Comments
Please log in or sign up to comment.