No, not the movie, the NeoPixel matrix! To make a matrix, just buy one strip of individually addressable NeoPixel LEDs. Uncoil the strip, and take note of the arrows on it. You can only attach them in ONE DIRECTION, you could ruin them if the orientation is wrong.
I used a 30 led/m 5m strip and cut them into strips of ten LEDs each. I then started laying down the strips on a piece of cardstock, alternating orientations. I then cut wires to the correct lengths and soldered them to the NeoPixel terminals. After doing that 14 times, my matrix was finally done! Next, I checked with a multimeter to ensure that there were no short-circuits, as a short-circuit will fry the Nano, the matrix, and maybe your USB port (I know from experience). Upload the neomatrix test sketch with the "NEO_BOTTOM + NEO_LEFT + NEO_COLUMNS + NEO_ZIGZAG" parameters. If it scroll "howdy" across the display, you're done with the display part!
A pong game has several objects: the paddle, walls, and the ball. The code has ball X and ball Y variables, which keep track of the ball's position. The ball's direction is handled by either a 1 or -1 being assigned to the direction variables. The paddle is a rectangle that is controlled via a potentiometer being mapped to 0 through 15. The paddle's Y won't change, so a variable for mapping it isn't needed. At the start of a game, the ball starts at 1,1 and the player must allow the ball to bounce once to begin. The physics take into account the ball's direction and where it hit on the paddle.
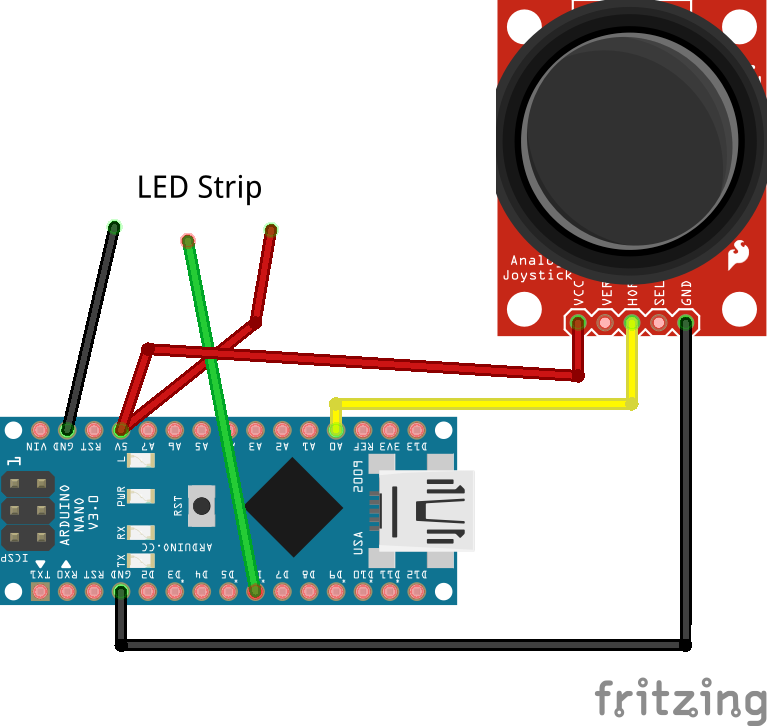
Fun time!Now, just hook up the NeoPixel matrix your Arduino Nano, the +5V on the joystick to 5v, the GND to Arduino GND, and finally the X axis to A0. Have fun with your new pong game! Try adding more players and better physics for a challenge!


Comments
Please log in or sign up to comment.