


Hardware components | ||||||
 |
| × | 1 | |||
| × | 1 | ||||
| × | 1 | ||||
 |
| × | 1 | |||
| × | 1 | ||||
 |
| × | 1 | |||
Software apps and online services | ||||||
 |
| |||||
| ||||||
Hand tools and fabrication machines | ||||||
 |
| |||||
| ||||||
 |
| |||||
Check out more experiments using TensorFlow for Microcontrollers at g.co/tfmicroexperiments
Hi! I'm Gautam, a maker in San Francisco 🌁 who has been collaborating on projects with friends at Google Creative Lab.
Constantly snoozing? Meet Morning Mountain: A Visual Alarm clock! It's an alarm clock that only turns off when you hold a power pose in front of it for 10 seconds.
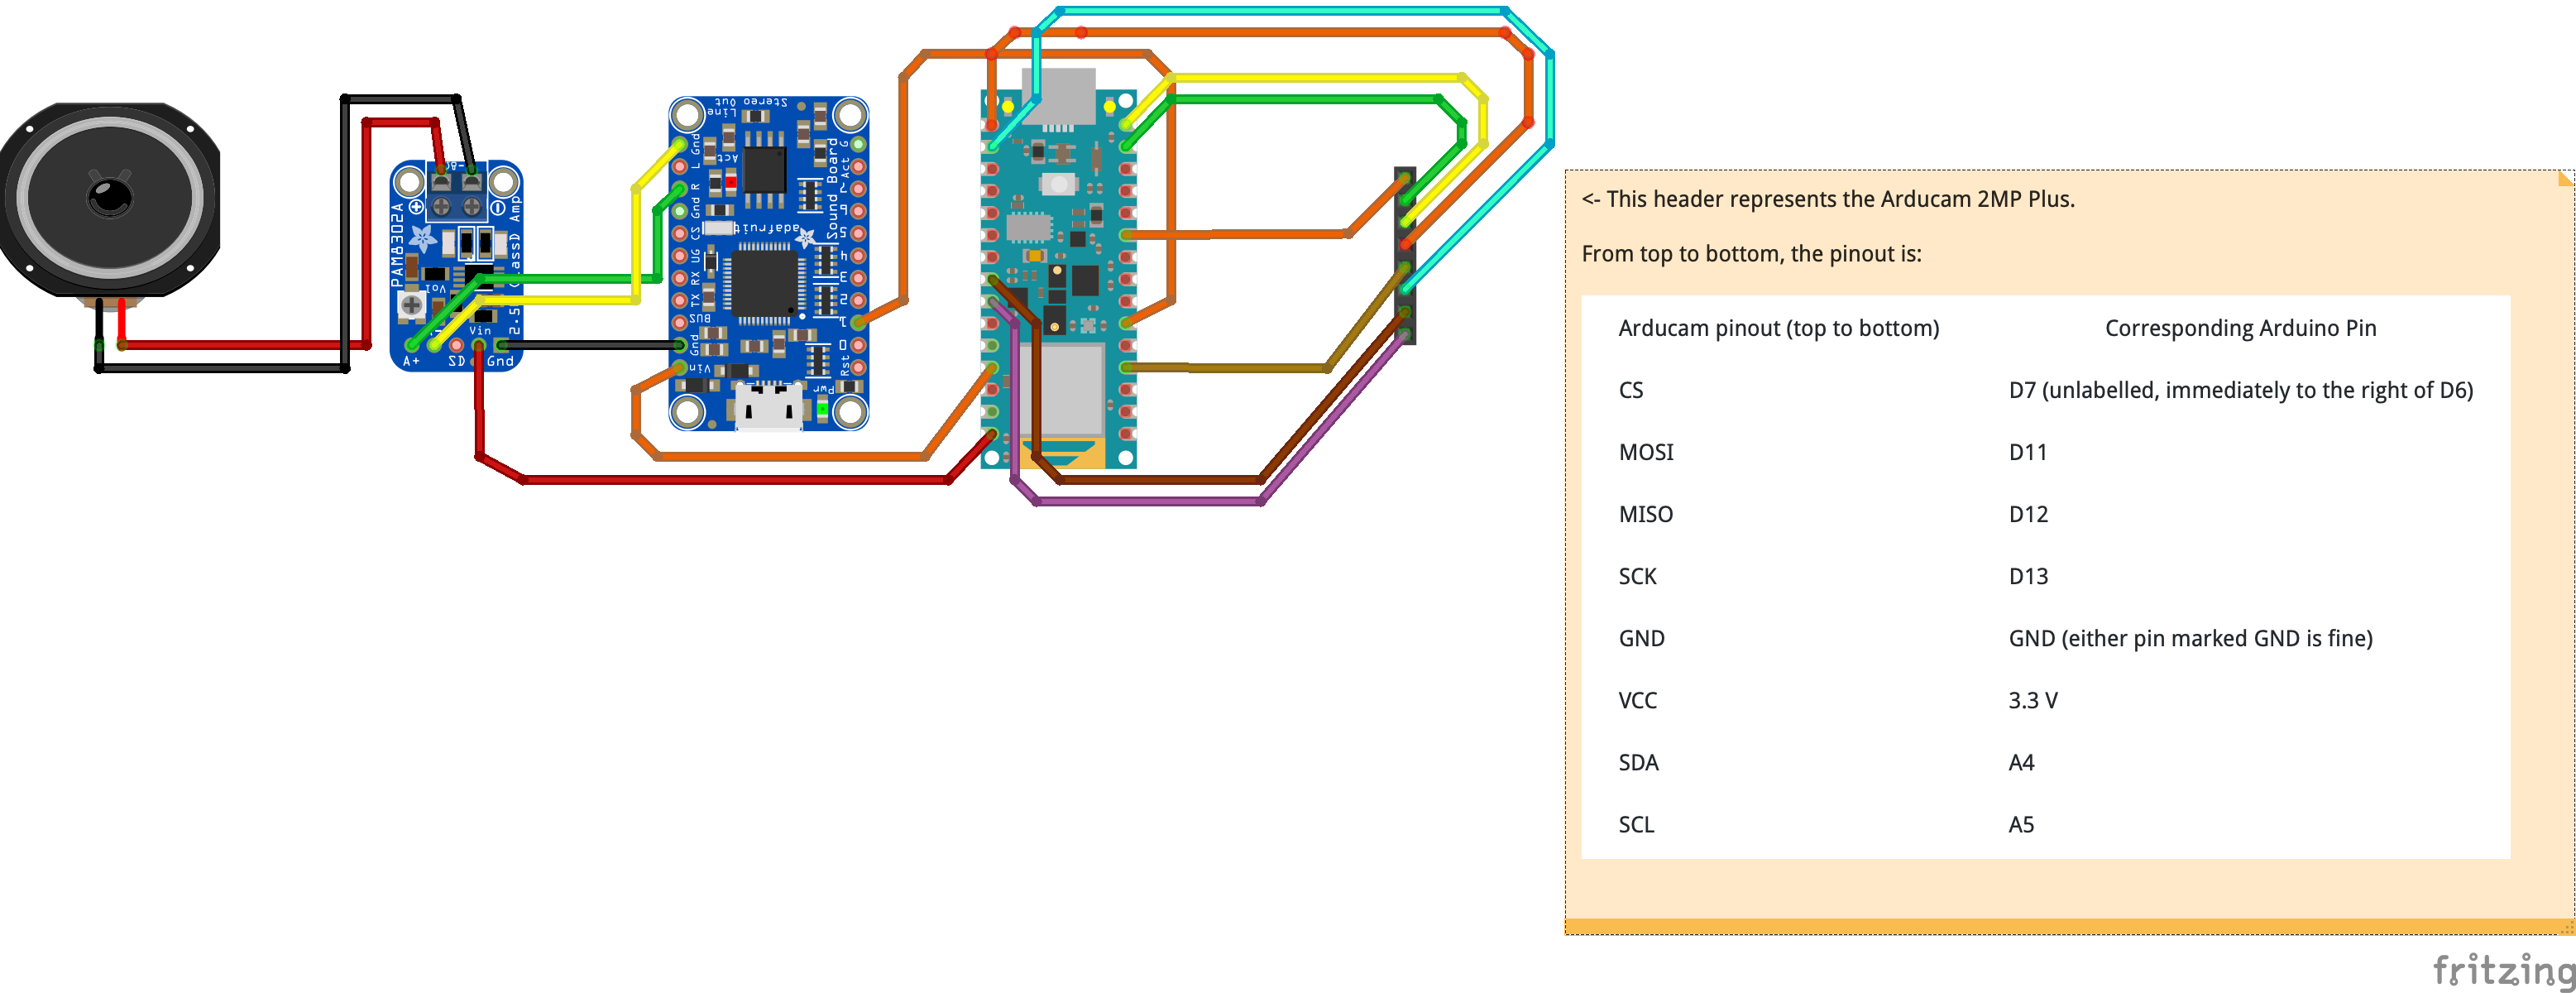
To accomplish this, we're going to use a TensorFlow Lite image classification model that runs directly on an Arduino Nano BLE! We'll be using the Arducam 2MP Plus camera, which easily connects to the Arduino.
Which pose turns off the alarm you might ask? Whichever you like! We'll train a custom model, using Teachable Machine, a web based tool that recently released a new [TinyML mode] to work with our Arduino Nano BLE.
The model running on the Arduino runs entirely on device, which means nothing is ever recorded or sent to the cloud. Furthermore, running our model on the Arduino allows us to use it to drive all kinds of accessories, in this case a sound board and speaker.
We’re sharing our project to hopefully inspire other makers out there to see what they can create with Teachable Machine and tinyML.
📦 Gather The PartsThese are the Electronics that we used, but you can probably find similar ones that work just as well:
Electronics:
- Arduino Nano 33 BLE (Sense optional)
- Arducam 2MP Plus
- 2.5w Amplifier
- AudioFX board
- Small Speaker
- 15 Female to Female Wires
Note: You can also use this combined AudioFX board and amplifier. It's a little more expensive, but offers cleaner wiring.
Note: Since the Arduino has no on-board realtime clock, the exact time of the alarm could potentially shift over time. To solve this, you could add a part like this real time clock module.
Additional Tools:
- Thin Cardboard - I used a cereal box 🥣!
- Glue - I used hot glue
- Craft Knife to cut the cardboard
- Soldering Iron
A couple key preparation steps before we assemble the alarm clock:
1. Solder all headers onto your parts. I like to solder the headers in so that I attach wires on the same side as the silkscreen labels.
2. Solder the 5V jumper on your Arduino Nano 33 BLE. This will enable the 5V pin (which we'll need to power the sound board).
3. Solder some leads onto the speaker if none are attached already.
🔊 Load your sound filePlug your AudioFX board into your computer, it will show up as a mass storage device. Add whichever alarm sound effect you want, keep in mind that it will be triggered in a loop. This particular sound board supports OGG and WAV files.
I used this sound effect, but you can use whichever you like. Make sure that you name the file 'T01.wav'
You can find more details on loading sound files here.
🛠 Assemble Your AlarmNow we'll assemble the simple cardboard body of the alarm. This just serves as a way to keep everything organized as well as holds the camera at a consistent angle.
Keeping the camera at a consistent angle will be helpful when we are training our machine learning model. Furthermore, the camera is a little sensitive to being jostled while in operation, so holding it in place can prevent errors.
1. Start by cutting a piece of cardboard roughly 9" by 2.5". This will be the main base of our alarm clock.
2. Trace the outline of the camera lens onto the cardboard and cut it out using the craft knife.
3. Put a very small amount of glue onto the ArduCam housing and push it though the hole you've just cut. Take care not to get glue onto the threads of the camera's lens.
4. Fold up the portion of the cardboard where the camera goes, setting the lens at roughly an 80 degree angle. Score the cardboard if needed.
4. Attach the other components to the body of the alarm, taking care to use the smallest amount of glue possible! This will make it easy to re-use the parts for other projects.
Note which direction the headers are facing, this makes it easy to affix the components to the cardboard body while also attaching the leads
Alright, the assembly is complete. On to wiring up the electronics!
🔌 Wire up your AlarmNext, wire up the Arducam, AudioFX Board, 2.5W amplifier, and speaker according to the wiring diagram below.
You'll note that we're powering the amp and speaker off of the Arduino's VIN pin. While this is not recommended for any larger speaker, the micro-speaker used for this project doesn't draw that much current. If you upgrade the speaker, make sure to upgrade the power supply as well.
Note: As with any Arduino project, use a high-quality power supply and USB cable to avoid current related instability.
By the end of this section, you should have something that looks like this.
You'll need a few additional libraries to communicate with your Arducam 2MP Plus.
Install the Arduino_TensorFlowLite library
To install it, open the Arduino library manager in Tools -> Manage Libraries... and search for Arduino_TensorFlowLite.
Install other libraries
In addition to the TensorFlow library, you'll also need to install two libraries:
- The Arducam library, so our code can interface with the hardware
- The JPEGDecoder library, so we can decode JPEG-encoded images
The Arducam Arduino library is available from GitHub at https://github.com/ArduCAM/Arduino. To install it, download or clone the repository. Next, copy its ArduCAM subdirectory into your Arduino/libraries directory. To find this directory on your machine, check the Sketchbook location in the Arduino IDE's Preferences window.
After downloading the library, you'll need to edit one of its files to make sure it is configured for the Arducam Mini 2MP Plus. To do so, open the following file:
Arduino/libraries/ArduCAM/memorysaver.hYou'll see a bunch of #define statements listed. Make sure that they are all commented out, except for #define OV2640_MINI_2MP_PLUS, as so:
//Step 1: select the hardware platform, only one at a time
//#define OV2640_MINI_2MP
//#define OV3640_MINI_3MP
//#define OV5642_MINI_5MP
//#define OV5642_MINI_5MP_BIT_ROTATION_FIXED
#define OV2640_MINI_2MP_PLUS
//#define OV5642_MINI_5MP_PLUS
//#define OV5640_MINI_5MP_PLUS
Once you save the file, we're done configuring the Arducam library.
Our next step is to install the JPEGDecoder library. We can do this from within the Arduino IDE. First, go to the Manage Libraries... option in the Tools menu and search for JPEGDecoder. You should install version 1.8.0 of the library.
Once the library has installed, we'll need to configure it to disable some optional components that are not compatible with the Arduino Nano 33 BLE Sense. Open the following file:
Arduino/libraries/JPEGDecoder/src/User_Config.hMake sure that both #define LOAD_SD_LIBRARY and #define LOAD_SDFAT_LIBRARY are commented out, as shown in this excerpt from the file:
// Comment out the next #defines if you are not using an SD Card to store the JPEGs
// Commenting out the line is NOT essential but will save some FLASH space if
// SD Card access is not needed. Note: use of SdFat is currently untested!

//#define LOAD_SD_LIBRARY // Default SD Card library
//#define LOAD_SDFAT_LIBRARY // Use SdFat library instead, so SD Card SPI can be bit bashed
Once you've saved the file, you are done installing libraries.
🤖 Train Your ModelAlright, now it's time to train a model that recognizes your power pose! This is a simple enough process. First, we need to collect some examples of what the Arducam sees when you're standing normally. Then we'll collect some examples of what the Arducam sees when you're in the power pose you've chosen.
We'll feed these examples into Teachable Machine, which will create a machine learning model that can distinguish between the two classes. Teachable machine runs entirely in your browser, with no data being saved in the cloud.
1. Run Uploader Sketch
Download and load the uploader sketch here. This sketch tells your Arduino to begin pairing with the teachable machine website. Once paired, the Arduino will stream its camera feed into TM, allowing us to collect the examples we need.
2. Connect
Create a new teachable machine image project here. You'll create two classes, the first will contain some examples of the camera with nothing in front of it, and some more examples of you standing normally (sleepily) in front of it.
Name your classes, then select the tinyBLE as the input type.
Note: You'll see a link to an Arduino sketch, you can safely ignore that as we've already loaded a similar sketch earlier.
Now hit connect, select your Arduino in the dropdown, and hit 'Pair'
You should see a preview of your Arducam feed in the class window.
3. Collect the Data
Use the record button to collect samples for the two classes. The first class, should contain pictures with nothing in front of the camera, and pictures of you standing with a normal pose.
Below you can see a few examples I trained for the first class.
The second class should contain pictures of you getting into and holding your power pose.
Once you've collect your samples, hit train, and don't switch tabs!
4. Test your model
Try your model out in the teachable machine preview window. Select TinyBLE from the input dropdown menu, you'll see the Arducam images start to be classified.
Note: Remember that the results of any machine learning model depend on the examples you give it. Trying different examples is a core part of exploring machine learning. So, if it's not working as you intended, play around with different approaches for what examples you provide.
5. Export the Model
At this point, the model is still running on your computer. You'll need to download it as a file in order to put it inside an Arduino sketch. To do this, it 'Export Model', then download the Arduino model inside of the TFLite Tab.
Unzip the folder that Teachable Machine downloads (after a brief conversion period), and look for the files called:
'model_data.cc', 'model_settings.h', and 'model_settings.cpp'.
These files contain the model you just trained in Teachable Machine and metadata about the model, respectively.
🔁 Load Your ModelFinally, it's time to load you're model back onto the Arduino!
1. Download the Alarm.zip sketch folder
2. Place the 'person_detect_model_data.cpp', 'model_settings.h', and 'model_settings.cpp' files you downloaded from teachable machine inside the Alarm sketch folder.
3. Open the sketch file and upload it to the Arduino
⏰ Test it out!Alright! All done, time to test it out! When the alarm clock sketch is loaded, the alarm will go off immediately. Get into the power pose to turn it off, and the clock will ring again in 24 Hours. Plugging in the clock serves as setting its alarm time, and any power outage will reset the 24 hour period.
🧪Extending the project
This is just a starter project, intended to show the potential of teachable machine and tinyML. There are a ton of ways to take this project further, through modifying the software and hardware. Such as:
- tweak the software to play a chime or alarm when something happens, like water boiling or if a bird is at the bird feeder.
- Adding a coin cell powered real time clock to make the time-keeping even more accurate, and power loss redundant!
- Improving the cardboard bit to be more durable, waterproof - etc.
And so on...
Have fun with Teachable Machine and TinyML!

Comments
Please log in or sign up to comment.