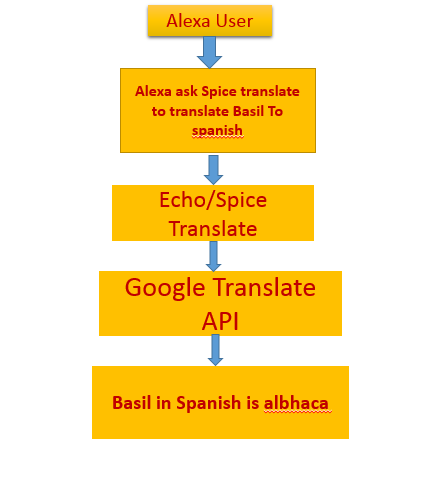
Abstract:
An Alexa skill project demonstration used to translate any words into any language using Google Translate API & Rapid API.
Links to enable this skill:
Skill ID: amzn1.ask.skill.7504fa5b-b08f-4a36-86f7-3fc7230e1378
Language is the life blood of everyone and should not be relegated to the sidelines. People commonly have language barriers while migrating from one country to another because of various factors such as work, education etc. They need to cook for themselves for their survival. But language plays a major problem while buying cooking stuff (spices) from local sellers. Spices add flavour to our dish. The name of spices differs by country. For example, basil is Thulasi in Tamil. So it's a quite inconvenient while buying spices from the local market. To overcome this problem I have made a skill which uses Google Translate API to translate a list of spices around the world into different language. So before going shopping you can create a list of spices needed to prepare your dish in local language. In this skill I have added support for only spice words. These words can be edited in Custom Slots in Amazon Skill Developer Portal and can be used to translate any words defined in Custom Slots. More Language can be added by specifying their ISO language Code for ex: 'en' for English in Index.js file given below.
Step 1: Defining the Skill Elements in Amazon Developer Portal- To get started, we'll head over to the Amazon Developer Portal and login
- Once logged in, head over to the Alexa tab and create a new Alexa skill
- Configure your Skill Information like the name of your skill and invocation name. In my case, my skill name is Spice Translate and the invocation name is spice translate.
- On next tab define the Intent Schema as follows:
{
   "intents": [
       {
           "intent" : "Translate",
           "slots": [
               {
                   "name" : "Source",
                   "type" : "SOURCE"
               },
               {
                   "name" : "Language",
                   "type" : "LANGUAGES_LIST"
               }
           ]
       },
     {
     "intent": "AMAZON.HelpIntent"
   },
     {
     "intent":"AMAZON.StopIntent"
     }
   ]
}
For this skill the intent has 2 slots. A slot is like a placeholder for a piece of data that the user can supply to the intent. The slots in our case will be:
- Source: words to be translated. In my skill I have a specified list of spice words
- Language: the language we want for translation. Specify the list of languages we wish to translate.
The source words can be edited and modified as per the title you're going to define for your skill. For ex., a list of birds etc.
Define Sample Utterances:Translate translate {Source} to {Language}
Translate how to say {Source} in {Language}
Translate to translate {Source} to {Language}
Translate get translation for {Source} in {Language}
Translate what is {Source} in {Language}
AMAZON.HelpIntent help
AMAZON.HelpIntent Help
AMAZON.StopIntent Stop
AMAZON.StopIntent cancel
AMAZON.StopIntent Cancel
- The next step is configuring our skill. But before configuring let's move on to building the back end for this skill that perform translation
- We'll use RapidAPI to connect to the Google Translate API. If you haven't already, create a RapidAPI account. Create a new project on RapidAPI and get the API key. Add Project Name and select node.js as backend language
- You can find your Rapid API key for your project in the Require SDK Section. Just copy the API key and project name and specify it in the Index.js file code.
How to get the Google Translate API key
- Select or create a Cloud Platform Console project.
- Enable billing for your project.
- Click Continue to enable the Translate API and any related services.
- On the Credentials page, get an API key (select Browser key when prompted). Note: If you have an existing API key, you can use that key.
- Go to translate API overview and press <kbd>Enable</kbd> button.
- In Rapid API, before clicking on Connect to API ensure you have logged in and created a project in your dashboard.
- Select the project on left. Enter the Google Translate API key below you have got and test the function.
- Copy the Google API code and paste it in index.js file in specified location and save the file in a directory.
npm install rapidapi-connect --save
- A node module folder will be created. Just compress the the edited
index.jsand node module folder to zip file used to upload in AWS Lambda or you can get this node module SDK from this link https://drive.google.com/open?id=0B65D_lfnTjnOMUtFTjBKZ3BGRDg
- Head over to AWS and sign in to your console. In the console, head over to the Lambda service and create a new Lambda function named Alexa_Spice Translate. Before select the blueprint as blank and Triggers as Alexa Skill Kit.
- Select Runtime as Node.js and Code entry as Upload Zip
- Head over to the directory, where the node modules and index.js zip file is present .upload the Zip file to the Lambda page.
- For the role, just choose the template "option".
- Review and save the function and copy the ARN Code.
- Go back to Alexa Developer Portal. Head over to your skill and select configuration and paste the ARN function copied from Lambda Function
- Define the public information and Privacy section.
- Test the skill using test section in developer portal.
Example phrases for my skill:
- Alexa ask spice translate to translate basil to Spanish.
- Alexa launch spice translate and get translation for bay leaves in Italian.
- Alexa ask spice translate what is basil in German.
Thanks for checking out my project. Respect if you like my project.


Comments
Please log in or sign up to comment.