


Hardware components | ||||||
| × | 1 | ||||
 |
| × | 1 | |||
Software apps and online services | ||||||
 |
| |||||
I finally had the time to put my hands on the ELEGOO UNO Project Super Starter Kit and wanted to start with testing the compatibility of the ELEGOO UNO board with the Arduino environment and, on the hardware side, with the Iono Solo industrial suit...
SetupSoftwareI had my Arduino IDE already installed, together with the Iono libraries. If you don't, install them on your computer.
HardwareI opened up the side covers of my Iono solo and installed the ELEGOO UNO board in it. The process is pretty simple, make sure to follow all the steps described in Iono's user guide.
First RunI launched the Arduino IDE, opened up the Modbus RTU Slave example from Iono's library and connected the ELEGOO UNO board to my laptop through its USB cable.
The IDE seamlessly saw the board connected and the upload process went as smooth as it could!
Nice :)
(PS I'm on macOS, things might go differently on a different OS)
TestingI chose the Modbus RTU sketch to test the ELEGOO UNO + Iono combo because it lets you use almost all the available features.
The Modbus RTU sketch provides a simple console to configure its parameters. While the board was still connected to my laptop, I opened up the serial monitor of the Arduino IDE and entered 5 spaces to enable the console:
=== Sfera Labs - Modbus RTU Slave configuration menu - v3.1 ===
0. Print current configuration
1. Speed (baud)
2. Parity
3. Modbus device address
4. Input/Output rules
5. Save configuration and restart
Type a menu number (0, 1, 2, 3, 4, 5):
The configuration menu appeared as expected...
Serial communication test: check!
In case you don't know, Modbus RTU is a communication protocol widely used in industrial automation. It allows to connect several slave units on the same serial bus (technically, an RS-485 bus), coordinated by a single master unit that sends commands and status requests on the bus.
The Modbus RTU sketch lets you use Iono as a Modbus slave unit. Iono has a RS-485 interface connected to the serial lines (RX-TX pins) of the Arduino/ELEGOO board. This lets you send and receive messages on the bus just by using the standard Serial's methods that you use to print and read messages on the Arduino IDE's serial monitor.
The above console lets you assign an Modbus address to your unit, configure its serial communication parameters and set rules to control Iono's relays by changing its digital inputs state, all without writing or modifying a single line of code.
So, I entered the Modbus parameters, set the I/O rules and saved.
The configuration is persisted on the board's EEPROM memory, so it is retained across restarts and power cycles. Let's test it...
I unplugged the board to power it off, plugged it back, entered the console again and printed the saved configuration: all was saved and restored correctly.
EEPROM test: check!
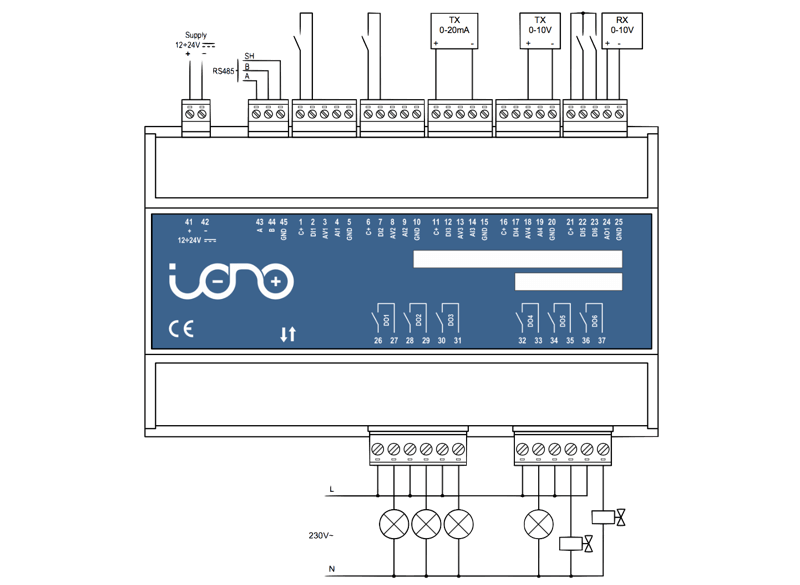
Iono has 6 digital inputs to which you can apply up to 40Vdc and 6 latching relay outputs rated for 12A at 250V. These I/Os are connected to the Arduino/ELEGOO board's pins so that you can read and control their state using the standard Arduino read and write functions.
In the above configuration I set the I/O rules to have the relays follow the state of the inputs.
One by one, I toggled the state of the digital inputs by connecting them to the 12V line that I was using to power up Iono and, as expected, the corresponding relay would switch accordingly.
I/O (partial) test: check!
The final test was to control Iono + ELEGOO board via Modbus.
I plugged a USB/RS-485 converter from my laptop to Iono's RS-485 interfaces and launched a Modbus master application on my laptop.
I configured it to send 20 requests per second to Iono, with a 115200 baud rate serial speed (max speed).
The ELEGOO board handled the communication with no issues.
RS-485/Modbus test: check!
ConclusionThe ELEGOO UNO board proved to work seamlessly with the Arduino environment and, combined with Iono Solo, performed very well as a professional PLC.
With this setup, you can easily read data from industry-standard sensors with 0-10V voltage signals or 0-20mA current loops, you can control high power loads, and communicate with other industrial equipment via Modbus.
You are now ready to conquer the industrial automation word with your next project ;)
Thanks to Elegoo's team for providing the Super Starter Kit!


Comments