Hardware components | ||||||
 |
| × | 1 | |||
 |
| × | 6 | |||
 |
| × | 4 | |||
 |
| × | 5 | |||
 |
| × | 1 | |||
 |
| × | 1 | |||
 |
| × | 4 | |||
I was playing with my original, 1978 Simon by Milton Bradley and I realized it would be an easy and amazing project to do with an Arduino Nano, Uno, Mini Pro, etc.
It doesn't require many components, just few buttons, LED, resistors and a switch to select the game level, and it's a very good and easy project for beginners.
The sketch is simple to understand and well commented, so it should be easy to understand how it works.
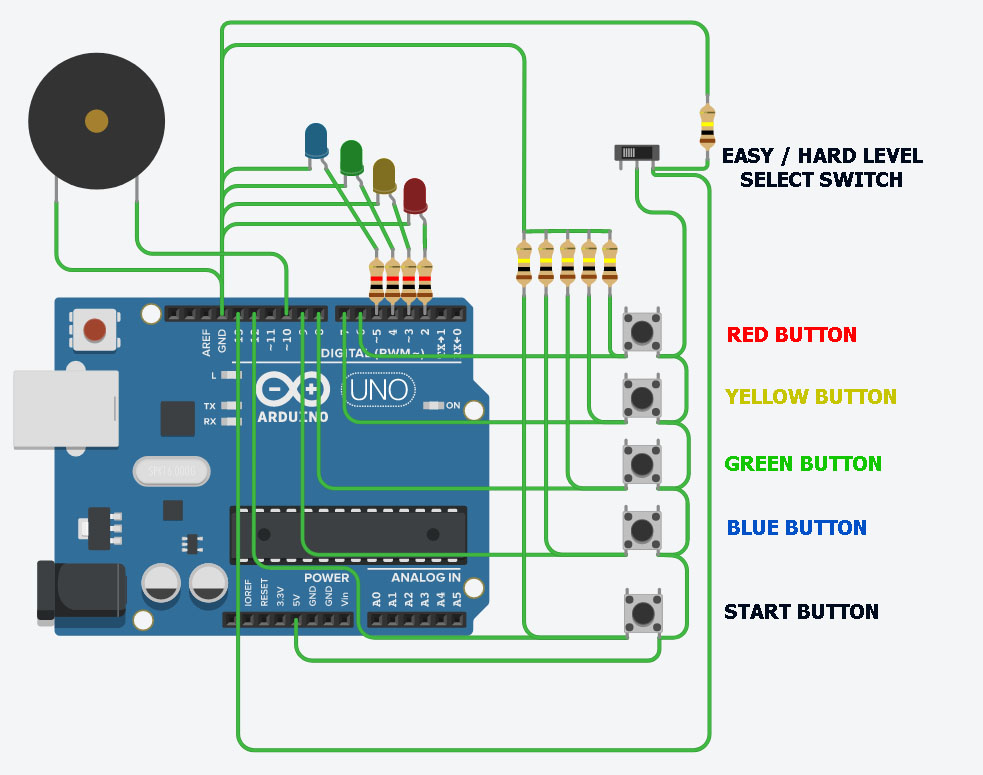
Just assemble the components as shown by the schematics, compile and upload the code and you're done.
Note(1): inside the sketch there are few additional instructions that show how to use a 3 position switch for ON/OFF and Game difficulty select.
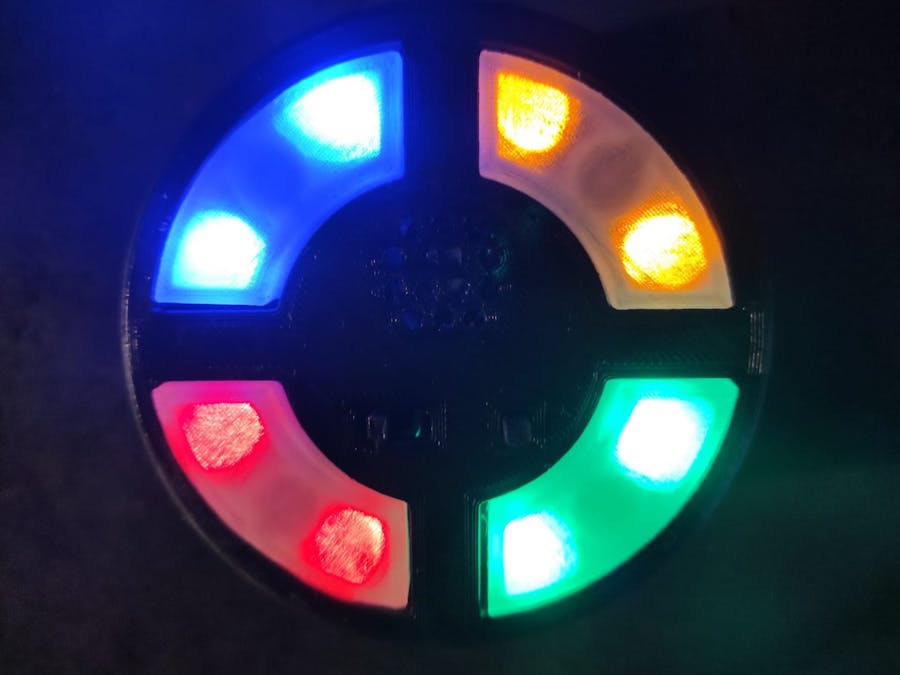
Note(2): I printed a 3D case with transparent and black filament; however it was just a prototype and the result isn't very nice, so I will not share the 3D sketch.
/*************************************************************************************************
*
*  ARDUINO SIMON 1.0
*
*  Feb/2022  Giovanni Verrua
*
*   This program is free software: you can redistribute it and/or modify
*   it under the terms of the GNU General Public License as published by
*   the Free Software Foundation, either version 3 of the License, or
*   (at your option) any later version.
*
*   This program is distributed in the hope that it will be useful,
*   but WITHOUT ANY WARRANTY; without even the implied warranty of
*   MERCHANTABILITY or FITNESS FOR A PARTICULAR PURPOSE.  See the
*   GNU General Public License for more details.
*
*   You should have received a copy of the GNU General Public License
*   along with this program.  If not, see <https://www.gnu.org/licenses/>.
*   -----------------------------------------------------------------------
*   This is the classic 1978 Simon by Milton Bradley recreated with an
*   Arduino Uno or Nano (or possibly Mini Pro, etc.)
*   For game rules see: https://en.wikipedia.org/wiki/Simon_(game)
*
*   -----------------------------------------------------------------------
*   Hardware needed:
*   1x Arduino Uno/Nano/etc.
*   5x buttons (one per color plus one to start the game)
*   4x leds (red, yellow, green, blue)
*   1x switch (for easy/hard selection) - not needed if you opt for the power+level switch below
*   7x pulldown resistors (any value between 10 kohm and 100 kohm)
*   4x 1 kohm resistors (or one per led if you want to use more than a led per color)
*   1x speaker (piezo or normal)
*
*   (optional for power+level switch - see below)
*   1 way, 3 positions switch
*   1x 5v Zener diode
*   1x 1N 4148 diode or any other equivalent diode
*   1x 1 kohm resistor
*   -----------------------------------------------------------------------
*   Connections (based on the #define below):
*   pin #2 -- 1 kohm resistor -- LED red    -- GND
*   pin #3 -- 1 kohm resistor -- LED yellow -- GND
*   pin #4 -- 1 kohm resistor -- LED green  -- GND
*   pin #5 -- 1 kohm resistor -- LED blue   -- GND
*
*   pin #6 -- 10..100 kohm pulldown resistor -- GND
*   pin #7 -- 10..100 kohm pulldown resistor -- GND
*   pin #8 -- 10..100 kohm pulldown resistor -- GND
*   pin #9 -- 10..100 kohm pulldown resistor -- GND
*   pin #12-- 10..100 kohm pulldown resistor -- GND
*   pin #13-- 10..100 kohm pulldown resistor -- GND
*
*   pin #6 -- button for red    --- +5V
*   pin #7 -- button for yellow --- +5V
*   pin #8 -- button for green  --- +5V
*   pin #9 -- button for blue   --- +5V
*   pin #12-- button for start  --- +5V
*   pin #13-- level switch      --- +5V
*
*   pin #10 -- speaker -- GND
*
*   NOTE: if you want to use a 3 positions switch for OFF / ON easy / ON hard you will need
*   to create the following schematic using a 1 way - 3 positions switch,
*   a 1N4148 diode, a 5V zener and a 1 kohm resistor. Be sure to make everything as explained
*   or you could fry your Arduino...
*
*   --- 9-12v Power ---O  ----O----  O----- off
*       (external)        (switch)
*                      O             O------------------ easy level -------+-------- Arduino V.in
*                                                                          |
*                      O             O--+-[1N4148]- >|-- hard level -------+
*                                       |
*                                       +--- 1 kohm resistor --+-------------------- Arduino pin# 13
*                                                              |
*                                                              +---|<-- 5v Zener --- Arduino GND
*
*
**************************************************************************************************/

#define LED_RED 2
#define LED_YEL 3
#define LED_GRE 4
#define LED_BLU 5

#define BUT_RED 6   //Button for red    light - put a 10-100 kohm pulldown resistor between this button and GND
#define BUT_YEL 7   //Button for yellow light - put a 10-100 kohm pulldown resistor between this button and GND
#define BUT_GRE 8   //Button for green  light - put a 10-100 kohm pulldown resistor between this button and GND
#define BUT_BLU 9   //Button for blue   light - put a 10-100 kohm pulldown resistor between this button and GND

#define TONEPIN 10  //Speaker pin

#define BUT_RUN 12  //button Start - put a 10-100 kohm pulldown resistor between this button and GND
#define GAMELEV 13  //switch that toogle level between hard (switch closed, HIGH) and easy (switch open, LOW) - put a 10-100 kohm pulldown resistor between this switch and GND

#define TIMEOUT 5000 //Timeout 5 Seconds for the player to hit next light before to loose the game - Same to the original 1978 Simon
#define LEVEASY 10   //10 lights sequence in the easy level \__ NOTE: the original game had 4 difficulty levels (sequences of 8, 14, 20 and 31 light)
#define LEVHARD 20   //20 lights sequence in the hard level /         it also had 3 game modes; I implemented the most common only.
#define GAMESPD 500  //milliseconds for every led/sound


int statGame = 0;  //0 = idle, 1 = game running

//A = 220(red);C = 139(yellow); E = 82(octave lower)(green); E = 165(blue) -> original tones by 1978 Simon
int tonSeq  [4] {   220   ,   139   ,    82   ,    165 };

int ledSeq  [4] { LED_RED , LED_YEL , LED_GRE , LED_BLU};
int butSeq  [4] { BUT_RED , BUT_YEL , BUT_GRE , BUT_BLU};

int gamSeq[LEVHARD];  //no need to initialize this array

int pointer = 0;      //game pointer (sequence)


//===================================================================================== LIGHT_AND_SOUND
void light_and_sound(int point) {

    digitalWrite(ledSeq[point], HIGH);
    tone(TONEPIN,tonSeq[point]);
    delay(GAMESPD);

    digitalWrite(ledSeq[point], LOW);
    noTone(TONEPIN);
    delay(GAMESPD/2);
}

//===================================================================================== SETUP
void setup() {

    randomSeed(analogRead(0));

    pinMode( BUT_RUN, INPUT); //initializing the digital pins
    pinMode( GAMELEV, INPUT); //initializing the digital pins

    for (int i=0; i<4;i++) {
         pinMode( butSeq[i] ,INPUT);  //initializing the digital pins
         pinMode( ledSeq[i] ,OUTPUT); //initializing the digital pins
    }

}


//===================================================================================== LOOP
void loop() {

      statGame = 0;
      pointer = 0;
      //-----------------------------------------------------------------------------------------------------idle
      while (statGame == 0){   //idle

           //--------------------------------------- idle sequence
           digitalWrite(ledSeq[pointer], HIGH);
           delay(200);
           digitalWrite(ledSeq[pointer], LOW);

           pointer++;  //using pointer for the idle light sequence
           if (pointer > 3) pointer = 0;

           if (digitalRead(BUT_RUN) == HIGH)  statGame = 1;  //pressed the start button, entering the game...

      }

      //-----------------------------------------------------------------------------------------------------RESETTING GAME
      unsigned long timeout = millis();  //tracking the game timeout

      int playGame = 0;  //0 = computer turn, 1 = player turn
      int gameLevel = 0; //0 = easy (sequence of 10 lights), 1 = hard (sequence of 20 lights)
      bool gameOver = false;  //true if the player lost the game

      pointer = 0;

      if (digitalRead(GAMELEV) == HIGH) gameLevel = LEVHARD;   //Level hard
      else                              gameLevel = LEVEASY;   //level easy

     //-----------------------------------------------------------------------------------------------------IN GAME

     while (statGame == 1){   // IN GAME

           while (pointer < gameLevel && !gameOver) {

                  //--------------------------------------------------------------------------------\-
                  if (playGame == 0) {  //computer turn

                     delay(1000);

                      int rndValue = -1;
                      while ( rndValue < 0 || rndValue > 3) {
                            rndValue = random(4);  //0 to 3

                            //a little explanation about the following line. The random() function often tends to repeat the same number over and over.
                            //the original Simon admits some replicated colors, but with Arduino it happens too often, IMO.
                            //So I decided to allow a replicated color every 3 step only [if it's the case]. Then:
                            //if the current color is == to the previous color and the current pointer isn't a multiple of three,
                            //I will call the random() function again.
                            //--------
                            //if you don't care about repeated lights, can simply comment or delete the following line.
                            //changing the % 3 with %2 will give more repeated lights, changing with an higher value will
                            //reduce the chance of repeated lights.
                            if (pointer >0 && rndValue == gamSeq[pointer-1] && pointer % 3 != 0) rndValue = -1;
                      }

                      gamSeq[pointer] = rndValue; //assign the latest color to the array

                      for (int i=0; i <= pointer; i++) light_and_sound(gamSeq[i]);   //playing the whole sequence

                      playGame = 1;

                  }
                  //--------------------------------------------------------------------------------/-

                  //--------------------------------------------------------------------------------\-
                  if (playGame == 1) {  //player turn

                     int j=0;
                     while (j <= pointer && !gameOver) {

                       if (timeout + TIMEOUT < millis()) {gameOver = true; j = pointer+1;}  //game timeout

                          for (int i=0;i<4;i++) {
                              if (digitalRead(butSeq[i]) == HIGH) {  //the player pressed a button, let me light the LED and see if it's the right one!
                                  timeout = millis();  //resetting the timeout
                                  light_and_sound(i);  //lighting the led for the pressed button
                                  if (i == gamSeq[j]) j++;  //the player chosed the right color, step ahead until the end of the current sequence
                                  else               { i=4; gameOver = true;} //wrong color, sorry!
                              }
                          }
                     }

                     playGame = 0;
                     pointer++;

                  }
                  //--------------------------------------------------------------------------------/-
            }


            //---- game is over; let me see who's the winner! ;-) ----------------------------------\-
            statGame = 0;
            delay(1000);
            if (!gameOver)  {  //the player won the game: playing the victory jingle ;D
               for (int j=0;j<20;j++) {
                   for (int i=0;i<4;i++) {
                        digitalWrite(ledSeq[i], HIGH);
                        tone(TONEPIN,tonSeq[i]*j);
                        delay(40);
                        digitalWrite(ledSeq[i], LOW);
                        noTone(TONEPIN);
                        //delay(10);
                   }
               }
            }
            else {  //boooh!!! Loser!!!
               for (int i=0;i<4;i++) digitalWrite(ledSeq[i], HIGH);
               tone(TONEPIN,80);
               delay(2000);
               for (int i=0;i<4;i++) digitalWrite(ledSeq[i], LOW);
               noTone(TONEPIN);
               delay(1000);

            }
            //--------------------------------------------------------------------------------------/-
     }

}


Comments
Please log in or sign up to comment.